Deliciously Different Low Carb Ideas – Hot Smoked Mackerel, Leek & Bean-Sprout Kedgeree. Fast, fuss-free & sublimely tasty!!

kedgeree

My favourite recipes are always ones which are quick and simple, yet packed with taste & flavour. Well, recipes doesn’t get any easier or more delicious than this! Hot smoked mackerel, with buttered leeks and bean-sprouts, all bolstered by a warm & aromatic hint of curry.

The inspiration for this dish comes from the classic ‘kedgeree’ dish, first made poplar in England at the Victorian breakfast-table. The traditional version also contains eggs and rice, which you could very easily include; indeed cauliflower rice (hyperlinked) would be a stunning addition, & hard-boiled eggs are ready in no time! But I chose to prepare this as a starter, so didn’t feel the need to bulk it up too much. If you include the eggs and the rice, then this would then make a brilliant stand-alone supper, dinner or luncheon-dish. So experiment away and be sure to tell me how you get on!

As with all recipes on this website; the ingredients here are very low in carbohydrate. At about 2.5g net carbs per 100g, beansprouts are a great way to get your daily intake of vitamins and minerals; plus they’re quick to cook, which can be a real blessing when time’s in short supply! Such low levels of starch, plus the fact there’s no wheat; make this dish perfect for diabetics, gluten-intolerants or those following a ketogenic-diet (like me). Fans of the paleo-regime will also be well-catered for, so I strongly recommend everyone to give this recipe a go!

Start by finely slicing a leek, including the green leaf-tops, to add colour and flavour. Sauté these in a generous spoonful of coconut-oil & butter, or just butter if you don’t have any coconut-oil to hand. Leave to soften on the heat for a few minutes, then add a couple of cupfuls of beansprouts. Sprinkle on a good teaspoon of curry-powder, followed by a crumbled chicken stock-cube. Then add half a can of full fat coconut milk and season well.

Once the coconut milk has come to the boil (circa 1-2 minutes), lay your smoked mackerel-fillets (I used pre-cooked from the supermarket) across the surface of the vegetables, then transfer the pan to a hot oven for 10 minutes, or until the fish is piping-hot and the liquid reduced by three quarters.

Take the pan out of the oven and spoon the vegetables into broad-bowls to capture the delicious coconut-curry sauce. Then simply place a mackerel fillet atop each portion, drizzle on some of the pan-juices and garnish with a final flourish of fresh herbs.

Voila! Dinner is served. Totally delicious from the first to the very last bite; so enjoy!

Browse this and other recipes by picture on my pinterest page: country walks in ketosis pinterest.

Thanks for reading and bon ap!

Adam.

Advertisement

Mouth-Watering Leek, Smoked Ham, Bacon and Mozzarella Gratin – low carb fast food at its best!

leeks 2

I’m not entirely sure whether someone writing a sensible ‘grown up’ food-blog like this should use words like ‘yummy’. But in this instance, I’m going to throw caution to the wind and come straight out with it… This dish is absolutely yummy! There; I’ve said it! Please don’t hold it against me; we all have or faults.

If you can bear to continue reading after that, I shall tell you that I didn’t get home from work until eight o’clock last night. As a result, I was ravenous & craving something fast, filling & easy to cook.  Well this delicious gratin is exactly that. Not only is it incredibly quick to prepare; it’s also one of those recipes that’s absolutely bursting with flavour from only a mere handful of simple ingredients. There’s also precious little washing-up; so I consider this dish to be a true winner on all fronts!

There’s something sublimely indulgent about the combination of leeks & salted butter. The vegetables go so tender as to almost melt off the fork. The leeks are then wrapped in smoky slices of cured ham & topped by a delicious layer of golden, molten mozzarella; can you understand why I describe this dish as ‘mouth-watering’?

Because there’s virtually no carbohydrate in this dish; it’s perfect for diabetics or anyone following a ketogenic-diet or paleo-plan.  The only real carb-content here is the circa 1g of net carbs found in the leeks themselves. And that certainly won’t break the cab-bank…! I’ve served the gratin with fresh green pea-shoots; but it would go equally well with any crisp green salad or even cauliflower rice (cauliflower rice recipe here).

Start by trimming the tops off your leeks, reserving them for another day’s stock or soup. Then cut the white stems into 3 inch chunks.  Sauté the leeks in butter in a heavy bottomed pan until they start to soften, circa 5 minutes. Once the leeks are tender, roughly chop a few rashers of bacon and add these to the pan.  Continue to cook on a low heat until the vegetables are golden and the bacon a crisp brown. Then remove the pan from the heat to allow to cool for five minutes, so that you don’t burn your fingers when wrapping the ham.

In a separate pan pour in a generous cupful of double cream and stir in a good tablespoonful of Dijon mustard. Place onto the hob, stirring occasionally until the cream approaches the boil. At this point, season well and mix in a handful of chopped herbs (I used basil but any fresh herb of your choice will do the job admirably!).

Cut your ham slices into lengths with approximately the same width as the leeks. Place a piece of leek on the end of each slice and roll them up like sausage-rolls. Once done, place these back into your original pan, which should still have the bacon scattered at intervals over the base. Then simply pour on your cream mixture, making sure to cover the surface as uniformly as possible.

All that remains is to cut your mozzarella into thick wedges and place these on top. Give the dish a final sprinkling of herbs then into a hot oven it goes for 15 minutes to brown up, up under the grill until the surface is bubblingly brown and delicious!

Spoon the finished dish into broad bowls and serve your salad to one side. Then dig in whilst the gratin is still piping hot!

Voila! A delicious low-carb meal ready in just under 30 minutes!

Browse this and other recipes by picture on my pinterest page: country walks in ketosis pinterest.

Thanks for reading and bon ap!

Adam.

Melt in the Mouth Mozzarella, Paprika & Jalapeño Turkey Steaks with Crunchy Buttered Mange-Tout- low carb cuisine doesn’t get much tastier or quicker than this!

WP_20150204_20_24_45_Pro (1)

Without wishing to ‘blow my own trumpet’; this dish was absolutely delicious! Melted mozzarella is undeniably a ‘food hero’; nothing beats the effect when you cut into hot mozzarella and indulgent strands of melted cheese ‘unwind’ into the air, prompting you to twirl it round your fork like spaghetti! And underneath that layer lies a bed of mouth-wateringly tender turkey-breast steaks, carrying just the right amount of heat through a sprinkling of peppery, tart jalapeños. In short – heavenly sublime!

The crowning-glory to this dish is the sheer volume of taste which can be delivered from a recipe this quick! Few meals can be this easy to prepare; so if you’re looking for a ‘low effort, maximum reward’ mid-week dish, then this must be it! Beyond the 2-3g net carbs provided by the mange-touts, there’s practically no carbohydrate here; so ketogenic-dieters, diabetics, paleo-fans and gluten-intolerants can all tuck in with glee, not concern!

Start by placing a heavy-based pan onto the hob and drizzling in a little oil with a knob of butter. Whilst this heats through, season your turkey steaks, then place into the pan once the oil is piping hot. Seal on each side for 2 minutes, or until the surface is dappled with light golden brown caramelisation.

Whilst the meat is searing, finely slice an onion, then sprinkle this inbetween the turkey-breast-steaks once turned. Soften the onion for a minute or so, before adding a large clove of crushed garlic and two roughly chopped jalapeño peppers (keeping the seeds in if you like the extra heat). Leave this to cook through on the hob for 3-5 minutes, stirring occasionally to prevent the contents from sticking to the base of the pan.

Once the heat has built up to a crescendo, pour on hot chicken-stock (or water and stock cubes), sufficient in volume to just cover the contents. The whoosh of steam is a thing of pure joy, as the pan rapidly deglazes to the heavens Be sure to lift up all the delicious caramelisation from the bottom of the pan with a sturdy wooden-spoon, as this is where all the flavour resides! Now simply leave to simmer until the liquid has reduced by thee quarters; allowing you to prepare the remaining ingredients.

Whilst the stock is bubbling away, finely chop some fresh basil and sprinkle this on top of the turkey. Open your packet of mozzarella, trying to drain off as much of the liquid as possible. If the cheese is cooked ‘wet’, then this will compromise the browning and ‘stretch’!

Slice the cheese into thin chunks, then once the liquid is barely covering the base of the pan; lay your mozzarella slices generously atop the turkey-steaks. Sprinkle the surface with a final flourish of herbs, then into a hot oven it goes for 15 minutes or until the cheese is richly golden and bubbling.

In the time that the mozzarella takes to brown, bring a shallow pan of water to the boil and steam your mange-touts with a little salt for 2-3 minutes until just tender, but still retaining their bite. Once there, strain the pan and stir through a generous knob of butter. A last minute grind of pepper and sprinkle of sea-salt will see your vegetables cooked to perfection.

All that remains is to lift the turkey out of the oven and serve it up alongside your hot buttered beans. The whole dish ready in just under 30 minutes, but I’ll wager the plates are ‘clean as a whistle’ in a fraction of the time!

Browse this and other recipes by picture on my pinterest page: country walks in ketosis pinterest.

Thanks for reading and bon ap!

Adam.

Deliciously Different Low Carb Ideas! Warm Cream-Cheese, Garlic, Avocado & Bacon Salad with Rocket & Basil – Truly Sublime!

avocado

Some recipes taste so wonderful, you’d scarcely believe that they’re ready in minutes! Equally challenging is when you’re looking for something low-carb, but crave something just that little bit different! Well this dish is a winner all round… Decadently indulgent garlic cream-cheese sauce, warmly smothered over rich avocado, topped with crisp salty bacon. Truly a recipe that has it all!

I serve it here as a starter; but because it’s so quick, it would equally make the perfect ketogenic lunch or light low-carb supper. Like all recipes here, it’s suitable for diabetics or those following a paleo-plan; and as there’s no gluten; coeliacs can also dig straight in! There’s plenty to go around.

Start by finely slicing an onion and softening this on the hob in butter. After a couple of minutes, tumble in a good half-handful of cherry tomatoes and add a clove-&-a-half of finely chopped garlic. Cook these until the cherry tomatoes start to burst (circa 2 minutes) then add a couple of tablespoons of water to loosen the mix. Warm through, then remove the pan from the stovetop to rest.

Meanwhile, depending on your cooker and preferred method of cooking; grill, fry or oven-bake your bacon until deliciously crisp. As a guide to quantity, allow two rashers per person. Then transfer to one side to ‘take the edge’ off the heat.

Halve and de-stone your avocado and arrange this in a salad bowl. Pile up rocket leaves or other peppery green salad (watercress is absolutely delicious), forming an impressive mountain to one side.

Finish by chopping fresh basil leaves and adding these to the tomato & onion mix. Then stir through circa 100g or two heaped-tablespoons of full-fat cream-cheese. Once this is velvety smooth and amalgamated, pour lavishly over the avocado and drizzle a little virgin olive-oil over the salad leaves to add a bright glossy shine.

Then simply dig in! From start to finish, a sumptuous delight ready in 10 minutes flat. So enjoy!

Browse this and other recipes by picture on my pinterest page: country walks in ketosis pinterest.

Thanks for reading and bon ap!

Adam.

Speedy ‘Upside Down’ Low Carb Lamb Moussaka – delicious, nutritious & fuss free!

WP_20150225_20_51_20_Smart (4)

Lamb moussaka must be one of my all time favourite dishes! The richness of lamb, simmered gently in a velvety tomato ragout is matched perfectly by a sumptuous smothering of decadent cheese-sauce. Combine this with melt-in-the-mouth slices of slow-baked aubergine, and you’re in food heaven! (Traditional recipe under the following hyperlink: Classic Lamb & Aubergine Moussaka).

Can something so delicious have a down-side? Regrettably yes. The full version, whilst unbeatable in taste; can be time-consuming. This one factor alone sometimes inhibits me preparing it, as time can often be in short supply & I need something fast to feed the ravening hoards!

Well this simple twist will deliver all the taste of the original; just in a fraction of the time! That has to be a winner in my book! And like all recipes on this blog, it’s low carb and suitable for diabetics, keto- & paleo-dieters and those with a gluten-intolerance or coeliacs. There’s no excuse therefore – give it a go!

Start by slicing your aubergines into thin, half-centimetre slices. I used two aubergines for four people. Tumble these into the base of an oven dish then glug on some olive-oil and season well. Stir through with your hands to ensure that the slices are all evenly coated, then into a hot oven they go for half an hour to roast through.

Whilst the aubergines are cooking, place a heavy casserole onto the hob and add a small spoonful of oil. Season your lamb-mince with sea-salt and black-pepper; then add this to the pan, enjoying the ‘sizzle’ as the meat hits hot metal. Seal this thoroughly, stirring occasionally to prevent it sticking; then add in a finely sliced onion, 2 crushed cloves of garlic and any other vegetables you have which need to be used up!

Sauté the vegetables for 5 minutes or so, then pour in a good glug of port or red wine for richness. Given the succulence of lamb, you’ll likely not achieve the whooshing sizzle of the traditional de-glazing process; the wine is there more for taste than any other additional benefits! Follow the wine with a dash of balsamic vinegar, crumble in 2 stock-cubes for background ‘warmth’ and add a generous spoonful of dried herbs (rosemary or oregano are just perfect!).

Then drain a can of tinned tomatoes (pouring off the liquid) and add this to the pan. Keep the mix on the simmer for 20 minutes until the liquid has reduced down and all ingredients have thoroughly cooked through. Then squeeze in a good squirt of unsweetened tomato purée and incorporate lavishly with a wooden spoon. Taste to adjust the seasoning, adding more herbs, salt, stock-cubes or pepper as appropriate. When done to your satisfaction, lift the pan off the heat, ready to assemble the finished dish.

Whilst the mince-ragout is on the simmer, pour a cupful of double cream into a saucepan. Follow this with half a cup of water, one cup of grated cheese (cheddar, parmesan or mix of both) and a tablespoon of Dijon mustard. Season well, then place onto the hob on a low heat, stirring occasionally until the sauce is thick and smooth. The reason you add the water is to help gauge when it’s ready. Once the water has evaporated (circa 10 minutes), you’ll end up back with the consistency of double cream. If you didn’t put the water in, the reduction would have nowhere to go and the pan’s contents would burn. When ready, simply remove from the heat and commence to layer up your ‘upside-down’ moussaka.

Take the aubergine out of the oven and pour your mince all over the top to form a lavish blanket. There’s no separation or fiddly layering here – the aubergine stays on the bottom, hence the name ‘upside down moussaka’! Follow the mince with your cheese sauce then a generous grating of cheese. Into the oven it goes for a final 15 minutes to turn the top golden and bubblingly brown.

I served this with cauliflower rice (instructions here: cauliflower rice recipe) but the dish is equally delicious on its own or accompanied by a fresh green salad!

The dish may take half the time to prepare as the original; but I’ll warrant it’ll be consumed every bit as quickly! The only short-cut here is time – it’ll taste as if you’ve toiled for hours! Sublime!

Browse this and other recipes by picture on my pinterest page: country walks in ketosis pinterest.

Thanks for reading and bon ap!

Adam.

Light & Tender Slow-Cooked ‘Lamb Vermouth’ with Fast Halloumi Vegetable Gratin – ultra easy, ultra satisfying; ultra low carb!

lamb

People often mistakenly think that if you cook red meat, then it must be paired with an equally dark, robust & red sauce (picture red wine, brandy or port…). In actual fact, this couldn’t be further from the truth. Take this lamb dish for example. The sauce is built upon a base of dry vermouth (martini) and chicken stock. The comparative sweetness of the fortified wine and the richness of the stock serve to ‘brighten’ the dish and add a lightness which is uniquely refreshing.

I’m the first to hold up my hand up when it comes to doing things traditionally; but I sometimes find that when deep profound flavours (like lamb and port) get piled up on top of one another; a dish can tend to become a little heavy, and even muddy in flavour. If you can lighten something, then I’m all for it – after all, lamb is historically a late springtime dish; so lets put a little of the ‘spring’ back into its step with a gentler approach to its often more formulaic preparation!

I’ve teamed this with a quick gratin of mixed vegetables – cauliflower, green beans and beansprouts; gratinated with halloumi and cambozola. The ingredients here are infinitely variable, but I find the taste combination of the salty halloumi and ‘gamey lamb’ to be one that’s wholly sublime. As long as you chop the vegetables into pieces no thicker than a green bean, you can use any vegetable e.g. peppers, onions, mushrooms, celeriac, courgette; even kale!

One of the principal reasons for the vegetable choice here is carbohydrate content. Cauliflower has a mere 1.5g of net carbs per 100g, coupled with beansprouts at 4.2g and green beans at 3.8g. None of these will ‘break the carb bank’ and all are quick to cook, with a fresh clean flavour that somehow seems suited to this time of year. Because the lamb is slow-cooked in the oven for at least four hours, we want to accompany it with something that’s ultra fast to prepare, yet doesn’t let the side down in terms of flavour or charm.  Such a medley as this will therefore ‘hold its head high’ and do us proud in the face of its competition. Who could ask for more?!

Before we commence, just a quick word on the cooking method. Rather surprisingly, slow-cooking is actually the perfect thing for a weeknight. At the right temperature, dishes like this can be left in the oven all day, meaning that dinner is practically ready for you when you get home. If you’ve got an electric oven, then circa 120-130ºc, or 1/2 gas mark if you’re using gas. I have an Aga, so it’s the simmering-oven the whole way for me! As long as you cover the meat to allow for moisture evaporation, you’ll be absolutely fine. It can sometimes be a nerve-racking ‘leap of faith’ to put something into the oven first thing in the morning then to leave it there all day; but believe me, this couldn’t be simpler, and the results will speak for themselves! So give it a go – you won’t regret it!

Now that we’re all set, it’s time to get started! Any cut of lamb will do; I used the old-fashioned but aptly named ‘scrag end’ of lamb. This is effectively neck-steaks, cut still on the bone, which respond beautifully to slow-cooking. If you’re feeling more extravagant than me however, feel free to use leg of lamb, chops or indeed diced ‘mixed’ cuts. The results will be just as delicious, whichever you choose!

To cook the lamb, season the meat liberally then place a heavy-bottomed casserole onto the hob with a little oil. Seal the meat on a high heat until lightly golden on all sides. Remove the lamb from the pan briefly, then tumble in a roughly diced onion and add a sprinkle of dried rosemary (or any herb to your preference).

Once the onions start to soften, deglaze the pan with a whooshing glug of vermouth, enjoying the splendid sigh of steam as the alcohol evaporates into thin air right before your eyes. Then crumble a chicken stock-cube or pour on sufficient fresh stock to cover the lamb once you’ve replaced it into the pan. If you’re using cubes, put the meat back in and pour on enough water to cover the contents (waist-height if you plan to cook this more quickly). Then simply throw in a couple of unpeeled garlic cloves (unpeeled so that they can be lifted out afterwards), season well and place into a low oven as above for 4 to eight hours.

Half an hour before you’re ready to serve, take the lamb out of the oven to check on progress. The meat should be unctuously tender and fall from the bone with the merest suggestion of a wooden-spoon. Depending on how much liquid you like, if there’s more than a cm’s depth, ladle some out (you want the sauce to thicken slightly) and replace the pan lid off  back into a hot oven to reduce and for the lamb to develop a delicious thick crust on top. If it’s already there without needing to go back in uncovered, then you’ll have saved yourself a job and you can simply replace the lid and leave it to one side until you’re ready to serve up.

Meanwhile prepare your gratin. Place a knob of butter into a pan on the hob and tip in your topped-and-tailed green-beans ( a generous half-handful per person). Sauté for a minute or two, then add in finely sliced cauliflower (to same thickness as the beans). Then pour on boiling water until the vegetables  are ‘ankle-deep’ in liquid, before crumbling in a final stock-cube for good measure. Then sprinkle on chopped chilli (I used x1 red chilli including seeds), to provide a little background heat; then leave to simmer for a further minute. Once the cauliflower is starting to go al dente, sprinkle on a couple of handfuls of beansprouts and top the lot with thick wedges of halloumi and/or blue brie (cambozola). As I say, there’s no need to be precious about the type – use whatever cheese you like or have to hand. Cheddar would be equally good, as would parmesan, stilton or camembert. The world is your oyster. Once layered, transfer the dish to a hot oven for 20 minutes or until the top is golden brown and sizzling.

When all is ready, ladle your stewed lamb into bowls and spoon your bubbling gratin all around. Finish the dish with a flourish of fresh herbs (basil or oregano are ideal), then dig in whilst all is still piping hot! From start to finish you’ll find that every last mouthful is delicious! But don’t just take my word for it – give it a go and find out for yourself. Delectable in every way!

Browse this and other recipes by picture on my pinterest page: country walks in ketosis pinterest.

Thanks for reading and bon ap!

Adam.

The trouble with ‘family walks’…

WP_20150220_07_47_59_Pro

My morning walk is a serious business. It’s a time for reflection, contemplation and ultimately a bit of ‘me time‘.

And then onto that calm scene bursts these two… As much as I love & treasure the two individuals who share my life and household, they are rarely a recipe for peace and tranquillity.

Where one goes, the other must follow; a boisterous double-act which jests, japes and jibes; only restful when every last bit of energy is spent (an evident problem on the ketogenic diet, where energy-levels are self-sustaining in contrast to the peaks and troughs of a glucose-metabolism…).

I suppose at least, I ought to be grateful for the company; certainly to the larger of the two… I just can’t help wishing however, we had a cat that wouldn’t follow us wherever we go. Every 5 yards there’s something new to pounce on, slowing up progress and causing a kerfuffle…

Whatever you get up to today, be sure to have patience with your loved-ones… you’d miss them if they weren’t there!

Thanks for reading,

Adam.

WP_20150220_07_47_56_Pro

With a spring in my step, as well as the air…

WP_20150217_08_33_53_Pro

Today is the first morning of the year that the dawn has felt more like spring than winter. The seasons are definitely on the turn, but the mornings still possess that strange, eerie quality of ‘no-man’s-land.

The sun is tangibly warm, but there’s still frost on the ground, which crunches slightly underfoot. Snowdrops, crocuses and daffodils are pushing their way vivaciously out of the ice-scorched ground, but as yet; their leaves are the only green in sight. We still have a long way to go before buds open up on the trees & hedgerows, and the scarf can be left in the drawer when it’s time for the morning walk…

But if the eyes can delight in the relief of spring’s arrival, so too can the tastebuds! The first delicate pink forced-rhubarb, still picked by candlelight in Yorkshire; has made its way to the grocers’ markets, as has the first vibrant gleeful purple-sprouting broccoli. Its taste abounds with the frenetic joy of spring and new growth; true and blessed relief after the interminable flatness of winter-store vegetables!

As I trudge round the fields on the morning  walk, my thoughts turn with relish to the new influx of taste & cheer that’s soon to greet both pasture and plate. For I feel we need it.

We have waited long enough.

Whatever you do today, be sure to watch out for the signs of spring, for they promise to bring relief and good cheer.

Thanks for reading,

Adam.

Quick Low Carb Blueberry & Vanilla Cake – decadently delicious; effortlessly easy! Or substitute raspberries for an ultra low carb treat!

WP_20150211_20_12_05_Smart

Any diet where pudding is possible is certainly a winner in my book! One of the only difficult things about a low carb, ketogenic diet though, is the lack of readily available ‘snack’ items or desserts. There are times when you really crave something sweet, yet nothing is commercially available which seems to cut the low carb mustard! To remedy this, I always make sure to have a stockpile of cake and low carb biscuits pre-prepared and ready to hand. This way, you always know that what you’re eating is keto-friendly and in plentiful supply.

Well this recipe is one such staple! It’s incredibly easy to do and ready in just over half an hour. This means that even if you’ve already started preparing dinner, you can still whip up a last minute wonder that’s deliciously tasty and nutritious. Once made, I often cut the cake into one-portion squares, so they’re ‘ready to go’ when you are… For that reason alone, this recipe has become a staunch favourite – few things could be simpler or more satisfying!

In this particular version, I’ve chosen to include blueberries. At circa 9g net carbs per 100g, they’re one of the few fruits which are truly keto-friendly. And even if 9g still sounds on the high side, please bear in mind that we’re only using 3/4 of this amount for the whole cake. 75g of blueberries is more than sufficient for our needs; the flavour permeates the cake mix and forms beautiful pools of dark inky blue, which is ultimately all we could ask for!

If you’re still feeling shy of the additional carbs, give this recipe a go using raspberries. They’re practically half the carbs of blueberries at circa 4.8g. Their flavour is just as delicious and their colour equally profound. Other substitutions would be coconut flakes, cocoa or macadamia nuts. Or why not try a scaled down mix of the lot for a truly indulgent low carb treat!

Any of the above options are sufficiently low in carbohydrate to make this dish eminently suitable for diabetics, paleo-dieters and those on a ketogenic plan. There’s also no glucose, so coeliacs or those with an intolerance to wheat can also enjoy this recipe. It’s a true ‘all-rounder’, so I strongly urge you to give it a go post haste!

To make the cake, measure up 6oz of xylitol sweetener and 6oz of unsalted butter. I always use xylitol in baking. In my experience, it’s the only sweetener which retains its sweetness once cooked; and its granular texture means that it behaves exactly like sugar in cake-recipes. Cream the two together by hand until they’re light and fluffy, then give your hands a good wash to whisk up the eggs.

Break 3 eggs into a bowl and whisk lightly with a fork until smooth. If you’re using vanilla-pods, scrape out the seeds of one pod and add this to the mix. If you prefer dried vanilla powder (as I used), half a teaspoon should be more than enough. You can equally use vanilla-essence, but this tends to contain liquid sugar-syrup, which isn’t ideal from a carb-perspective. If you choose this option, make sure to read the label carefully and buy a production without additional sugar.

Incorporate the egg into the creamed butter and sugar a little at a time. Again, I always find that using your hand allows the maximum quantity of air to be locked into the mix. Tilt the bowl at an angle and fluff the mix upwards so that the motion elevates the mix rather than flattens it (as will happen if you go at it horizontally with a spoon).

Weigh up 6oz of ground-almonds and stir in 1 teaspoon of bicarbonate of soda. Fold this into the mix; again at an angle, making sure to lift and turn, so that the mixture rises and falls back onto itself. It’s best to use a sturdy metal spoon, as this will afford you the greatest control. Fold the dry ingredients in until you have an obliging dropping-consistency, which is a delicate pale yellow in colour.

Roughly measure out your 75g of blueberries or raspberries and fold these in at the last minute. Once fully incorporated, spoon the cake-mix into a buttered baking dish (I used a medium rectangular dish, but this can equally go into a round cake tin if you prefer…).

Bake in a moderate oven for circa 25 minutes, or until risen, golden but not too brown. The cakes should be spongy and resistant to the touch, and rise back up when pressed lightly with the finger. The fruit will have formed dark, enticing pools of colour across the surface, which permeate and marble deliciously throughout the cake below. Remove from the oven and leave to cool until lightly warm or room-temperature.

Serve with a light drizzle of pouring cream, or double-cream whipped up with vanilla powder and a little sweetener for that extra touch of indulgence! A sumptuous and decadent treat, that’s so light on the carbs, you can feel free to have another slice!

Browse this and other recipes by picture on my pinterest page: country walks in ketosis pinterest.

Thanks for reading and bon ap!

Adam.

Top 20 Low-Carb Chicken Recipes

If you’re just starting a ketogenic- or low-carb diet, food choices can sometimes seem a little daunting! Alternatively, if you’ve already been on the plan for a while; finding inspiration for ‘what to have for dinner tonight’ can also prove a challenge!

Never fear however; County Walks in Ketosis has a huge library of delicious LCHF recipes to help along the way.

Chicken is a great option for a huge range of dishes. It’s brilliant in starters, soup or salads, and translates beautifully into rich, sumptuous dinners in a myriad of forms. Its morish yet mild taste can be coupled with exotic flavours from all around the globe; from Middle-Eastern dishes, through to classic French, American, African, Indian, Italian and of course English (he says proudly!).

Its versatility is truly its crowning feature; but it also has an added bonus – it’s incredibly quick to cook and so many cuts are readily available from the local supermarket or butcher, that practically anything is possible!

To provide a little inspiration, I’ve assembled my top 20 ‘chicken’ recipes from this blog. Simply click on the title/hyperlink below to take you straight to the relevant page.

All recipes can be browsed by picture on my pinterest page: country walks in ketosis pinterest.

1. Chinese Leaf Cabbage with Ginger & Peanuts, Served with Crispy Roast Chicken

2. Sweet Chilli Chicken with Buttery Egg-Fried Cauliflower Rice & Cheese Griddled Aubergines

3. Timbale of Chicken, St Agur & Black Olives with Basil & Pumpkin Oil

4. Yoghurt & Cumin ‘Chicken Skewers’ with Roasted Aubergine & Aromatic Cauliflower Rice

5. Warm Jerk Chicken Salad with Quail’s Eggs & Yellow Peppers

6. Warm Paprika-Chicken, Bacon, Edam & Green-Bean Salad with Tangy French Vinaigrette

7. Fiery Jamaican Chicken & Pork with Rum, Coconut & Turmeric Rice

8. Black Forest Chicken with Courgette-Noodles

9. Chinese Chilli Chicken-Drumsticks with Spicy Butternut Noodles

10. Chicken, Chorizo & Chicory Gratin with Smoked Ham, Brie & Emmental

11. Slow-Roasted Chicken with Sausage, Sage & Onion Stuffing & Rich Gruyere, Parmesan Mornay

12. Jamaican Jerk Chicken with Spinach & Coconut Cauliflower-Rice

13. Creamy Italian Pesto, Smoked-Bacon & Mascapone Chicken with Fresh ‘Traffic-Light’ Salad

14. Spatchcocked Roast Chicken Satay with Buttered Greens & Cauliflower Rice

15. Warm ‘Greek-Style’ Chicken Salad with Roasted Aubergine, Courgette, Basil & Halloumi

16. Earthy & Aromatic Spanish Chicken with Chorizo, Aubergine & Buttered Savoy

17. Classic Chicken Caesar Salad

18. Chicken in a Creamy White Wine, Tarragon-Sauce with Roasted Courgette-Gratin

19. Sage-Roasted Chicken with Creamy Forestière Mushrooms, Broccoli & Sugar-Snap Peas

20. Creamy, Mild, Cauliflower, Celery & Coconut Korma (adapted for shellfish or chicken)

Enjoy browsing and thanks for reading. Bon ap!

Adam.

Chinese Leaf Cabbage with Ginger & Peanuts, Served with Crispy Roast Chicken – a low carb oriental-inspired extravaganza!

WP_20150215_21_37_42_Smart

If you’ve followed this blog for any length of time, you’ll be instantly aware that my style of cooking is firmly seated in the classic European repertoire. It’s not that I don’t like anything else; rather that I know where my strengths lie and therefore I naturally gravitate towards the type of food I cook well and instinctively ‘understand’.

Taking Chinese cuisine for example; this is a thing I have always loved, but in all honesty, I’ve never been particularly good at cooking it! This evening however, I thought I’d bravely leave my comfort zone and try something I wouldn’t normally cook. And I’m incredibly glad I did! This Chinese ginger, garlic and peanut cabbage was an absolute delight, and so incredibly easy to do! It’s a bit late for a new year’s resolution, but I think I should make one! From this moment forwards, I vow to leave my comfort zone more often and occasionally turn my hand to cuisine I wouldn’t automatically think of. And obviously if I don’t try new things, I’ll never learn; so this recipe turns a new leaf for me – and I promise to do it more often!

The great thing about oriental stir-fries is their speed and convenience. Old habits are the hardest to break, so I oven-baked the chicken in my usual way; but beyond 5 minutes chopping, the cabbage dish only took a further 5 minutes to cook. This is quite a change for me, as someone who’s used to standing over the range for hours on end, slowly mixing, simmering and stewing; especially in winter! As a result, this dish is perfect for a week-night, when you’re back late from work and want something quick which doesn’t compromise on flavour! Give it a go therefore and let me know how you get on. And equally, if you have any tricks to boost my ‘Chinese confidence’, they’d be gratefully received!

This particular recipe is great for a ketogenic diet, as all the ingredients are incredibly low in carbohydrate. At 1.14g net carbs per 100g, the Chinese leaf cabbage will certainly not break the ‘carb-bank’ – there’ll be no insulin-ramping or rise in blood-sugars, making this dish perfect for diabetics or those on a paleo-regime. And because there’s no gluten, those with an intolerance, or coeliacs can also tuck in with gusto. There’s plenty to go around!

Start by preparing your chicken. I used thighs, but any cut of your choice would be equally delicious! Season the skins with a generous sprinkle of salt and pepper, then simply place into an oven-tray and bake in a hot oven (circa 180ºc) for 45 minutes to one hour, until the skins are crisp and golden and the meat cooked through to perfection.

20 minutes before you’re ready to serve up, take the outer leaves off your cabbage and finely slice the rest into thin strips. If it’s easier, you can do this with a food-processor, but my traditional old habits die hard! Transfer this to a bowl, then do the same with half a yellow pepper. Next you can get started on your garlic and ginger.

Peel a generous amount of ginger-root, larger certainly than your thumb. Then peel 2 cloves of garlic and chop both with a sharp knife into fine pieces (again, you may prefer to use a food-processor, but I always like to keep the washing-up to a minimum). Transfer this to one side and move onto your peanuts.

I used unshelled monkey-nuts, simply because I had them in the cupboard. Any pre-roasted and salted peanuts will do however; just make sure to read the packet carefully to make sure there’s no sugar or carbohydrate added to prevent them from ‘clumping’ in the packet. The peanuts provide a delicious variation in texture, so although not essential, I’d highly recommend including them! For one whole cabbage, I used a generous handful of nuts (or circa 50 laboriously hand-shelled monkeynuts!). The volume can obviously be varied to your preference.

Place a wok onto the hob and pour in a couple of tablespoons’ of sunflower or vegetable oil. Once this is piping hot, add your chopped garlic and ginger, followed by your cabbage thirty seconds later. Stir-fry the lot for a further 2 minutes, then pour on 1/2 a cupful of water, add a large pinch of salt and crumble in 2 chicken stock-cubes for background ‘warmth’.

Cook this for another couple of minutes whilst you dry-roast your peanuts in a second pan. This is incredibly easy to do and provides a delicious crunch and full-bodied flavour. Simply tip the peanuts into a pan and toast over the hob with no oil for 1-2 minutes until they start to smoke slightly and brown in patches. Once achieved, scatter them over you cabbage and stir in until evenly incorporated.

All that remains is to take your chicken out of the oven and lay it on top of the cabbage. Garnish the lot with a generous sprinkle of chopped herbs (parsley or coriander) and a quick squeeze of lime juice. You’ll be amazed at how something so simple can be so rich in flavour and texture – a positive winner all round!

Browse this and other recipes by picture on my pinterest page: country walks in ketosis pinterest.

Thanks for reading and bon ap!

Adam.

Classic Lamb & Aubergine Moussaka – just low carb!

WP_20150211_20_38_39_Smart

Moussaka is one of my favourite dishes! The richness of minced lamb, combined with the fresh taste of sun-ripened tomatoes and sharp tang of yoghurt is truly sublime! Best made the day before; it’s one of those great dishes you can cook and prepare ahead of time! This makes it ideal for dinner-parties, when you want the kitchen to be clean and tidy for when people arrive; or simply if you know you’ve got a busy schedule coming up and want something you can simply heat through in the oven, which still feels like a substantial meal!

And okay – I freely admit that I browned this a little too long in the oven. We’re all human and the Low Carb Kitchen is by no means immune to the cooking mishaps which plague us all! I am sure yours will look better than the above; but take my word for it – it tasted absolutely heavenly; despite the over-colouration of the yoghurt! Send me a picture of your own creation, and I can do a bit of ‘photo-substitution’; piggy-backing off your own success and expertise!

All ingredients here are incredibly low in carbohydrate. As a result, this moussaka is great for a ketogenic diet, paleo-plan, diabetic-LCHF regime or for those with an intolerance to gluten. All dietary-requirements are welcome at the Low Carb Kitchen!

Start by slicing your aubergines into thin, half-centimetre slices. Depending on the size of your dish, you want at least 3 layers of aubergine. I used a large rectangular oven-dish, enough for 6 people. This warranted 4 large aubergines; you want each layer to just cover the footprint of the dish. I always think it’s best to err on the side of caution and buy ‘one to many’, just in case!

Place the slices onto a lined baking-tray, then drizzle these with olive-oil and grind on some salt and pepper. It doesn’t matter if they overlap or are half-piled on top of each other – the end result will taste the same! Into a hot oven they go for circa half an hour, until the aubergine is soft and pliable, and just starting to brown. Remove the tray from the oven and set to one side to cool.

Whilst the aubergines are cooking, place a heavy casserole onto the hob and add a small spoonful of oil. Season your lamb-mince with sea-salt and black-pepper; then when the oil is good and hot, tumble in your lamb, enjoying the ‘sizzle’ as it hits the pan. Seal this thoroughly, stirring occasionally to prevent it sticking; then add in 2 finely sliced onions, 3 crushed cloves of garlic and any other vegetables you have needing to be used up! Mushrooms are great, as are leeks, peppers and courgettes. In terms of quantity; I used 500g of mince for 6 people. Feel free to adjust accordingly in response to size or requirement!

Sauté the vegetables for 5 minutes or so, then pour in a good glug of port or red wine for richness. Given the succulence of lamb, you’ll likely not achieve the whooshing sizzle of the traditional de-glazing process; the wine is there more for taste than any other additional benefits! Crumble in 2 stock-cubes for background ‘warmth’ and add a generous spoonful of dried herbs (rosemary or oregano are just perfect!). Then drain two cans of tinned tomatoes (pouring off the liquid) and add these to the pan. Keep the mix on the simmer for 20-25 minutes until the liquid has reduced down and all ingredients have thoroughly cooked through. Then squeeze in a good squirt of unsweetened tomato purée and incorporate lavishly with a wooden spoon. Taste to adjust the seasoning, adding more herbs, salt, stock-cubes or pepper as appropriate. When done to your satisfaction, lift the pan off the heat, ready to layer up into your serving-dish.

Whilst the mince-ragout is on the simmer, pour a cupful of double cream into a saucepan. Follow this with half a cup of water, one cup of grated cheese (cheddar, parmesan or mix of both) and a tablespoon of Dijon mustard. Season well, then place onto the hob on a low heat, stirring occasionally until the sauce is thick and smooth. The reason you add the water is to help gauge when it’s ready. Once the water has evaporated (circa 15 minutes), you’ll end up back with the consistency of double cream. If you didn’t put the water in, the reduction would have nowhere to go and the pan’s contents would burn. When ready, simply remove from the heat and commence to layer up your moussaka.

Into your oven-dish, cover the base with a layer of aubergine, then top this with a fine coating of cheese-sauce. Now ladle on your lamb-mix until the white sauce is all covered. Repeat the process, aubergine > sauce > mince until the three components are all used up. Take note however – we want the top layer to end with aubergine and sauce – no mince! So bear that in mind when portioning your ingredients.

Once the top layer of aubergine and sauce has gone on, spoon on 3-4 tablespoons of Greek yoghurt. This provides a wonderful sour tang, which counteracts the richness of the cheese and lamb to perfection. Smooth this flat then sprinkle on a dusting of grated cheese and dried herbs to complete the dish. When all is ready, cover the dish with tinfoil and leave in a cool place overnight for the dish to settle and the ingredients to develop in flavour.

The next day, 40 minutes before you’re ready to serve dinner; transfer the covered dish to a moderate to hot oven. Learn a lesson from my mistakes – keep the tinfoil on to prevent the yoghurt from browning too soon. After 20-25 minutes, remove the tinfoil and check the temperature with a probe thermometer (we want 65ºc plus…). If you don’t have one of these, you can easily trust your eyes – if the centre is bubbling and piping hot, you’ll be well on your way! Return the dish to the oven uncovered for a final ten minutes to brown up nicely on top and reach the requisite 72ºc plus!

Once nice and brown, transfer to the table, and serve up with a crisp green salad to provide textural variation. You’ll find this recipe so delicious, you’ll want to cook it time and time again! (Preferably with better results than the picture above!).

Browse this and other recipes by picture on my pinterest page: country walks in ketosis pinterest.

Thanks for reading and bon ap!

Adam.

Zingy King Prawns with Chilli, Lime & Coriander – a delicious low-carb lunch or starter; ready in minutes!

WP_20150211_20_06_05_Pro

Dishes like this are real proof that delicious food needn’t take hours to prepare. This zingy, maximum flavour recipe is ready in under 10 minutes flat! As such, it’s the perfect low-carb lunch or starter for anyone on a ketogenic diet; diabetics, gluten-intolerants and paleo-fans alike!

Roughly chop a clove of garlic and a red chill, followed by the stalks of your coriander. Place a wok onto a high heat and drizzle in a little oil. Add your pesto mix and sauté for a minute, before adding you prawns. Stir-fry these for three minutes max, until well heated through. Then add a good squeeze of lime juice to liven up the flavour.

Pile some salad leaves into your serving-bowl; watercress, rocket, or anything with a strong peppery flavour is ideal. Spoon your warm prawns evenly over the the mix and season well. Then return the wok to the pan, and quickly fry one egg per person, adding a little more oil if necessary. Lift the eggs onto the the salad then curl over a good handful of parmesan shavings, using a sturdy swiss-peeler or grater.

Finish the lot with a final flourish of chopped herbs and another squeeze of fresh lime-juice. Voila! Your delicious, healthy meal is ready! Certainly a dish of maximum taste, yet minimum effort!

Browse this and other recipes by picture on my pinterest page: country walks in ketosis pinterest.

Thanks for reading and bon ap!

Adam.

Pot-Roasted Beef Brisket with Creamy Cumin Chou D’Alsace – a sumptuous low carb feast!

country walks in ketosis

WP_20150206_21_11_17_Pro

There’s something infinitely wonderful about slow-cooked food at this time of year. Over the weekend, when time is precious; food you can simply leave in the oven all day is a true delight! When you return home, a richly delicious smell is ready to greet you at the door, and dinner is all but ready! What could be easier or more convenient than that?

Some cuts of meat are more suited to slow-cooking than others. Brisket is the perfect cut of beef for such a treatment. Rather interestingly, cows do not not have collar-bones. This means that their entire front-body weight (and they’re heavy!!!) is carried by their chest muscles. Brisket is one of these ‘pectorals’, and as a consequence, it’s entirely built for strength. The muscle contains a high proportion of collagen, making it incredibly tough if cooked quickly. The fibres need to slowly break down over a long…

View original post 1,002 more words

Pot-Roasted Beef Brisket with Creamy Cumin Chou D’Alsace – a sumptuous low carb feast!

WP_20150206_21_11_17_Pro

There’s something infinitely wonderful about slow-cooked food at this time of year. Over the weekend, when time is precious; food you can simply leave in the oven all day is a true delight! When you return home, a richly delicious smell is ready to greet you at the door, and dinner is all but ready! What could be easier or more convenient than that?

Some cuts of meat are more suited to slow-cooking than others. Brisket is the perfect cut of beef for such a treatment. Rather interestingly, cows do not not have collar-bones. This means that their entire front-body weight (and they’re heavy!!!) is carried by their chest muscles. Brisket is one of these ‘pectorals’, and as a consequence, it’s entirely built for strength. The muscle contains a high proportion of collagen, making it incredibly tough if cooked quickly. The fibres need to slowly break down over a long period of time. When achieved, the meat is unctuously delicious and practically dissolves under the fork with the merest pressure. Time is all it needs; therefore let the cooker do the work, so you don’t have to! You could even cook this overnight, to reheat the next day – few dishes are this flexible; so enjoy that flexibility where you can!

I’ve teamed this with Alsation cabbage. “What is that?” I hear you ask… Alsace’s history is a curious mix of sometimes German, and sometimes French occupational rule. The food is a delicious yet peculiar mix of flavours; part Anglo Saxon & part Roman. A number of Alsation dishes take advantage of this crossover, in championing the surprisingly sublime taste-combination of bacon, garlic, cream and cumin in their preparation. This mix is warm, rustic, earthy and delicious; I for one certainly can’t get enough of it! I strongly urge you to give at a go; you won’t regret it!

The only carbohydrate here is the 1.5g of cellular net carbs contained within the savoy cabbage. This low level  makes it a wonderful dish to serve to those on a ketogenic diet, but it’s equally fitting if you’re gluten-intolerant, are following a paleo-plan, or just simply want a break from ‘the bloat’. In summary then, it’s simple, fuss-free and nutritious. So give it a go!

Start with the beef. Bring this up to room-temperature and season well on all sides. Place a heavy-based casserole onto the hob and spoon in a little butter and oil to heat through. Then lower in your brisket-joint, enjoying the sizzle as the meat hits the pan.

Seal and brown the beef on all sides, then tumble in a chopped onion and a bit of leek if you have it, for good measure! Whilst these are sautéing, spear a garlic-clove with a cocktail-stick and rest this on top of the vegetables. The reason for this is that you can then simply lift it straight out afterwards. It then provides a beautiful, soft mellow infused garlic flavour to the dish, which is utterly sublime in every way! The subtle background perfume of bay also goes beautifully with beef, so add a couple of bay-leaves, then deglaze the pan with a generous glug of port or red-wine.

Add sufficient water to at least three quarters cover the beef, then crumble in a stock-cube for a little warmth of flavour.  Place the pan into a low-oven to cook for at least four hours. Whether you place a lid on the pan depends on the heat-source you’re using. Fan-ovens tend to dry-cook food, evaporating the liquid, which can result in ‘dry’ or tough meat. If you’re using one of these, I’d advise putting a lid on the pan to prevent moisture loss. If you’re cooking on gas or an aga, you’ll be fine to leave the dish uncovered to maximum 140ºc.

I left the beef in the oven for 8 hours. Upon returning home, the liquid had only reduced by an inch and the meat was sublimely tender. The top had developed a glossy crust; which locks all the juices into the meat, preventing them from evaporating upwards during cooking. When ready, remove the speared garlic, drain off all but a half-centimetre of the liquid and return the pan to the low oven with the lid off to crisp the top even further.

To make the cabbage, place a second casserole onto the hob and melt in a little butter and oil. Add some finely chopped bacon (or lardons if you have them) then finely slice an onion.  Sauté this alongside the bacon for a couple of minutes, before crushing in a generous clove of garlic or two. Now add an enthusiastic teaspoon of cumin and a small shake of paprika. The smell should be savoury and delicious; mouthwatering in every way! Then glug in a glassful of vermouth or white wine to deglaze the pan. The kitchen will witness few more enchanting aromas than this!

Whilst the liquid is bubbling away, finely slice and rinse your cabbage. Add this to the pan, retaining any water which remains on the leaves after rinsing. Sauté for a couple of minutes, then crumble in a chicken stock-cube to perk up the flavour. If you need to add a little more water, do so by all means. We want the cabbage to be waist-deep in liquid. Sprinkle in some dried herbs (sage, oregano or thyme are wonderful) then place a lid on the pan to simmer for ten minutes, allowing the cabbage to soften before you reduce the liquid.

When the 10 minutes are up, take the lid off the pan and taste to adjust the seasoning. Give the pan a good stir, then leave the lid off to allow the moisture to evaporate. At this point, take your beef out of the oven to rest until the stock has all but reduced from the vegetables.

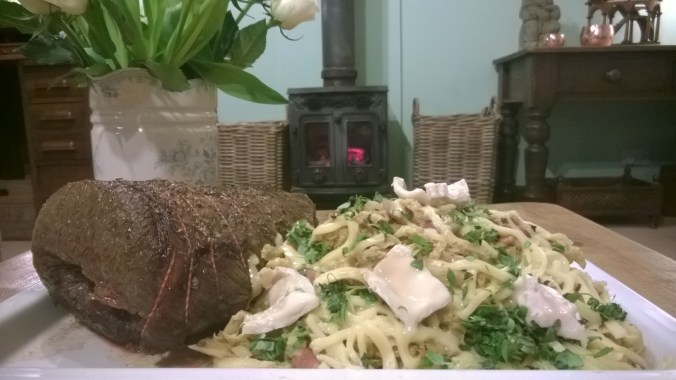
Finally, stir a swirl of double-cream around the cabbage and remove from the heat. Transfer both the beef and the vegetables to your serving plate, then finely slice or grate some nutty emmental or other ‘mild’ cheese into thin strips.  Sprinkle these all over the savoy, then if you’re feeling indulgent (and I was), you can also tumble on some brie or other soft-rinded cheese to add richness. This is by no means essential, so I leave the choice entirely up to you!

Garnish the lot with a drizzle of the delicious pan-juices and a final flourish of chopped herbs. When you dig in with a knife, the beef will literally collapse into tender, soft chunks. The cabbage will be earthly and aromatic in flavour, providing just the right level of bite to compliment the melt-in-the-mouth consistency of the beef . Few dishes can be so perfectly balanced or more delicious than this! – it’ll be well worth the wait!

Browse this and other recipes by picture on my pinterest page: country walks in ketosis pinterest.

Thanks for reading and bon ap!

Adam.

Strawberry, Almond & Pecan Hearts – a deliciously simple low carb Valentine’s Day treat!

WP_20150214_20_08_15_Smart (1)

These delicate and delicious strawberry, almond and pecan cakes couldn’t be simpler to make – the perfect dish for Valentine’s Day or equally good at any time of year when you happen to feel like spoiling someone! The sweet perfumed scent of strawberries is complimented wonderfully by the dense, nutty crunch of pecans and soft cloud-like swirls of whipped cream. Quite simply heaven on a plate!

The classic adage goes ‘say it with flowers’. I certainly don’t disagree with that, but flowers and cake are infinitely preferable in my book; so pull out all the stops and show someone you love them with a little bit of good old fashioned baking!

They also say that ‘the way to another’s heart is through their stomach’; but so often with flour- and sugar-free cakes, the results can be a little disappointing. Not so with these however! The taste and texture of this recipe is so similar to a classic sponge-cake that you’d never know it’s low-carb. This makes it the perfect thing to serve up to diabetics, paleo-fans, gluten-intolerants and those on a ketogenic-diet. Both heart and stomach will be won over; so give them a go!

To make the cake, measure up 6oz of xylitol sweetener and 6oz of unsalted butter. I always use xylitol in baking. In my experience, it’s the only sweetener which retains its sweetness once cooked; and its granular texture means that it behaves exactly like sugar in cake-recipes. Cream the two together by hand until they’re light and fluffy, then give your hands a good wash before whisking up the eggs.

Break 3 eggs into a bowl and whisk lightly with a fork until smooth. If you’re using vanilla-pods, scrape out the seeds of one pod and add this to the mix. If you prefer dried vanilla powder (as I used), half a teaspoon should be more than enough. You can equally use vanilla-essence, but this tends to contain liquid sugar-syrup, which isn’t ideal from a carb-perspective. If you choose this option, make sure to read the label carefully!

Incorporate the egg into the creamed butter and sugar a little at a time. Again, I always find that using your hand allows the maximum quantity of air to be locked into the mix. Tilt the bowl at an angle and fluff the mix upwards so that the motion elevates the mix rather than flattens it (as will happen if you go at it horizontally with a spoon).

Weigh up 6oz of ground-almonds and stir in 1 teaspoon of bicarbonate of soda. Fold this into the mix; again at an angle, making sure to lift and turn, so that the mixture rises and falls back onto itself. It’s best to use a sturdy metal spoon, as this will afford you the greatest control. Fold the dry ingredients in until you have an obliging dropping-consistency, which is a pale yellow in colour.

Roughly chop a good handful of pecans and three or four strawberries and fold these in at the last minute. Then spoon the cake-mix into your cake-tins. I used small, individual squares, but this can equally go into one larger tin; round or square to your preference.

Bake in a moderate oven for circa 25-30 minutes, until risen, golden but not too brown. The cakes should be spongy and resistant to the touch, and rise back up when pressed lightly with the finger. Remove from the oven and cool thoroughly until room-temperature.

Once the cake is well cooled (it needs to be cool, or your icing will melt); place 6 large tablespoons of double-cream into a bowl. Add half a cupful of table-sweetener (this can be other than xylitol, because it’s uncooked) and a third of a teaspoon of vanilla powder. Whisk the lot with a balloon-whisk until the cream is just starting to form peaks. Make sure not to over-mix or it will separate. We want it still nice and soft – spreadable is the key! Test for sweetness, adjusting vanilla or sweetener levels to your preference.

Layer the frosting generously atop the cakes with a palette-knife. Then slice a strawberry into thin slices, trimming each slice down into a heart shape. Top each cake with a strawberry heart then lift onto your serving plate. I’ve chosen to keep these relatively pure and uncluttered in appearance; but you can equally sprinkle a few more chopped pecans on top to add theatre. The choice is entirely yours…

Serve with a final halved strawberry and a light drizzle of pouring cream for that extra touch of indulgence. Once you’ve made these, love will be in the air with every mouthful! Even St Valentine himself couldn’t resist a second helping!

Browse this and other recipes by picture on my pinterest page: country walks in ketosis pinterest.

Thanks for reading and happy Valentine’s Day from the Low Carb Kitchen!

Adam.

What ‘grows up’, must come down…

The farmers have been busy on the hedgerows, thinning out the tough previous season’s growth to make way for spring’s abundance of fresh, green leafy shoots.

In this particular instance however, I feel things may have gone just that little bit too far

WP_20150211_08_25_06_Pro

It rather puts me in mind of the time I requested a slightly too enthusiastic haircut. My ears have never felt so chilled, and I had to walk around for a whole month in a rather foppish tweed cap. Unfortunately, the trees do not have that luxury.

In the fair State of Ketosis, weight loss and ‘shrinking down’ is therefore very much the spirit of the day! Even the local shrubs and trees are at it!

At the very least I suppose, it’s another sign that spring is on its way, and we must make ready.

On the off-chance you’re booked in for a haircut today; heed this word of caution – go steady!

Thanks for reading and enjoy the day!

Adam.

The Plank – The Sequel!

Those of you who’ve followed this blog for a length of time, may remember back to October when I first described my daily walk around the fields.

One of the highlights (or lowlights!) of the morning ramble remains the terrifying obstacle of the plank! (see original post under hyperlink: the plank). The steep, muddy banks of the stream are particularly slippy; and the wood itself becomes perilously icy in bad weather.

Well now, thanks to the community-mindedness of a local farmer; a new option presents itself. Behold – the plank, the sequel!

WP_20150210_08_12_30_Pro

To be honest with you; I’m not at all sure about this! I now have a choice of two potentially lethal homespun footbridges to cross, and identifying the lesser of both evils is not straightforward….

Do I prefer…

Short or long?

Flat or bumpy?

2 foot drop into icy stream or 4 foot?

Feeling wimpy, or brave and heroic?

Other than the ability to re-enact ‘Dirty Dancing in Ketosis’; there’s not much to choose between them!

I think over the next week I may try ‘one day the plank’, ‘next day the trunk’!; until I eventually decide which best suits my timorous nature! I’ll let you know which option wins out.

Whatever you get up to today, try to be a little braver than me!

Thanks for reading and enjoy the day,

Adam.

All salute the spring…

As the wintry white carpet of snow and frosts gradually begins to thaw; another carpet of purest white slowly starts to emerge. From out the still icy ground, a shiver of snowdrops lifts shimmering to life; delicate and fleeting, but a first and sure sign that spring is finally on its way.

WP_20150206_008

Whilst it may be premature to say that ‘spring has sprung’; that spring is tightly coiled and it won’t be long before all bursts back into life. It is a pent-up and restless energy which communicates itself frenetically to all of nature – sudden birdsong breaks forth from out the trees and the bushes’ brave buds sprout silent & spontaneous from stalk and stem.

Another sign that the seasons are on the turn, is the mists which once again rise up from the still solid soil. The sun is finally strong enough to evaporate the dew; albeit haltingly and in patches.

WP_20150209_08_12_58_Pro

We are by no means safely out of winter’s grasp; but that vice-like grip has loosened; it’s certainly sufficient to let a little light into the freeze of February, so that’s good enough for me!

Whatever you do today, be sure to look out for the signs of spring. For it will soon be upon us.

WP_20150209_08_06_00_Pro

Thanks for reading and enjoy the day,

Adam.

The Moon-Dial…

WP_20150206_07_50_39_Pro

In a far-flung reach of the garden stands a strange and mysterious statue. Its surface is pitted and time-worn; no-one knows when it was built, or for what purpose.

On these cold and frosty winter nights, the moon hangs huge and resplendent against a grey-black sky. Gradually, its light falls on the statue, which then casts an ominous shadow over the frozen, silvered grass. As if like a finger, it points resolutely to some unknown destination; signposting a dark path into the woods, which none dare to follow.

For this reason, it’s come to be known as the ‘moon-dial’.

If the moon’s magnetic power is sufficient to pull the great oceans, moulding their unfathomable depths into ever-changing surges and tides; who am I to rule out its other more subtle effects and powers..? The sight of the winter moon is truly awe-inspiring; a sight I both respect and admire. But one that I’d much rather contemplate from the comforting warmth of my bed, gazing safely out of the misty, frosted window-panes…

But in the cold grey mornings, as daylight tremblingly takes hold; the moon-dial serves another purpose. I watch patiently, waiting for the giant moon to sink below the statue’s orb, and the weak sun rise above it, before I haltingly pull on my wellies and venture out into the steely cold. Before this point, it is far too dark and bitter to face the morning frosts. The moon-dial becomes my own personal alarm-clock; a sign that it’s time to wake up and grudgingly start the day.

But thankfully with each passing dawn, the sun gets stronger and stronger. We are all ready for the spring, and as the days slowly lengthen, we take heart knowing it’s not far around the corner.

Whatever you get up to today, enjoy the daylight hours and be sure to keep an eye out for the increasing signs of spring. For they bring warmth and relief to the soul.

Thanks for reading,

Adam.