Meltingly Tender Pot Roasted Beef – Traditional Home-Cooking, Without the Carbs!

WP_20151020_20_19_18_Pro

If ever a dish had the power to warm both heart and soul to the core; this is it!

Food can mean so much more than nutrition alone. When you cook up ‘something special’, which you mightn’t normally cook; your actions can relay a real sense of occasion. You’re conferring a special treat, and with it, you’re communicating a range of sentiments: comfort, warmth, love & nurture. Nothing says “I care” quite as much as dedicating your time to producing your level best! A poet does it with words; the cook does it with dinner!

But to achieve these wonderful results, it needn’t follow that the process itself prove complicated or difficult; nor that you’ll be slaving for hours, then end up with a huge mountain of washing up! This recipe is actually incredibly simple, but the finished dish is anything but… I strongly urge you to give this a go – you won’t be disappointed!

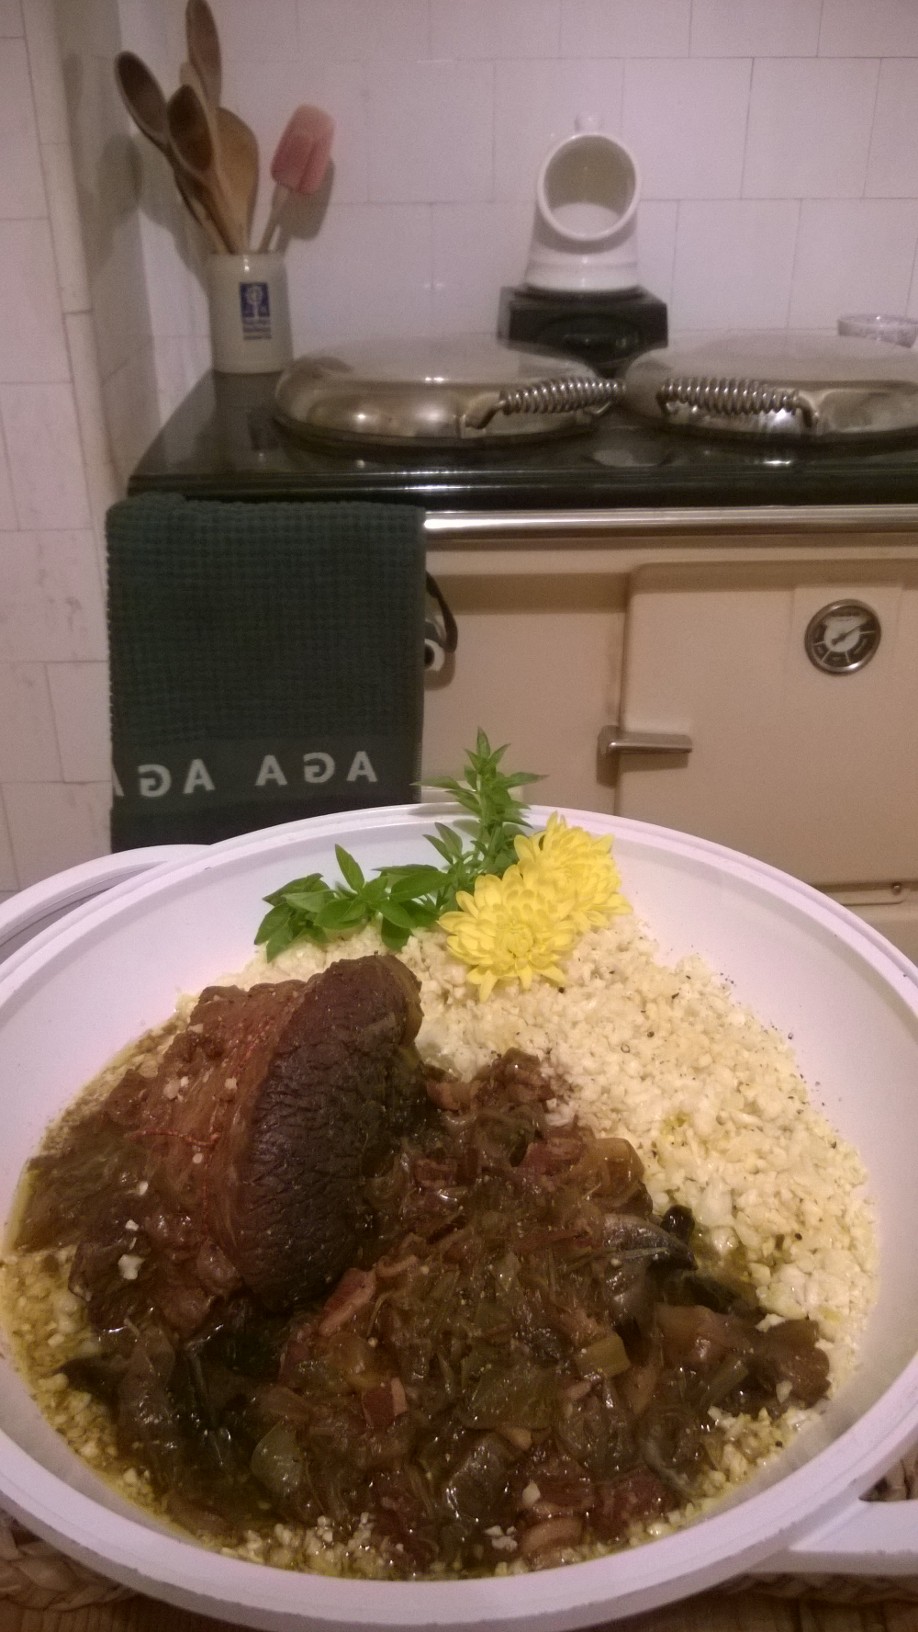
Enough of results; let’s focus on contents…! Do you see rice in the picture? Am I advocating carbohydrate on a low carb blog? Heaven forbid! What I’ve served this with is cauliflower rice; a true godsend on any low carb or paleo plan. I hyperlink the recipe to this as follows: cauliflower rice recipe.

And the beef itself? The brisket is slow cooked over hours, which means that excess liquid is staved off and the sauce requires no thickening-agent whatsoever. Indeed, all ingredients in this dish are suitable for both classes of diabetics, or anyone following a ketogenic / low-carb diet or paleo-regime. Beyond this, it’s suitable for all, so cook it for some ‘carb-eating friends’; they’ll never know!

So to begin, bring you beef-brisket to room temperature and season well.

Brisket is an ideal cut for slow cooking. Why? Cows don’t have collar-bones. This means that the entire weight of their head and neck is borne up by muscle. By necessity, that muscle must be pretty strong; so it contains high amounts of collagen, a structural protein which requires long slow cooking to break down and tenderise before it’s ready.

Pan fry brisket at your peril – you’ll end up with tough, fibrous strips which are truly unpalatable in every which way. But with slow-cooking, the collagen gelatinizes which naturally thickens the sauce (as per oxtail) and delivers delicious tender meat which simply melts under the fork – you’ll scarce need a knife!

Once the meat is room-temperature and the oven is good and hot; place the brisket into a heavy-based casserole pan, then straight into the oven for circa 20 minutes until the joint is sealed and deliciously brown on all sides.

Whilst this is looking after itself, quarter a couple of onions, then halve each segment into eighths. Peel a couple of cloves of garlic and roughly chop, followed by a green pepper, a leek, some celery and any odds & ends you may wish to use up. To be honest with you, as long as the onions and garlic are there, you can pretty much use any low-carb vegetable you wish. Try a dice of celeriac or courgettes – delicious!

Once the meat has browned, remove it from the oven and place the pan onto the hob. Tumble in your vegetables, followed by a couple of bay-leaves and a sprig or two of parsley if you have it. Return to the oven for 5 minutes, until the vegetables are good and hot, then bring out the pan once more and deglaze with a whoosh of red wine or port.

Why do I keep taking the pan back out of the oven, then in again, like a saucepan-hokey-cokey? Who wants to clean the hob unnecessarily…? Keep it clean as you go, then afterwards you’ll feel all the more smug as you get to relax all the sooner…

When the alcohol has reduced into a delicious cloud of steam, follow it by two cupful’s of water, a couple of beef stock-cubes and a generous teaspoon of Dijon mustard. You can of course use fresh beef-stock if you wish; if you do, then omit the stock-cubes and water. With regards volume, I state ‘two cups’, but depth is the real key here. You want the joint when on its side to be waist deep in liquid; no more, no less. Once achieved, allow the sauce to come to the simmer on the hob, then put the lid firmly onto the pan and into a slow oven it goes for circa 4-6 hours until it is achingly tender.

Why is the timescale so vague? A dish like this is pretty forgiving. As long as the oven is low enough and there’s sufficient water, it could easily go in overnight and not suffer – in actual fact, it’d be all the more delicious! What does a low oven mean? Think gas mark 1-2, circa 140-150°c. I have a cast-iron range cooker, so into the simmering oven it goes and I needn’t even peek until dinner time!

Once the time has elapsed, remove from the oven and take the lid off the pan. There should still be at least a cm of liquid and the most delicious, rich, savoury smell should serve as your reward! Check the sauce for seasoning and adjust if required. Place the lid back on the pan, then leave to one side to ‘rest’ whilst you cook the cauliflower rice.

Why do people always tell you to leave meat to rest? My own interpretation of this is somewhat grizzly and gruesome. If you’re of a nervous disposition, then please jump straight to the next paragraph, stopping reading from this point onwards…. Look down at your forearm, then tense your arm-muscles. Imagine cutting a knife through that; it would literally tear in the most rough and brutal way and you’d need a saw to get through it! With heat (like exercise), the muscles and tendons tighten, much like when you’re tensing your forearm. It would be a nightmare to cut through and would never achieve a clean slice. Now un-tense your arm. It’s clear to see how the muscles relax and lose their stress. Relaxed muscle (ergo meat) will cut cleanly, resulting in less moisture loss in the form of meat-juices, and a melting tender consistency. A good sharp kitchen knife will do the job – no need for a saw here (the same goes for a steak knife). As I say; that’s my own version of events – it’s always been the easiest way for me to envisage the process, serving to explain why meat should always be left to rest before carving. Take it or leave it… it works for me!

Gruesome bit over – the fragile amongst us can now resume. Cook your cauliflower rice as per the recipe under the hyperlink (cauliflower rice). Then simply lift the meat out of the pan and place atop the still al dente rice, spooning the beautifully reduced vegetables and sauce all around.

For that all important final professional flourish, garnish with chopped herbs: basil, parsley or oregano. Then simply carve the beef and dig in! The carving can almost be done with a wooden spoon.

Despite my long-winded, tiresome explanations, this recipe couldn’t be simpler. But I’m sure you’ll agree, it tastes anything but! So give this a go and toast the onset of winter with a bowl of pure comfort!

Thanks for reading and bon ap!

A.

Seared Leg of Lamb With Warm Asparagus, Sprouting Broccoli & Feta Salad – Divinely Different Low Carb Cookery!

WP_20151016_21_30_21_Pro

If I were asked to recommend one low carb recipe to an absolute ‘low carb beginner’, I think this might be it! Few dishes can be so simple to prepare, yet taste so rich and amazing as this!

Lamb will always be a winner in the Low Carb Kitchen. Once in the oven, the succulent smell of roasting meat fills the room, and is truly mouth-watering! Plus, it’s one of those meats that can simply be left to do its own thing.

I’m often quoted to state “don’t fuss over your food; no-one likes to be mothered, and the same goes for your dinner!”. Well a leg of lamb is a refreshingly independent beast, requiring no fussing or mothering whatsoever! This makes it the perfect dish to prepare on a lazy Sunday or when you have people coming to dinner and want something that can simply sit in the oven whilst you relax and get on with the rigour of entertaining!

There are also few dishes which look quite so impressive as a leg of lamb. It has instant ‘plate theatre’, which combined with the luxury of rich asparagus and fluffy white feta, makes for a true treat in every which way!

Then add to this the low levels of carbohydrate, and you have a dish which is perfect for ketogenic dieters, diabetics or anyone who simply wishes to beat the bloat of a high-carb lifestyle. You feel great and get to eat food like this. Who could ask for more…?

So, how to go about cooking this plate of purest wonder? Start by preparing your vinaigrette ahead of time. See the following hyperlink for the standalone recipe: traditional French vinaigrette recipe.

Vinaigrette is something I always have in the cupboard. It keeps for yonks and provides the perfect finish to so many salads and vegetables. Try it with cooked celeriac and parmesan, or roasted broccoli and pine nuts – divine!

Anyway, I digress… Place your lamb onto a sturdy baking-tray or roasting dish. Season well on all sides, then into a very hot oven it goes for 20 minutes, until seared and golden on all sides. Temperature wise, think 220°c / gas mark 7, or top of the aga roasting oven.

The smell coming from the oven will be sublime at this point. Now simply turn down the temperature to approximately 180°c / gas mark 4, and roast for an hour and a half, until the meat comes away from the bone. Once roasted to perfection, remove from the oven and leave covered in tinfoil to rest for 20 minutes.

Whilst the meat is ‘relaxing’, bring a pan of water up to a rapid boil for your vegetables. Snap the tough stalks off the asparagus at their natural breaking point, and trim the ends off the stalk-broccoli. Plunge these into the water for two minutes, then strain off the liquid. Return in the same pan to the hob, this time glugging over a generous whack of best quality olive oil. When the edges begin to char and blacken in an appealing way, sprinkle on some sea salt and season well with crushed black pepper.

Dice your feta cheese into 1cm chunks, then add this to the vegetables. I also added a few chopped cherry tomatoes for colour, but this is your choice entirely! Now spoon a good couple of tablespoons of vinaigrette over the top and stir through thoroughly.

To finish the dish, tear over a handful of fresh coriander leaves. Their peppery sharpness provides a wonderful counterpoint to the richness of the lamb and sour tanginess of the feta.

Then simply carve the meat into luxurious chunks, which literally fall from the bone when cut. Spoon out the vegetables and dig in whilst the lot is still piping hot.

I’ll vouch there won’t be a scrap left on the plate!

Thanks for reading and bon ap!

Adam.

Celeriac Chips – Who Needs Potato? The Low Carb Food Revolution Continues!

Celeriac Chips

In a contest between low carb v bloating starch & sugar; the ketogenic approach seems to be boasting “anything you can do, I can do better!” And that’s certainly the case with this recipe – celeriac chips!

When you first start a low carb or paleo regime, a lot of old favourites suddenly feel out of bounds. Without a little learning, any attempts to recreate them can often seem half-hearted, presenting a poor substitute for the dish you’re trying to copy.

With a little experience however, the food world is your oyster. And one thing I’ve genuinely missed…? Chips! Not that we ate them much anyway, but it’s always been more the feeling of depriving yourself that’s hard – the sense of ‘I can’t have this’ which makes you want it all the more!

Well celeriac chips are in no way a poor relative of their potato cousins. In all honesty, they taste far better and have a warm nutty flavour which is truly irresistible! And at circa 5g net carbs per 100g, they’ll hardly break the carb bank, leaving ketogenic dieters, paleo fans and both types of diabetics free to tuck in with gusto!

So without further ado, the next life-changing low-carb experience awaits. And it couldn’t be easier!

Heat sunflower or vegetable oil in a frier or on the hob until circa 130°c. Whilst the oil is heating, peel your celeriac root with a sturdy peeler, then cut the ball in half vertically. Follow this by cutting each half into 1cm thick slices, then cut each slice in turn into 1cm wide batons.

Once the chips are cut, lower them into the hot oil and leave to cheerily bubble for 8-10 minutes until cooked through, but not brown. When I say cooked through, image ‘bite-able’!

When ready, lift the chips out of the oil and place on greaseproof paper or kitchen towel. Now turn up the temperature of the oil to circa 180-190°c ergo good and hot! Once the oil has reached the desired temperature, lower the chips back in and fry for a further 5 minutes until they’re golden brown with a slight crisp around the edges.

Lift out and place back onto kitchen towel again to drain for a couple of minutes. Dredge with a generous sprinkle of sea-salt and serve up to the ravenous horde. I’ll wager you try at least one before they reach the table!

A good low carb dip or sauce is garlic mayonnaise (aioli). What more can you want? So forget the humble potato – there’s far finer things on the horizon. When it comes to low carb, the grass is certainly greener. But don’t just take my word for it, try this recipe and give it a go yourself. You won’t regret it!

Thanks for reading and bon ap!

Adam.

Spicy Ginger ‘One-Pot Pork’ With Beansprouts, Coconut & Coriander – Substantial & Filling, High in Flavour, Low in Carbs!

pork

The evenings are starting to draw in ever earlier, and at such times we instinctively crave something that’s quick and simple to prepare, yet has the robustness and filling quality of a good home-cooked meal.

Well this dish delivers on every level. The flavours are rich and exotic, proving that a deep and complex taste needn’t be complex to prepare!

I really love this style of one-pot cooking. After work when you’re just wanting to relax and unwind; no-one relishes a recipe to be fussed over, culminating in a slavish pile of washing-up. And besides; there’s something indescribably comforting about a big substantial pot of food, all served up in brimming ladle-fulls; it warms the heart and soul alike; not to mention the eye and the stomach!

Low-carb dishes can sometimes feel a little on the anaemic side, so dishes like this, which leave you luxuriously full are always welcome! And because the carbohydrate content is so low, this recipe is perfect for diabetics and anyone following a ketogenic- / paleo-regime.

Vary the vegetables according to what you have to hand. Just make sure they keep to the keto-go-go guidelines (hyperlink here)!

Start by placing a heavy based pan onto the hob over a medium heat with a little oil, ready for your pork. I used pork shoulder-steaks for this recipe, but any reasonably quick-cook variant will do, such as loin, diced cuts or leg-steaks. Place your pork into the hot pan, making sure to season well & enjoy the hissing and spluttering as the meat hits the searing metal. Brown lightly for a couple of minutes whilst you set about preparing the ‘flavour part’.

When it comes to things like chilli, we’re all different. I like it really hot, but others may be more of the sensitive type. I used 3 large red chillies here, but feel free to go green or smaller, such as bird-eye chillies. Scotch bonnets will also promise you a definitively committal adventure!

Either on a chopping board or in a food processor, roughly chop chilli, garlic and ginger then add this to the pan. I used three small cloves of garlic, the chillies as above and a thumb-sized piece of ginger. Freeze-dried ginger or even powder will work equally. If you’re using powdered form, then add this when you add the other spices later.

Stir the mix thoroughly into the pork, then chop your vegetables. As I say above, use whatever you have in stock. My mix went as follows: 1 large onion, 1 leek (plus green-tops), 1 courgette, 1 green pepper. Roughly chop these, as the French would term ‘a la Paysanne’. Once hacked to a pleasing and inexpert inconsistency, add to the pan and stir well.

Now for the spices. Sprinkle in a generous teaspoon of ground all-spice (not mixed spice [think cake], but all-spice berries), followed by a teaspoonful of ground cumin. Season well and then crumble in a couple of chicken stock cubes, or fresh stock if you’re sufficiently organised. If you’re using dehydrated cubes, pour in a centimetre’s depth of water and mix in. If liquid stock, then up to the same depth as per water above.

Leave this to simmer and reduce for a few minutes, then add condensed coconut block or coconut cream. You can of course use canned coconut milk, but if you choose this option, be careful to not add the water or liquid stock quantities above. One of the joys of this dish is the thick sauce. If it goes too watery then you end up with more of a soup, rather than the satisfying filling quality of a hearty wholesome casserole.

Stir in a good handful of frozen petits-pois for bulk (or as low carb frozen peas as you can find), then into a preheated oven it goes (circa 180-190°c, gas mark 5) for 20 minutes with the lid on, to cook through and thicken nicely. We want no more than 2cm’s depth of liquid in the pan when it goes in.

The organised amongst us will use this interim time to do the washing-up & tidy the kitchen. The indulgent amongst us will grab the time to read a book or have a well-deserved sit down! I leave that choice up to you!

However you fill it; once the princely period is over; take the pan out of the oven and stir thoroughly. Then tip in your beansprouts (large packet circa 300g for x2 people) and place the pan back into the oven for 5 minutes further. This allows the beansprouts to wilt and heat through.

Your last task is to roughly chop coriander leaves. If you’re feeling rustic, then tear them on with your hands, which fills the room with a wonderfully verdant citrus aroma. Interestingly, if you chose to spend the ‘oven time’ by doing the washing-up, then you might be more of a ‘knife and chopping board type‘ when it comes to the final hurdle of herbs! The indulgent set tend to use the hands!

Whatever your route, simply scatter the herbs on top and spoon into deep earthy bowls. Then once served, continue the spooning once more, but this time from the bowl upwards!

In a word – delicious!

Thank you for reading and bon ap!

Adam.