Pizza – the ketogenic way! The low-carb food revolution continues!

WP_20150103_20_59_12_Pro

When I first started the ketogenic-diet, I thought “that’s it – you’ll never have pizza again!”. A period of food-mourning ensued, but now I’ve welcomed it back with open arms; and as always, it’s a true pleasure greeting familiar old friends! How can you eat pizza on a low-carb diet? Cauliflower pizza-base. Yes, that’s right; you’ve read it correctly: cauliflower!

I was a little sceptical when I first read about this. It sounded complicated, fiddly and didn’t overly promise much on the taste front… But having tried it, I’m now a firm convert! It’s no more labour-intensive than any other pizza-recipe; in fact, it’s a little bit easier, as there’s no faffing around with yeast or flouring kitchen-surfaces to roll out the base &tc.

Is it exactly the same as traditional flour-based pizza? Not exactly, but that in no way diminishes it; it’s simply different. The topping tastes just the same as you’d expect; the one difference is that the base isn’t ‘crisp’ like wood-fired pizza; it’s more chewy and firm in texture; which is certainly good enough for me. Any way, to be able to eat pizza without the associated ‘food-guilt’ is a wonderful thing. Second helpings? No problem with this recipe!

Diabetics, paleo-fans and those with a gluten-intolerance can also throw open the doors to this old favourite, because the carb-content is incredibly low. There’s no flour, no ‘bloat’, no soaring blood-sugars and no insulin-ramping to worry about – just delicious healthy food (I never thought I’d be saying that about pizza!!).

Start by making the base. Half a large cauliflower will make 1 dinner-plate sized pizza. Being me, I used two whole cauliflowers as I wanted some leftovers for lunch the next day. Pulse your cauliflower florets in a food processor until you have the consistency of breadcrumbs. Then simply place this into a large mixing-bowl and microwave for circa 8 minutes until the cauliflower is cooked through. This staves off moisture and cooks the vegetables through, so that the base doesn’t go into the oven ‘from raw’. Depending on your microwave, check after 6 minutes to see how things are going. To test that it’s done, taste a bit. You don’t want it to be cooked to point of being mooshy; just ‘biteable’ without the texture of rawness. When this is achieved, stir through to dissipate the heat and leave to cool down thoroughly.

At this point, start on your topping. Finely chop an onion and sauté this in olive oil with chopped garlic until the onion turns translucent. Ramp up the heat and deglaze the pan with a glug of red wine or port. If you wish to add peppers or other vegetables, feel free to do so; but all you really need is a can of tomatoes. Empty this into the pan once the liquid has been added. Season well and stir in chopped herbs and a vegetable stock-cube. Leave this on a low simmer until the contents reduce, then add a squeeze of tomato-purée. Hey presto; your sauce is done. Leave this also to stand for 20 minutes to cool down slightly.

No let the grating begin! Start with parmesan. Finely grate a good couple of handfuls for the base, then however much cheese you feel is gratuitously acceptable for the topping! Transfer these to a bowl until you’re ready to use them.

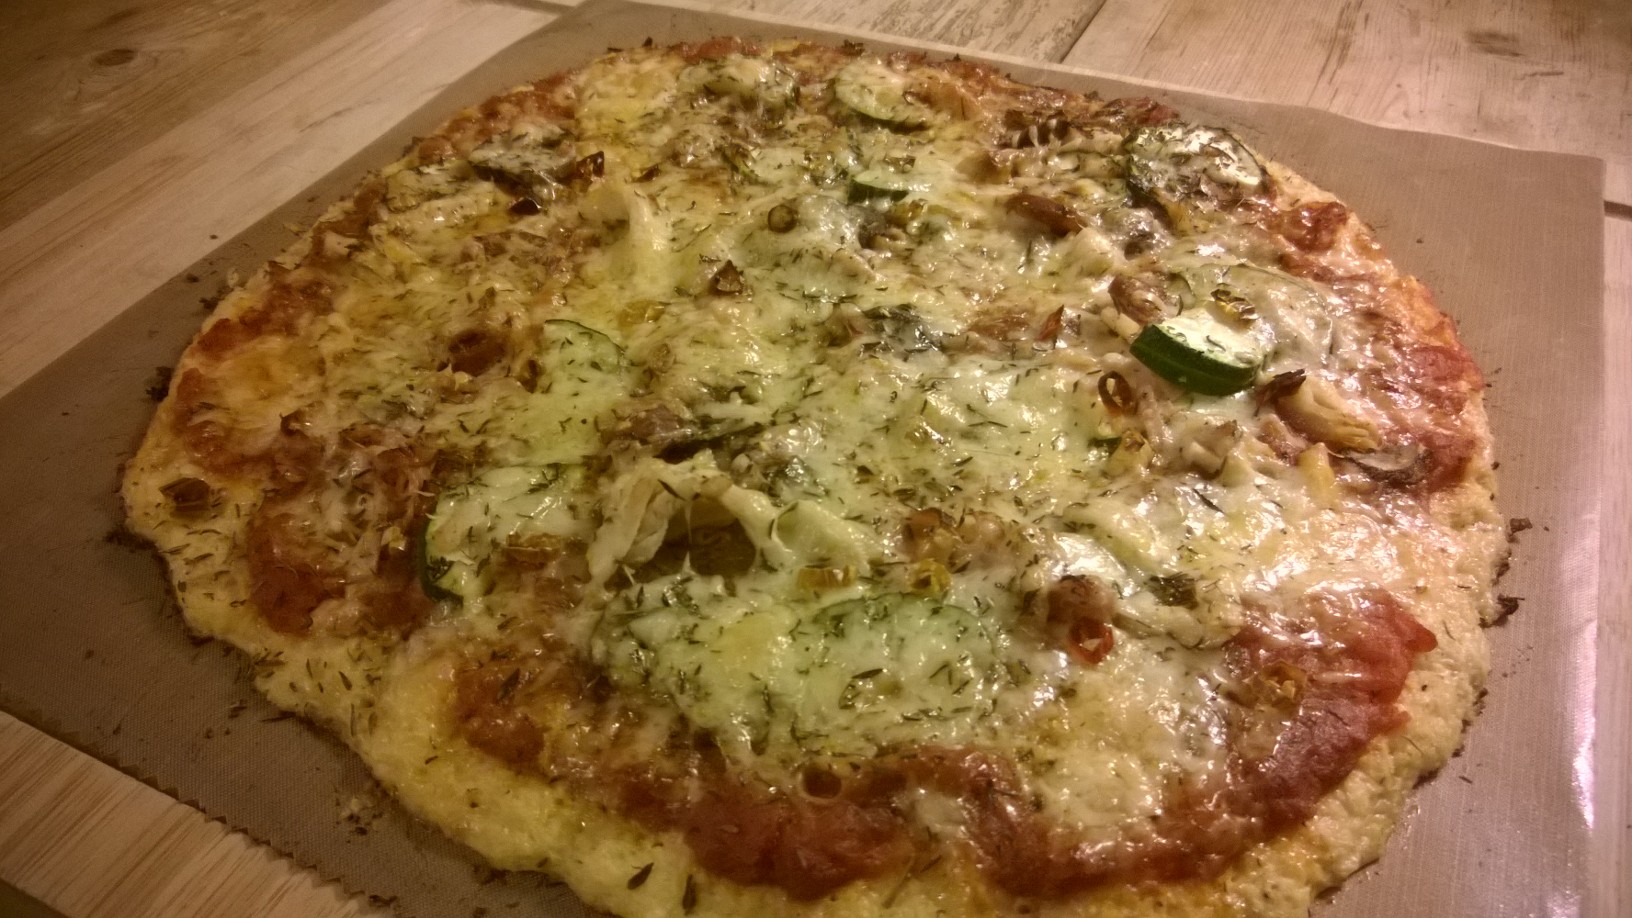
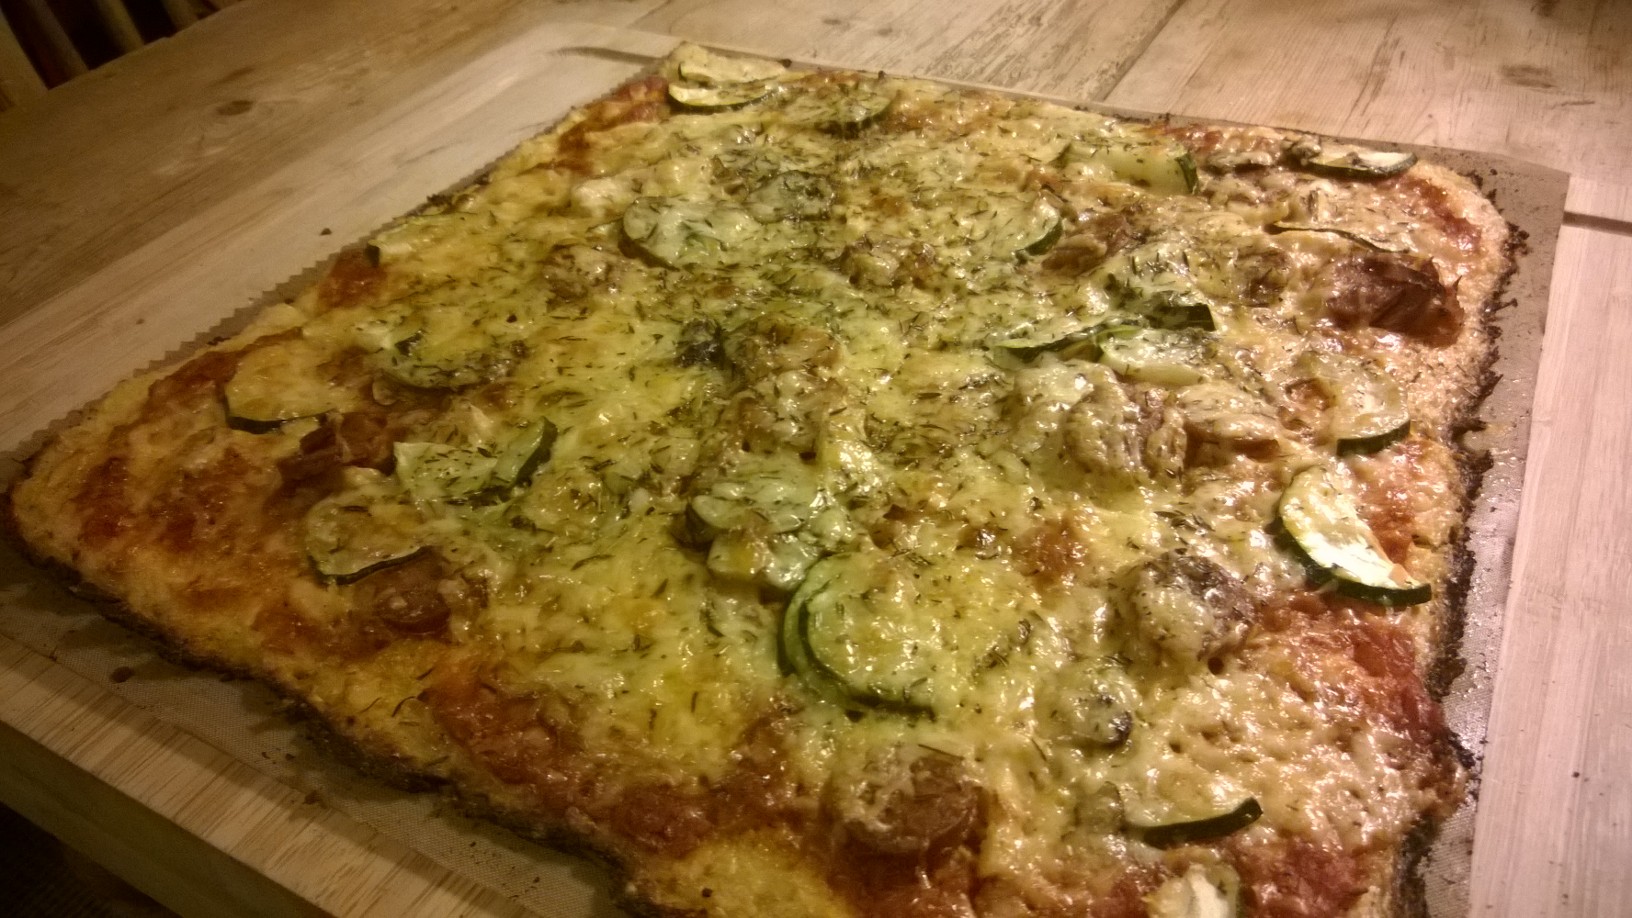
Now for the base. Add your parmesan cheese and season the cauliflower liberally. Next time I do this, I think I’ll add more parmesan than I used for this particular batch. Why? It’s the parmesan which melts and ‘firms up’ to give the base its crispness. I get the feeling that more parmesan will deliver more ‘bite’. Give it a go and let me know how you get on! Next beat some eggs in a bowl and add these slowly. I used 4 eggs for 2 cauliflower heads. You want the mix to be ‘shapeable’, not soggy. Picture the texture of cooled porridge! Pile the mix onto a silicone baking-sheet or greaseproof paper and pat into your desired shape, at about a 1/3 cm thickness. You don’t need a rolling-pin, just use your hands. The mix is not ‘elastic’ like a flour-base, so there’s no stretch. All you need do is ensure a thin covering across your surface area, and you’re done! The top picture was a square base, to cut up for lunch the next day. The picture below was the first ’round’ one (we made two of these for dinner – one each!).

When your base is the required shape, spoon on your tomato-topping and gently spread flat with the back of a spoon. Then pile on whatever keto-friendly ingredients you see fit! This dish is great for using up any bits and bobs you have lying around the fridge which are insufficient in quantity to ‘stand on their own two feet’. I used sliced mushrooms, courgette, mozarella, ham, salami, chorizo, peppers, olives and chilli. Whatever you use, chop the ingredients finely so that they’ll cook through nice and quickly, then scatter across the surface of your pizza.

Top the lot with generous handfuls of grated cheese, sprinkle on a few dried herbs then transfer the pizza with a paddle (if you have one) to the base of the oven. I have an aga, so I cooked this on the floor of the oven. You can equally use a pizza-stone, a slab of marble preheated in the oven, or simply a baking-tray. Make sure that the oven is good and hot, then in goes the pizza for 10 minutes until the top is bubbling, melted and golden brown, and the base is cooked through and caramelised around the edges.

Hey presto, your low-carb pizza is ready! Cut into slices at the table, or fold into wedges whilst watching a favourite film! Either way, it’s absolutely delicious! You won’t be disappointed!

Browse this and other recipes by picture on my pinterest page: country walks in ketosis pinterest.

Thanks for reading and bon ap!

Adam.

WP_20150103_20_15_03_Pro

Shepherd’s warning…

WP_20150109_006

As the old adage goes, “red sky at night, shepherd’s delight; red sky in the morning, shepherd’s warning!”…

“When it is evening, ye say, It will be fair weather: for the sky is red. And in the morning, It will be foul weather to day: for the sky is red and louring.”

A sky of glowing embers at dawn heralds the onset of bad weather. It’s already bitterly cold and damp; so no good can come of this baleful omen.

Whatever your day holds; be sure not to stray too far from the comfort of the fireside, and wrap up warm. If this old saying holds true; you’ll need it!

Thanks for reading and try to enjoy this harsh, unforgiving Friday.

Adam.

Fiery Malaysian Laksa with Crisp Pork Belly – low carb goes East!

laksa

This recipe whoops a ‘grand huzzahin tribute to the splendid, vicious firework that is the scotch-bonnet chilli! In isolation, it must be considered a pungent, mean & unpleasant beast; one which doles out penance to all those who countenance it. But when tempered by a little sweetness & warmth; its unremitting intensity is bridled and the ‘beast is tamed’!

Much like a tiger, chilli is a thing of beauty; something to be admired yet very much treated with respect. But once the cook has learnt this skill, the two will become firm friends for life, with most pleasing results!

Laksa is a delicious dish from Malaysia, which carries considerable influence from other Oriental cuisines. The origin of the name is unknown, but thought to stem from either Persian or Sanskrit. There are a myriad versions of the recipe, but this one is based on the wonderful, keto-friendly foundation of coconut-milk and chicken-stock. These two mild and velvety ingredients are just what’s required to sooth the vicious, bad temper of the chillies; delivering a perfectly balanced & mouth-watering equilibrium of taste! This is heightened by the addition of coriander leaves and lemon/lime juice, which add just the right touch of sourness to complement the sweet coconut. Some dishes have a perfect flavour-profile; and this is one of them!

The original dish is made with thin rice-noodles (vermicelli). These are not ideal on a ketogenic-diet, due to their high carbohydrate content. This recipe therefore uses courgette-noodles, or ‘zoodles, which make a delicious alternative to their high-starch counterpart. This renders the dish infinitely accessible to diabetics, gluten-intolerants, or those who quite simply want a break from the stodge! The carb-content is very low, so there’ll be no impact to blood-sugars or insulin ramping – you can tuck in to your heart’s content!

In this version, I use pork-belly slices because of their crispness in contrast to the noodles. Should you wish however, you can equally replace these with chicken, other poultry, game or even fish. The true beauty of this dish lies in the sauce, everything else plays ‘second fiddle’. As a result, my choice of meat is guided by texture rather than taste. I leave any variants up to your own creative instinct therefore. If you have any special successes, make sure to write back and tell me how you got on!

So, to work! Start by cutting your pork-belly slices into inch chunks and placing-these onto a baking-tray. Season well and place into a hot oven for 30-40 minutes, or until crisp and golden brown.

If you have a ‘mini-food-processor’, destalk 1-2 scotch-bonnet chillies and whizz these up until finely chopped. Add two cloves of garlic and a large pinch of salt, then follow these with your coriander stalks and a grind of pepper. Blend these as fine as possible, then scrape out with a spatula. If you don’t have a food-processor, chop the lot with a sharp knife on a sturdy wooden board. If you choose this option, make sure not to touch anywhere near your eyes for a good long while – it hurts!!!!

Place a wok or broad-based pan onto the hob and add a good glug of oil. Sunflower- or rapeseed-oil are perfect; olive oil has a lower burning point so cook a little more slowly if you use this. Sauté the mix for a couple of minutes, then add a chopped onion and a diced pepper. Soften these for a minute, then pour in a half-cupful of chicken-stock, or water and stock-cubes (to taste). The mix should burst into an aromatic cloud of steam, that fills the room with a sharp chilli-garlic fragrance! This is delicious, but powerful; so don’t place your head directly over pan when adding the liquid!

The water will start to evaporate fairly quickly under the high heat. Before this happens, open a can of full-fat coconut milk and stir this into the mix, making sure to scrape the can clean with a spatula. If more water is required, add this in and season well. You want the liquid to be the consistency of a thin soup. As the dish simmers, it will soon thicken up.

Take 2-3 courgettes and cut into ‘zoodles’ with a spiraliser or julienne-peeler (see the following link for more details – courgette-noodles). Add the noodles to the sauce and simmer for 5 minutes until cooked through. At this point, squeeze in the juice of one lemon or lime and sprinkle in your chopped coriander leaves, reserving a few to garnish.

By this time, the sauce should be rich, thick and glossy. Taste to adjust the seasoning (including ‘warmth’ of flavour by crumbling in another half chicken-stock-cube) and then add powdered sweetener to ‘round’ the taste-profile. I suggest a small half-teaspoon, but this will naturally depend on how much chilli you used and your personal preference. Once all is to your liking, remove the pork from the oven, ladle the laksa into bowls and arrange the pork-pieces on top. Finish the dish by garnishing with a sprig of coriander and a slice of lime. Truly delectable in every way!

Browse this and other recipes by picture on my pinterest page: country walks in ketosis pinterest.

Thanks for reading and bon ap!

Adam.

Cheeseburger ‘Des Vosges’ with Chorizo, Green Beans & Mangetouts – ‘cultured’ low carb fast food

WP_20150105_20_29_43_Pro

I’ve always been a firm believer that you ‘can’t improve on a classic’! But I equally believe that you can give it a holiday! This dish does exactly that. The humble cheeseburger packs its passport and a weekend bag and departs on a European jaunt… one that takes in the best of culinary Spain and France all in one recipe!

Fromage Des Voges originates from the Alsace region of France. This territory has swapped ‘ownership’ countless times in history between Germany and France. As a result, it’s truly the ‘crossroads of Europe’ and steeped in heritage which presents a peculiar cultural identity. Its food is pleasing in its breadth and diversity and the cows which produce this cheese graze on what I can only term as a ‘herby cud’, inclusive of the odd pine-needle. The cheese’s depth of flavour is therefore second to none, with a dense almost chewy bite and mellow soft rind; just the thing to lend our cheeseburgers an interesting cultural twist and give them a story to tell after their travels! Naturally however, if you can’t get hold of ‘des vosges’; any full-bodied soft French cheese will hold its own admirably!

As for chorizo, this is always a ketogenic-dieter’s best friend! It’s low in carbs and possesses the remarkable ability to ‘pep’ up other ingredients by its delicious deep, savoury taste. I always keep some in the fridge to lend pizzaz when my vegetable supplies are getting low or simply border on the mundane. The cured sausage’s distinct ‘smoked paprika’ flavour, means that just a little goes a long way; making it the perfect store-cupboard staple for use in a vast array of recipes.

As always on this blog, this recipe is low-carb and great for diabetics and those on a ketogenic-diet. There’ll be no impact to blood-sugars or any change to insulin-levels (a good thing for us all!). There’s also no gluten, so those with an intolerance will be fine.  This recipe has another string to its bow however – it’s incredibly quick and easy; from fridge to plate in 20 minutes! This makes it a great dish for a week-night, when you’re late home from work and want something that’s fast yet packed with flavour! One final attempt to convince you…? It tastes wonderful in every way!

Start by preparing your vegetable accompaniment. Slice your chorizo into half-centimetre chunks and sauté in olive oil in a broad-based pan until the chorizo starts to brown. At this point add a finely sliced onion and a red pepper cut up into bitesized pieces. Soften these in the chorizo oil then crush in a clove or two of garlic and add a bit of chopped chilli to taste. Cook on a high heat then deglaze the pan with a generous slug of red wine or port. Top and tail your green beans and tumble these into the pan, adding a half-centimetre’s depth of water to the vegetables. Crumble in a stock-cube or two to provide some background flavour then leave to simmer on a low heat for 10 minutes or until the beans are cooked through.

Meanwhile heat a heavy-based pan or skillet on the hob then drizzle in a small amount of oil. When sizzlingly hot, place in your burgers and cook for two minutes on each side until brown. A comment I always make is ‘not to mother your food’. Don’t poke and prod at it; meat is ready to be turned once it comes away freely from the bottom of the pan., If you attempt to do this before the surface has sealed and caramelized, the meat will rip; and you’ll be left with an unattractive mess. Simply ‘nudge’ the burgers with a wooden-spoon; they’ll come away when they’re good and ready. Not before.

Having turned the burgers it’s time to layer on your cheese. Be generous here; no-one likes a miser. Once the cheese is piled up resplendently on top, transfer the pan to the oven to allow the topping to melt. At this stage, add your mangetouts to the vegetable pan and place the lid on firmly.

Cook both the burgers and greens for circa two minutes, until the vegetables have ‘lost their rawness’, yet still retain a defiant crunch. The cheese should be oozingly melted and delicious. Serve these up in jiffy and enjoy!

Browse this and other recipes by picture on my pinterest page: country walks in ketosis pinterest.

Thanks for reading and bon ap!

Adam.

Top 10 Low-Carb Starters

If you’re just starting a ketogenic- or low-carb diet for the New Year, food choices can sometimes seem a little daunting!

Never fear however; County Walks in Ketosis has a huge library of delicious LCHF recipes to help along the way.

The ketogenic-diet has no restriction on calories, portion-control or the quantity of food you eat. As a result, delicious starters are very much to be enjoyed, as long as they adhere to the broad range of keto-friendly foodstuffs. This range is so wide however, that the only problem you’ll experience is deciding what to cook first!

To provide a little inspiration, I’ve assembled my top 10 ‘starter’ recipes from this blog. Simply click on the title/hyperlink below to take you straight to the relevant page.

All recipes can be browsed by picture on my pinterest page: country walks in ketosis pinterest.

Top 10 salads:

1. King-Prawn, Courgette & Mascapone Roulade

2. Oven-Warmed Camembert with Truffled Bresaola & Rocket Leaves

3. Thai Smoked Haddock Fish-Cakes

4. Creamy Broccoli & Stilton Soup

5. Smoked Salmon, Prawn & Quail’s Egg Florentine

6. Asparagus, Cream-Cheese & Parma-Ham Tartlets

7. Timbale of Leek, Parmesan & Crayfish Tails

8. Norfolk Crab, Avocado & Brown Shrimps

9. Fiery Padron Peppers

10. Pan-Seared Fillet of Cod in Vermouth & Basil

Enjoy browsing and thanks for reading. Bon ap!

Adam.

Top 10 Low-Carb Salads

adampaulgarner's avatarcountry walks in ketosis

If you’re just starting a ketogenic- or low-carb diet for the New Year, food choices can sometimes seem a little daunting!

Never fear however; County Walks in Ketosis has a huge library of delicious LCHF recipes to help along the way.

Salads are great as a quick low-carb lunch, healthy starter or side-accompaniment to a main-course. They’re ready in minutes and are bright, colourful and fuss-free!

To provide a little inspiration, I’ve assembled my top 10 salad recipes from this blog. Simply click on the title/hyperlink below to take you straight to the relevant page.

All recipes can be browsed by picture on my pinterest page: country walks in ketosis pinterest.

Top 10 salads:

1. Paprika-Chicken, Bacon, Edam & French-Beans

2. Spinach, Asparagus & Goat’s Cheese

3. Emmental, Smoked Ham & Avocado

4. ‘Russian Millionaire’s’ Salad (you’ll quickly see what I mean)

5. Padron-Peppers with Parmesan & Salami

6. Greek…

View original post 33 more words

Top 10 Low-Carb Puddings / Desserts

If you’re just starting a ketogenic- or low-carb diet for the New Year, food choices can sometimes seem a little daunting!

Never fear however; County Walks in Ketosis has a huge library of delicious LCHF recipes to help along the way.

Life isn’t complete without puddings! And unlike a low-fat diet, the ketogenic-plan permits a full range of delicious, indulgent and fuss-free desserts, which will still allow you to lose weight and enjoy your food to the max!

To provide a little inspiration, I’ve assembled my top 10 pudding recipes from this blog. Simply click on the title/hyperlink below to take you straight to the relevant page.

All recipes can be browsed by picture on my pinterest page: country walks in ketosis pinterest.

Top 10 salads:

1. Velvety Vanilla Cheesecake

2. Malibu, Coconut & Chocolate Brownie Pots

3. Tira Misu Cake (personal favourite!)

4. Chocolate Almond Roulade with Brandy Cream

5. Sparkling ‘Gin Fizz’ Jellies

6. Indulgent Dark Chocolate Layer-Cake

7. Madagascan Vanilla & Pecan Crowns

8. Rich Spiced Cranberry Cheesecake with Macadamia Crunch

9. Chocolate Orange Mousse with Almond Stars

10. Dark & Delicious Coffee & Walnut Cake

Enjoy browsing and thanks for reading. Bon ap!

Adam.

Top 10 Low-Carb Salads

If you’re just starting a ketogenic- or low-carb diet for the New Year, food choices can sometimes seem a little daunting!

Never fear however; County Walks in Ketosis has a huge library of delicious LCHF recipes to help along the way.

Salads are great as a quick low-carb lunch, healthy starter or side-accompaniment to a main-course. They’re ready in minutes and are bright, colourful and fuss-free!

To provide a little inspiration, I’ve assembled my top 10 salad recipes from this blog. Simply click on the title/hyperlink below to take you straight to the relevant page.

All recipes can be browsed by picture on my pinterest page: country walks in ketosis pinterest.

Top 10 salads:

1. Paprika-Chicken, Bacon, Edam & French-Beans

2. Spinach, Asparagus & Goat’s Cheese

3. Emmental, Smoked Ham & Avocado

4. ‘Russian Millionaire’s’ Salad (you’ll quickly see what I mean)

5. Padron-Peppers with Parmesan & Salami

6. Greek Chicken & Aubergine

7. Smoked Mackerel & Green Beans

8. Avocado, Bacon & Blue Cheese

9. Prawn, Pepper & Celeriac

10. Classic Caesar Salad

Enjoy browsing and thanks for reading. Bon ap!

Adam.

Warm Paprika-Chicken, Bacon, Edam & Green-Bean Salad with Tangy French Vinaigrette – a fast, delicious keto lunch!

WP_20150102_12_41_11_Pro

This dish is everything a salad should be – fast, effortless and full of flavour! Just the thing for a delicious low-carb lunch or nutrient-packed starter!

I always feel that salads should be as visually pleasing as they are rich in flavour. The addition of bright yellow and red cherry-tomatoes serve to lift the dish and provide a splash of much needed ‘cheery colour’ amidst the grey of winter!

All ingredients are low in carbohydrate, so are suitable for a ketogenic diet, or those with diabetes or a gluten-intolerance. But as always, the contents of this salad can be varied in line with whatever you have available at the time. Chicken, bacon and cheese however form a delicious taste-combination which delivers outstanding results every time!

Details of how to make the vinaigrette can be found under the following link: classic French vinaigrette. I strongly urge you to give this a try. It’s incredibly easy and will rapidly become a store-cupboard staple. You can use it to dress pretty much any salad, as well as a lot of hot dishes, to include vegetables such as celeriac, winter cabbage or sautéed peppers. Its moreish tangy flavour will complement a huge range of ingredients – no kitchen-cupboard can be complete without it!

Start by pan frying your bacon in a little butter to prevent it sticking. Once nice and crisp, lift out of the pan and place on kitchen-paper to drain. Add your chicken to the pan (I used leftovers from another dish, but you can equally use thinly sliced strips of chicken breast or finely diced brown meat, such as thigh or leg). As soon as the chicken is in the pan, dust it lightly with a generous sprinkle of paprika and season well. Continue to sauté, stirring occasionally, for a good 5 minutes, until the outsides start to crisp. Then lift the chicken out of the pan and set to one side to cool slightly.

Keep the pan on the heat and turn up your stove to the highest temperature. Pour in a centimetre of water and bring this to the boil. Whist the water is coming to the boil, top and tail French beans then add them to the pan when the water is ‘rolling’. Cook for two minutes then plunge into cold water so that they retain their vibrant colour and crispness.

The final usage for your pan is to cook a couple of eggs (I love one-pan dishes – it really economises the washing-up!). I used quails eggs because we had them in after Christmas, but hens’ eggs are an equal delight! The cooking method is quite up to you – you can poach, fry scramble or make into an omelette then slice to form strips. I opted for the quick sautéing method – one minute and they’re done! Once cooked, transfer the eggs to kitchen-towel to drain.

Into your salad bowl, place a good couple of handfuls of fresh green salad and follow this with your drained green-beans (I always pat them dry with kitchen-paper to avoid a ‘watery salad). Ladle a couple of spoonfuls of vinaigrette over the top and mix in well with your hand or a spoon. Season enthusiastically, then start to layer up your bacon and chicken.

Disperse the above with slices of cherry tomato and thinly chopped Edam cheese. If you don’y have Edam, any comparative cheese will do. Preferably you want something with a bit of texture, to serve as a contrast against the other ingredients. For this reason alone I’d avoid soft cheese, but I certainly shan’t judge you if you over-rule this advice!

Once all your ingredients (chicken, bacon, cheese, tomatoes, salad-leaves and eggs) are stacked into a delicious pile; finish the dish with a final flourish of vinaigrette and some chopped basil.

Low-carb doesn’t get much better than this! And all in 10 minutes!

Browse this and other recipes by picture on my pinterest page: country walks in ketosis pinterest.

Thanks for reading and bon ap!

Adam.

Classic French Vinaigrette – the ultimate salad dressing (plus it’s low carb!)

WP_20150102_12_27_16_Pro

You can’t beat a classic! French vinaigrette must be the definitive dressing for salad. Rich, thick and tangy, it’s incredibly versatile and can be served with a myriad of different things. As such, it’s a store-cupboard staple, and no kitchen can be considered complete without it!

Despite its wonderful taste and ease of preparation, few people seem to get it right. The dressing should be thick and emulsified; more of a coating than a pouring dressing. The flavour should have just the right amount of sharpness, thereby able to cut through strong ingredients such as cheese, smoked fish and cured meats. I always think it’s at its best when served simply however; tossed over crisp green leaves or crunchy French beans. When topped with a light shaving of parmesan, such dishes become a delicious meal in themselves!

A common mistake with vinaigrette is the use of olive oil. This will result in an unattractive suspension which quickly separates. You’re left with a green sludgy liquid which tastes as bad as it looks. In my experience, the best oil to make vinaigrette is sunflower oil. It’s light in flavour, which allows the other ingredients to deliver the taste. If all you can taste is oil then there’s very little point! You may as well stick with that and save yourself the effort!

Another positive is that French dressing is also incredibly low in carbohydrate. This makes it brilliant for a ketogenic diet, and eminently suitable for diabetics or those with a gluten-intolerance. Keep it in the cupboard to ‘dress up’ a quick low-carb lunch or starter. You’ll soon wonder how you ever got by without it!

The recipe is incredibly cheap and easy to follow. I always make it in a big batch, as it keeps for months. The below makes just over a pint and a quarter, so you can keep it in a sealable Kilner jar, ready on hand for whenever you need it.

Into a food-processor with the blade attachment, rip in a good handful of fresh parsley leaves and crush in two cloves of garlic. The parsley serves to ‘calm’ the taste of the raw garlic, thereby delivering a light, mellow flavour, rather than a dressing which tastes of garlic alone. Sprinkle on a large pinch of coarse-salt and grind in a good whack of pepper.

Pulse these in the food-processor until the parsley is finely chopped. At this stage, spoon in two large tablespoonsful of Dijon mustard and squeeze in the juice of one lemon. Measure 100ml of white-wine vinegar and pour this on top, then start the motor to form a busily whirring pale-yellow mix.

Into a jug, measure out 600ml of sunflower oil and then pour this very slowly into the processor’s funnel, the motor going all the time. You want the oil to be added as a constant drizzle. Too much to quickly will mean the mix separates and does not emulsify. The dressing will soon thicken to a thick mayonnaise-like consistency. Once all the oil is incorporated, stop the motor and give the dressing a taste,

The flavour should be pleasantly sharp, but not so vinegary as to make you wince. If it needs more oil, add this slowly until the flavour tastes right. Hey presto, your dressing is done!

Spoon the vinaigrette into a Kilner-jar and then gaze lovingly at it with pride! Your salads will soon become the envy of all your friends and lunches need never taste flat again!

Browse this and other recipes by picture on my pinterest page: country walks in ketosis pinterest.

Thanks for reading and bon ap!

Adam.

New Year’s Diet? Why not try the ketogenic plan? Lose weight & become a fitter, happier, healthier ‘you’!

Looking to lose a few pounds in the new year? Why not give the ketogenic diet a go…?

  • Delicious, satisfying food
  • No hunger pangs
  • Fast, sustainable weight loss
  • Great for diabetics
  • A diet you can physically ‘test’ to be sure it’s working (take the guesswork out of progress)
  • Increased energy levels
  • Stable blood-sugars – no more energy peaks and troughs!

Browse the following links to find out more:

What is the ketogenic diet?

How does it work?

What can I eat?

To give you a flavour of the mouth-watering food, take a look at my recipes & browse by picture on my pinterest page: country walks in ketosis pinterest.

Give it a go and feel for yourself the difference it can make!

Make 2015 a year of change!

Good luck and thanks for reading,

Adam.

Crispy Roasted Duck with Aromatic Almond & Saffron Cauliflower-Rice – a delicious, indulgent low carb treat!

WP_20141223_21_10_44_Pro

Some dishes are just so delicious there won’t be a scrap left on the plate. So much so, you’ll want to cook them time and time again. Well this recipe is certainly one of those! Crispy spiced duck with cauliflower-rice, studded and jewelled with almonds and saffron.  Quite simply sublime!

Duck is a particularly succulent meat, with a strong rich flavour. When cooked in the right way, the skin goes ‘cracklingly’ crisp, whilst the meat below remains tender and meltingly soft. There’s also a wonderful sense of pride when you carry a plump golden bird to the table. It’s majestic in its finery and remains one of those rare dishes which truly feels like a special treat. The cook’s reward is an army of empty plates, scraped ‘clean as a whistle’ – strong testament indeed that the meal was both appreciated and expertly cooked!

This dish may sound complicated, but is actually incredibly easy to do. All you need is a little time and a good hot oven. This simplicity is echoed in the cauliflower-rice, which is every bit as tasty as the duck itself. The delicate scent of saffron perfectly complements the robust flavours of the duck, and the rice looks truly beautiful when studded with almonds and bright coloured peppers.

Orange-flower water and zest add to the dish’s aromatic profundity; indeed duck and orange is a flavour-partnership which has endured for centuries! All the above is elegantly lifted by the lightest whisper of chilli, which serves to cut through the richness and balance the flavour… a veritable ‘symphony of taste’!

Duck is perfect for a ketogenic diet. Low carb dishes can sometimes lack that satisfying ‘filling’ quality, but this delivers on all levels! There’s no gluten, so those with an intolerance to wheat will be fine; as will diabetics and those on a paleo-regime because there’s no dairy. Everyone is welcome at the table – the more the merrier!

Start by preparing your duck. Make sure it’s at room temperature, then dust the skin lightly with a mix of equal-quantities of garlic-salt and smoked paprika. Season all over and then leave to sit for 20 minutes to develop in flavour. You can leave this over-night if you like, but I’m impatient! Once rested, season all over then sprinkle a little dried oregano over the skin. Place the bird breast-side down into an oven-dish, then into a hot oven it goes for 40 minutes to an hour, until the skin on the underside goes crisp.

Roasting the duck upside down at first will mean that all the fat and juices sink down into the breast, preventing it from being dry. Once golden and brown on the underside, turn the bird over and re-season the top, making sure to provide enough salt that the skin crisps up and turns a fine, succulent bronze. This will take a further half hour to 45 minutes.

Once the duck has been turned, you’re ready to start on the cauliflower-rice. Cut the cauliflower into florets and pulse these in a food-processor until the texture is as per rice grains. It’s best doing this is batches, so that the food-processor doesn’t turn the lot into purée!

Once chopped, place a wok or wide-bottomed pan onto the hob and add in butter & a little olive-oil (so the butter doesn’t burn). Sauté a finely sliced onion and garlic for around four minutes, then add chopped chillies and a small sprinkle of cumin (quantity subject to preference for both). We don’t want this to be too overpowering, so tread lightly (I used a de-seeded green chilli, finely sliced and half a teaspoon of spice). Thinly slice half a green, red and yellow pepper and add these at the same time as the chilli.

Cook the vegetables through for a couple of minutes, then pour in your cauliflower-rice. Stir authoritatively, so that the whole lot is well-coated in butter, then sprinkle on grated orange zest and your saffron strands. Follow this with a couple of chicken stock-cubes for background flavour, and a small capful of orangeflower-water. If you don’t have this, the orange-zest should suffice. I use it because it provides a delicate ‘floral’ note, which adds to the exotic, aromatic quality of the dish.

Whilst this is cooking through, toast a handful of flaked almonds under the grill until they start to char and smoke around the edges. The aroma from this is mouthwatering. For some reason it always reminds me of Christmas & hot roasted chestnuts!

Meanwhile, take your duck out of the oven and cover well with tinfoil to rest for circa 15-20 minutes. It should be richly bronzed, and slightly red from the paprika. The aroma should speak for itself; there’s no need to describe to you how good this will be!

Taste the rice to adjust the seasoning and check that the cauliflower is cooked through. We’re looking for tender, but still keeping its bite. Sprinkle the toasted almonds on top and remove the pan from the heat.

Transfer the duck to a pre-heated serving platter and pile your rice all around. Garnish with a final flourish of toasted almonds, chopped herbs and few strands of orange-zest for colour.

Carry to the table with pride and ‘dig in’ whilst the duck is still piping hot! Delicious!

Browse this and other recipes by picture on my pinterest page: country walks in ketosis pinterest.

Thanks for reading and bon ap!

Adam.

Creamy Broccoli & Stilton Soup – hearty, filling & low carb…

soup

Winter is a time when food must be hot, hearty and plentiful. It’s cold outside, and the kitchen provides the perfect remedy to that; both in terms of the cooking itself and the delicious dishes it produces.

Whenever I think of Winter, hot mugs of soup come immediately to mind. Soup is incredibly easy to make and wonderfully filling. It’s also very economical and a great way to use up any leftovers which can’t quite make it in quantity to stand on their own two feet!

This broccoli and stilton soup makes a hearty low-carb lunch or starter. As such, it’s great for diabetics or those on a ketogenic diet because the only carbohydrate in the whole thing is cellular, coming directly from the broccoli itself (2.13g net carbs per 100g = very low!). It will keep for several days in the fridge, but I very much doubt it will last that long!

If you don’t have stilton, any firm blue cheese will do (danish blue, st agur, roquefort &tc). You don’t need much, which is why this dish is great for using up odds and ends. We always buy lots of stilton & blue cheese at Christmas time, so often end up with various assorted bits of this and that. They all go in however, with simply stunning results!

Take a large onion and roughly dice. Place a deep casserole onto the hob, with butter and a little oil, then add the onion and cook this until it starts to turn translucent.

Whilst the onion is looking after itself, chop your broccoli and rinse lightly. In it goes to join the onion, then pour on water so that the vegetables are well submerged. Don’t go overboard on the water – it’s easy to add more, but you’ll end up with watery soup if you add too much. Rule of thumb? Just enough to cover the contents; more later…!

Crumble in a couple of chicken stock-cubes & dried herbs, then place the lid on the pan and simmer for 20 minutes until the vegetables are soft enough to collapse when pressed against the side of the pan with the back of a wooden spoon.

Finely dice your blue-cheese, then sprinkle this in (quantity to taste). Stir around, so that the cheese begins to melt; then go in with a stick-blender until smooth. Pour in a splosh of cream, then taste to check for seasoning. If you need a little water to thin things down, then add this in small quantities until your reach the desired consistency.

Ladle into bowls and eat whilst piping hot. Just the thing for a cold, winter’s day!

Browse this and other recipes by picture on my pinterest page: country walks in ketosis pinterest.

Thanks for reading and bon ap!

Adam.

Classic Beef Bourguignon with Celeriac & Mange Tout – low carb perfection!

WP_20141230_20_56_32_Pro

Anyone who says that a low carb diet is difficult to follow is obviously not doing it properly! Take this dish for example… Generous chunks of 30-day matured beef, sautéed in butter then slowly simmered in red wine with garlic, mushrooms and herbs. Few things could be more delicious or more appetising! There’s a reason that this dish has been so universally celebrated for so long… quite simply, it’s perfection itself!

Because it’s very low in carbs, this dish is ideal for diabetics and ketogenic-dieters alike. You never know, paleo-fans or gluten-intolerants may want to give it a go too. The more the merrier!

The name bouguignon takes its roots from the French red wine of Burgundy, where the dish originates. The wine is soft, velvety smooth and rich in flavour (most definitely my favourite!). Without this, purists would argue that it can’t be called a bourguignon. In all honesty however, any good French red will yield equally pleasing results; they’ll just lack the authenticity and a bit of the smoothness of the original.

Don’t be put off by thinking this may be too complicated. The dish itself couldn’t be simpler. All you need is good quality ingredients and a reliable heavy-based casserole. When people refer to French cookery, they don’t mean a list of complex ingredients or fiddly, time-consuming recipes. They’re actually referencing a way of cooking. French cuisine is a methodology; a time-honoured discipline, designed to bring the best out of ingredients. When the French refer to the ‘art of cookery’; art in French means type or style. The ‘French-style’ requires the mastery of a few basic techniques which, once learnt; will deliver consistently outstanding results.

One of these competencies is the classic French method of cooking meat. There’s a stately ritualism to this process, which is almost comforting in its cadences. The succulent sealing-in & caramelisation of the meat is followed by the slow softening of shallots & garlic; then deglazing the pan with a magnificent whooshing ‘sigh’, as wine hits the thirsty metal-surface of the pan. As the kitchen fills with the delicious aroma of melting butter, fresh herbs and pan-seared meats, you’ll begin to feel like an alchemist creating pure gold from the very simplest of ingredients. It’s truly an art worth learning!

Start by sealing your beef. This must be room temperature and dry to the touch.  Heat a metal-lined sauté-pan on the hob (non-stick doesn’t deglaze with pleasing results) and throw in a knob of salted butter followed by a dash of oil. The sizzle should be a rewarding sensation in itself, as should the aroma.

Add your beef to the pan and seal on each side until it’s golden brown and deliciously caramelised. You must excuse me for constantly repeating myself, but it needs to be said…! Do not fuss around with the meat in the pan or move it until it’s good and ready. No-one likes to be mothered; why do it to your dinner?! When the beef is ready to be turned, it will release itself of its own accord in response to the merest touch with finger or wooden-spoon. If it sticks, it’s not ready. We want the meat to caramelise and brown; not steam! And do not crowd it in the pan or the same will happen!

Once the meat is beautifully golden on each side, lift out of the pan and tip in sliced shallots & chopped garlic. Soften these until translucent and just starting to brown, then add sliced mushrooms and simmer these until coloured. Once done, crank up the heat as high as you can. This is not some obscure act of retribution, you simply want the pan to be as hot as possible for when you pour in the wine. That way, you’ll deglaze with the maximum effectiveness, lifting all the caramelised flavours straight off the bottom of the pan.

Once it’s good and hot pour in a large glass full of red wine, making sure to stand over the pan and enjoy the cloud of sweet, alcoholic steam which billows beautifully out into the kitchen! Once the liquid has all but evaporated, place your beef back into the pan and pour in a enough beef stock (or water and stock cubes) to ensure that the meat is just submerged. Dissolve a small teaspoon of Dijon mustard into the pan and add a bay-leaf or two for warmth. Simmer for 10 minutes then stir in a good handful of chopped parsley, place the lid onto the pan and put the casserole into a medium oven for 1-2 hours (the slower the better!).

In the last hour of cooking, prepare your celeriac. Peel ‘the big ugly’ and dice into 1cm chunks. Add a spoonful of butter to a broad pan and sauté the celeriac for a couple of minutes on a medium heat. Finely slice an onion and a clove of garlic then add these to the pan and cook for a couple more minutes until the onion starts to soften. At this point, pour in chicken stock (or water and some stock cubes) until the liquid just covers the vegetables. Season well and simmer for circa 40 minutes more until the liquid had reduced and the celeriac starts to break down when pressed with a wooden spoon. If you like, you can add a handful of grated cheese. Cheddar, emmental or gruyere would be perfect. Take the pan off the heat and garnish with a sprinkle of herbs.

Remove the casserole from the oven and place onto the hob on a very low heat. In a mixing bowl, add one small teaspoon of cornflour and whisk in enough water to form a thin ‘pourable’ paste. Make sure to whisk sufficiently to avoid any lumps. These will ruin the sauce and be unpleasant to eat. You may wonder at the addition of flour for a low carb diet. Cornflour is an incredibly potent thickener. The amount you’re using will provide only a tiny quantity of carbs, circa 5-10g for the whole dish. Per portion it will only be a couple of grammes! If you’d rather leave it out, I’d quite understand, but as everything else is very low in carbohydrate, I don’t see this small sacrifice as a problem – the results will be worth it! Stir the cornflour paste into the beef and simmer for a minute or two until the sauce thickens.

All that remains is to ladle the bourguignon into bowls and spoon on your celeriac mix. Few dishes could be more luxurious and resplendently rich than this one. Be sure to enjoy every last mouthful. We certainly did!

Browse this and other recipes by picture on my pinterest page: country walks in ketosis pinterest.

Thanks for reading and bon ap!

Adam.

The Big Switch – a diabetic’s move from glucose to a low-carb ketogenic diet…

As the homepage of this blog informs, one member of our household (Nicholas James) is a type 1 diabetic.

My own research on the subject highlighted that a ketogenic diet can also be brilliant for diabetics. This is due to its ability to lower insulin-dependence and stabilise blood-sugars. Two weeks into my own diet, NJ also decided to take the plunge and try it for a day. The results were so good, so immediately, that he’s still going strong and hasn’t looked back!

The ‘big switch’ was a nerve-racking thing however. We did it as a process of experimentation unsanctioned by the medical profession! After all, it is not current guidance in the UK for the treatment of diabetes and there is precious little information available on the subject, particularly if you’re a type 1 diabetic.

The only way to see whether it worked therefore was to try it! We took small steps but soon found that it was far easier than we’d thought (if you’re not eating carbohydrate, you don’t need much insulin – bingo!!!). But enough from me; over to someone who can tell you more with specific regard to diabetes. Over to you NJ…

“Hello again.

Last time I wrote about my experience in the summer of 2013, when I found out I was a Type 1 diabetic. It’s funny to think that my life just 20 months ago was a time when bread, pasta, chocolate and fruit juice could be consumed without a second thought. Just over a year on, and it feels as if I’ve always been this way, and the strange thing is, I really don’t mind it.

As a nurse pointed out to me in the hospital, the good thing about diabetes is that it makes you far more aware, on a daily basis, of the things that your body doesn’t really appreciate. Of course, I can’t now have a sugary treat each day, drink apple juice with breakfast, snack on a cake between meals or be care-free with food like a ‘healthy’, ‘normal’ person can. But, in my mind, this unexpected disease that hit me in my early 30s, was a wake up call to make sure I took active care of my body into middle age and beyond. Something maybe people without diabetes wont do until it’s too late.

So for one year I followed the NHS guidelines for a diabetic diet: Low fat, healthy, carb intensive and accurately balanced out with appropriate doses of insulin.

A typical daily food intake would be:

Breakfast: Porridge with sweetener, nuts and berries.

Snack: Banana and digestive biscuit.

Lunch: Tuna Salad and oatcake biscuits, banana.

Snack: Apple

Dinner: Chicken leg, pearl barley, green beans, low fat fruit fromage frais.

It worked well and I was very pleased with my results. A 12 unit dose from an Insuman Comb25 pen before breakfast, and the same again before dinner saw my blood glucose levels maintained between 5 and 10…most of the time.

I say most of the time, because I had a daily dip at around 10.30am where my sugars crashed down to around 3.1, then post lunch I may jump up to 12.0, before dipping again in the afternoon. Pre-dinner I tended to be around 6.0, but then could be, depending on what time we ate, anything up to 10.0 before bed.

Despite being told by medical staff that “it was the blood glucose score before eating that mattered”, I just didn’t like this constant see-sawing action between lows and highs. Indeed, I later discovered that it is the fluctuations between high and low blood sugars that cause a lot of damage to the body and ultimately lead to the complications associated with diabetes.

Adam was moving towards a ketogenic diet for weight-control, so I thought I’d look into whether this could work for diabetics. In his best selling book, Dr. Richard Bernstein seemed to advocate that the LCHF diet offers a solution to this constant battle between injecting insulin and topping up glucose, that many diabetics face.

Without the advice or guidance from any of my doctors I decided to give it a go. Carefully at first, by lowering my insulin to 8, and dropping my carb intake slowly over a couple of days, until I reduced it to no carbs at all. The immediate effect was that my insulin dose was far too high, and I went quickly into hypoglycaemia. By adjusting this down to a dose of 3, I plateaued to a constant reading of 5 on my blood metre. Not just 5 before food, but a consistent and constant reading of between 5 and 6 no matter what time I tested my blood, which I did so frequently during this trial. This was proving a success!

However, the effects were not all positive – but I had been reading ahead and was expecting the consequences of chyanging to a keto-regime. The increased thirst, headaches, queasy feelings and nausea lasted for a couple of weeks. I also started losing weight more rapidly than Adam, which worried me as I thought I was re-entering a state of ketoacidosis. However, my weight then plateaued at 12 stone, which was my ideal weight according to the BMI.

So far, so good! I’m delighted with my blood sugars, I’ve lost a bit of weight and I feel that I have more energy, particularly when I’m running. What’s not to love about this take on healthy diabetic eating – I just hope my doctor agrees.

I wonder what he will say…”

Thanks for reading,

Adam.

Creamy Bacon, Mozzarella & Courgette Bake with Oven Roasted Pork Loin – the best of a low carb diet!

WP_20141229_20_30_01_Pro

Anyone on a ketogenic diet will soon learn to appreciate courgettes as a delicious, reliable staple. They’re incredibly adaptable and can be used in an infinite number of dishes: zoodles, roulade, rosti, or equally a simple weeknight recipe such as this; courgette & mozzarella bake.

Courgettes pick up the favour of anything they’re cooked with, so garlic and bacon form the perfect backdrop for this rich and velvety smooth dish. The zucchini turn buttery soft in the oven, and baked mozzarella complements this wonderfully. Melted cheese is mouthwatering at the best of times – here it blends into the cream to form a decadent, indulgent sauce which is truly delicious!

Because the gratin is so smooth in texture, I’ve teamed it with roasted pork belly. This goes wonderfully crisp in the oven, and serves to contrast and counterpoint the softened courgettes and cream. The combination is incredibly moreish – we had no leftovers whatsoever, all plates were scraped clean! This is music to any cook’s ears; as such, this dish comes highly recommended.

The carb-count is very low, so diabetics and ketogenic-dieters need have no concerns over impact to blood-sugars. There’s no gluten, so those with an intolerance needn’t worry also. Above all however, it is quick and easy to prepare, so can be done any night of the week. In this cold wintry weather, we all crave comfort-food, and it couldn’t get more comforting than this! Give it a go and make sure to tell me how you got on…

Start by sautéing diced bacon in a thick-bottomed gratin-dish or casserole. I used butter and a drizzle of oil to prevent the butter from burning. Add a finely sliced onion and cook until this starts to turn translucent. At this point add chopped garlic and 2 large sliced courgettes (one per person). Continue to cook these on the hob for 5 minutes or so, until the courgettes start to brown and soften.

Meanwhile heavily season your pork belly strips and place onto a baking tray. Oven bake these at the top of the oven until they go crisp and succulent. This should take circa 30-40 minutes in a hot oven.

Once the pork has gone in to roast, crumble a couple of chicken stock-cubes into your sautéing courgette mix for background flavour.  Then stir in double cream until the whole lot is just submerged. Dice mozzarella and mix this in so that it’s evenly distributed throughout. Season well and top the lot with a large handful of grated hard cheese such as cheddar or parmesan. This gives the dish that delicious brown ‘crispness’ on top. A quick sprinkle of dried herbs, then into the oven it goes for circa half an hour until the top is golden and bubbling.

Once all is ready, serve up the lot whilst still piping hot. You can also serve salad or green vegetables alongside if you like, but one thing is definite: big hearty bowlfuls are a must! There’s no better way to enjoy comfort food like this, so huddle up warm and dig in!

Browse this and other recipes by picture on my pinterest page: country walks in ketosis pinterest.

Thanks for reading and bon ap!

Adam.

Buttered Bacon ‘Brussels’ with Parmesan – the perfect low carb winter vegetable!

WP_20141222_20_51_24_Pro

Winter fare should be rich, hearty and plentiful – and that naturally includes delicious side dishes and interesting ways to prepare vegetables.  Brussels sprouts are a perfect example of how a relatively ‘plain’ vegetable can be transformed into a thing of wonder with a simple twist in its preparation. Around Christmas time ‘brussels’ are in abundance, so take advantage of the seasonal glut and try something a little different from the norm… You won’t regret it!

I must admit that I’ve never been a particular fan of sprouts! That’s until I prepared them in this way – richly sauteed in butter and garnished with a generous grating of parmesan. They retain a delicious peppery ‘nutty’ bite, sufficiently tasty to win over even the toughest of ‘anti-sprout-protesters’! Give this recipe a go and you’ll soon see what I mean. Once tasted, you’ll never prepare them any other way!

Sprouts are a great green vegetable for a low carb diet. At around 5-6g net carbs per 100g, they’re brilliant for diabetics and those on a keto- or paleo-plan. They’ll be no impact to your blood-sugar and they’re packed with micronutrients, making them supremely ‘good for you’, as well as being a perfect keto-friendly foodstuff.

Start by dicing smoked bacon and adding this to a heavy-based saute-pan with a large spoonful of butter. Cook this until it starts to colour, then add a finely sliced onion and a crushed clove of garlic. Continue to saute these until the onion is soft and translucent.

Meanwhile, prepare your sprouts. Cut off the tough base stalk and halve the individual sprouts lengthways. The tougher outer leaves will fall off, which is no problem – simply discard these as the inner leaves have a much nicer texture. Once ready, add your sprouts to the pan and turn up the heat. An extra spoon of butter will help to soften them as they cook.

Pour on a centimetre’s depth of white wine or vermouth, then crumble in a couple of chicken stock-cubes. These provide a background warmth which ’rounds off’ the flavour and combats any acidity. Simmer the brussels for about 20 minutes until tender or until the liquid has evaporated. Season well, then stir through a generous grating of parmesan cheese and chopped basil.

Tumble into a serving dish and rush to the table whilst still piping hot. Delicious!

Browse this and other recipes by picture on my pinterest page: country walks in ketosis pinterest.

Thanks for reading and bon ap!

Adam.

Roasted Guinea Fowl with Cauliflower & Chickpeas in a Cumin & Coconut Sauce – low carb and delicious!

guinea fowl

Guinea-fowl is a wonderful thing – beautifully simple to cook and absolutely delicious to eat! Its taste echoes the rich depth of flavour found in pheasant, but lacks the ‘gaminess’ which many people find off-putting. There is also none of of the dryness which can plague game, or poultry like turkey. For this reason, it comes highly recommended and if you haven’t tried it before, I strongly urge you to give it a go. You won’t be disappointed!

Because guinea-fowl has a richer flavour than chicken, it can carry the weight of stronger tasting accompaniments. For this reason I’ve chosen to pair it with cumin, coconut, lemon and a slight hint of chilli. These serve to ‘lift the denseness’ of roasted meat and provide a cleansing ‘zing’ to the palette.

To provide a little textural variation, I’ve also added chickpeas. These have a slightly higher carbohydrate content than other keto-friendly vegetables (circa 10-11g net carbs) so they should therefore be consumed in moderation. They’re packed with micronutrients however, plus they have a lot of dietary fibre; so are a nice addition to the low-carb repertoire if used sparingly!

In spite of the chickpeas, this dish is brilliant for diabetics and those on a ketogenic diet. What carbohydrate there is, is slow-release; so it won’t impact your blood sugar. Paleo-dieters can also dig in, as can those with a gluten-intolerance, because this dish is gluten free! No excuses therefore, so dig in!

Start by roasting your guinea-fowl. Very little fussing is necessary. If you wish to insert a peeled onion and a dessertspoonful of butter into the cavity , then this can only enrich the dish. There’s no need however; it tasted wonderful when I did it without, so it’s up to you. Season your guinea-fowl all over, then place it breast-side down into an oven-dish. Roasting it upside down for the first hour will mean that all the fat and juices sink down into the breast, preventing it from being dry. Once golden and brown on the underside, turn the meat over and re-season the top, making sure to provide enough salt that the skin crisps up and turns a fine, succulent bronze. This will take a further half hour to 45 minutes.

Peel and slice an onion, then sautée this in a little butter & oil, making sure that the butter doesn’t brown. Add chopped garlic and chilli, volume dependent on how strong you like things. Soften these until the onions are translucent. Then add a generous dessertspoonful of cumin powder.

Whilst this is filling the kitchen with a heady aroma, chop your cauliflower and tumble it into the pan. Drain a can of chickpeas and add half of this to the pan, saving the rest for another day. If you have a higher carbohydrate threshold than circa 20g a day, then feel free to add the whole can! Then pour on a centimetre depth of water and season. Whilst the water is reducing, open a can of coconut milk (make sure it’s full fat) and add this to the pan. I also like to crumble in a couple of chicken stock-cubes for ‘warmth’.

Take the guinea-fowl out of the oven (it should be golden brown and succulent) then transfer to a pre-heated serving dish to rest. Add any roasting-juices to your cauliflower-pan – this will add richness and depth of flavour. Then cover the bird well with tinfoil so that it doesn’t get cold.

Meanwhile continue to simmer your cauliflower mix on a low heat for 10 minutes or so, until the coconut milk starts to thicken. Add a tablespoon of desiccated coconut for texture and body, then stir and give the sauce a good taste. Depending on how much chilli you’ve put in, the dish will probably need a little sweetening. Xylitol is very much the low-carb, diabetic-friendly sweetener of choice. It’s 100% natural, doesn’t lose its sweetness in cooking (unlike tabletop sweetener) and behaves exactly like granulated sugar. I couldn’t praise it enough!

Once the taste is adjusted to your preference for sweetness & seasoning, remove from the heat and add a generous squeeze of fresh lemon juice.

Spoon the cauliflower mix onto your serving dish beside the guinea fowl. Make sure to pour over any delicious sauce left in the pan – this is no time to scrimp! Finish the dish with a generous handful of chopped herbs (coriander or basil are just perfect). Then simply enjoy!

Browse this and other recipes by picture on my pinterest page: country walks in ketosis pinterest.

Thanks for reading and bon ap!

Adam.

Week 11 – Sun 14th December

weight loss 14.12

Well, I’m eleven weeks in now. Just to remind you all, I started the ketogenic diet at 15 stone, 10 pounds. My goal is 12 and a half stone, by mid-March 2015. This means a target weight-loss of 2lb per week.

Week Eleven’s target-weight therefore? 14 stone, 2 pounds. Waistline measurement only once a month, so not this week.

This week has presented particular challenges. We’re away on holiday in the German Christmas Markets. This is truly a land of carb-temptation! Beer, noodles, cake, dumplings, mulled-wine – all things a ketogenic-diet strictly forbids. Okay, at the time of writing this, we’ve only been here one day, but I must admit to having broken the rules and cheated, even on day one. I’ve had a couple of beers and food that looked carb-free but I have my doubts…

This morning the ketone-strips tested negative so I think I’ve pushed myself out of ketosis. Knowing how volatile the pounds and ounces can be, I step tentatively onto the scales… Can just one day’s cheating be reflected in weight…?

14 stone, 8 pounds. That’s another pound off! The downward trend continues and this week’s reading presents a 1lb weight-loss from last week. The ‘1lb pattern’ seems to have settled into a routine over the last four weeks, so I’m pleased. I’m officially 6lb behind target, but as I’ve stated in previous posts, I’ve accepted that speed is not an issue. As long as I’m losing weight, that’s all that counts. I’m now 1 stone & 2 pounds lighter than I was eleven weeks ago. This is a brilliant feeling – I’m now just about 14 and a half stone – that sounds so much better than 15 stone 10!

Being on holiday is hard on a diet – not because the food on a ketogenic regime is unappetising, simply because cooking it is so much harder. Out of necessity a large number of meals are consumed in pubs and restaurants, where one never truly knows what one’s eating, irrespective of the waitresses’ assurances.

The holiday-apartment also only seems equipped to cook the most basic of meals – boiling pasta etc (not keto-friendly!).  I have a lot of kitchen equipment at home – things like a food-processor to make cauliflower-rice and a spiraliser to do courgette-noodles. None of this exists in the holiday-flat; even fresh coffee is difficult! Add to this, the large store-cupboard of ingredients I have at home. I can make cakes and sweet things, but on holiday I don’t really want to go to all the expense of buying things in for just one week. We wouldn’t use half of them, and I’d have to end up binning food which I hate. In short therefore; a ketogenic diet relies 100% on real home-cooked food, when the ability to do this is curtailed, things become more of a challenge!

In spite of that, I’m here to have a good time. If I gain a pound or two over the week, then that’ll be no real problem – I can always lose them again! I didn’t come to Germany to spend my entire time in the kitchen, so some compromise is in order. I’m still highly motivated to achieve my goals (holiday or no holiday) – the plan is a long-term thing; so ‘short-term’ is simply a temporary obstacle!

Please do ‘look in’ on me next week to see if I make further progress towards my targets. Or there’s always the alternative that I’ve gained a few pounds!  Either way, I find it really positive to have people read this – the support is a massive encouragement!

Thanks again for reading, and have a great week,

Adam.

The Low Carb Christmas – Snowy White Coconut, Malibu & Chocolate-Brownie Pots

coconut malibu pots

We may not be guaranteed a white Christmas, but that’s all the more reason to bring the magic of a snowy white winter to life in the kitchen. These delicate coconut and chocolate pots perfectly capture the essence of Christmas food and will lend the festive table a touch of icy sparkle. As magnificent in taste as they are in appearance; this dish delivers an air of elegance and sophistication which delights & enchants on all levels. So give it a go and let me know how you get on!

This recipe is truly a symphony of contrasts. The dark chocolate richness of the cocoa brownies is set off beautifully by the brilliant white of coconut. The velvety smoothness of the syllabub is interrupted & heightened by the dense chewiness of cake. And the zing of Malibu coconut-rum lifts the sumptuous creaminess of the mousse. It’s a dish of perfect balance; for that reason I cannot praise it enough!

Because there’s no sugar or flour, this pudding is wonderful for diabetics, ketogenic-dieters, and those with an intolerance to gluten. And because they’re so simple to make, they’ll remove some of the ‘cooking pressure’ from your shoulders, and can be made well in advance. Given the frantic busyness of Christmas, this is a huge bonus to cook and kitchen alike!

Start by making the brownies. Measure 4oz of xylitol sweetener into a bowl. I always use xylitol in baking. In my experience, it’s the only sweetener which retains its sweetness once cooked; and its granular texture means that it behaves exactly like sugar in cake-recipes. Cream this with 4oz of unsalted butter, then mix in 2 beaten eggs. When smooth, fold in 2oz of ground almonds, 2oz of dessicated coconut, a half-teaspoon of baking-powder and 1oz of good quality cocoa. The texture should be a spreadable, if reluctant dropping-consistency.

Line a 9×7 inch baking-tray. Spread the mix so that it covers the bottom of the tray. Bake in a moderate oven for circa 20 minutes until the cake is resistant to the touch and springs back when pressed. I’d have a quick check after 15 minutes – the trays’ shallow depth and large surface area will mean this cooks quickly! Remove from the oven and place on a wire rack to cool.

Meanwhile, prepare your coconut topping. This requires coconut milk and gelatine. People can often be a little shy of gelatine, as they think it’s fiddly and difficult to use. This couldn’t be further from the truth. Make sure you buy a good quality leaf gelatine; you’ll have no problems and quickly realise how easy it is!

Start by soaking gelatine leaves for 5 minutes in cold water. Four leaves will make a pint of mix. Once they’ve soaked, drain the water and squeeze out any excess liquid with your hand. Set a 1/4 pint of water on to simmer, with 3oz of sweetener. Once this is almost at the boil, remove from the heat and stir in your gelatine.

Empty a can of coconut-milk (400ml) into a jug and whisk until smooth. Add 3-4 tablespoons of tabletop-sweetener and a good glug of Malibu coconut rum. Pour your gelatine into this and whisk again, to incorporate all together.

Break your chocolate cake into bite-size pieces and arrange covering the base of your serving dishes. You can either use individual glass bowls as I have, or make a larger trifle in one big bowl. Sprinkle a further teaspoon of Malibu over each portion of cake, then ladle your coconut/gelatine mix over this until your reach the top of each bowl. If the sponge floats to the surface, don’t worry; this lends visual appeal and creates ‘texture throughout’. If you’d rather keep it classically ‘layered’, ladle on a little of the mix and set this in the fridge for 20 minutes first.  After that you can top up the pots as above, but the set layer will keep the cake from rising up and give you a pretty ‘striped’ finish. It’s entirely up to you which effect you go for; I must admit that I chose the path of least resistance!

Place your bowls in the refrigerator to chill over night. In the morning, they’ll be beautifully set and luxuriously smooth! Decorate with a sprig of holly and some strands of orange zest for colour et voila! Your pots are complete. Simply take to the table and serve up with pride!

Be sure to keep reading for more festive recipes over the coming weeks! Check out The Low Carb Christmas for details.

Enjoy the festive season and thank you for reading,

Adam.