Smoked Cod, Leek, Pepper & Parmesan ‘Pesto Parcels’ – delicious low carb fast food!

WP_20150119_20_36_42_Pro (1)

Sometimes all we want is something that’s quick and easy but in no way compromises on taste! Well this recipe is just that! Team it with a green salad as a starter or light lunch; or serve with steamed vegetables and roasted celeriac for a more substantial main course. Either way, this is a perfect dish for those evenings when you’re late home from work and don’t fancy using every pan in the kitchen! A chopping-board, sharp knife and a baking-tray are all you need; then 15 minutes later, dinner is served!

The taste-combination of smoked cod, parmesan and basil-pesto is divine! The three flavours are all equally robust, so they complement & carry each other in perfect equilibrium. The vegetables go velvety smooth and the cheese melts down into the sauce, forming ‘swirling layers’ of flavour – it’s amazing how something so simple can deliver such profound results!

There’s practically no carbohydrate here at all, so ketogenic-dieters and diabetics will be in ‘food heaven’. As will those on a paleo-regime or coeliacs, as there’s no gluten to worry about; just food as nature intended!

On a sturdy chopping-board, finely slice half a leek and half a yellow pepper. Pile these into the centre of generous tinfoil sheets, then spoon a teaspoon of basil-pesto on top of each pile. Shave some parmesan curls into the centre with your knife, then lay your smoked cod fillets across the lot.

Grind on some black pepper, then fold the edges of the tinfoil into the centre to form square ‘parcels’. Onto the baking-tray they go, then into a hot oven for 10 minutes until the fish is cooked through.

When they’re good and ready, simply unfold the parcels and spoon the fish into your serving-bowls. Pour the vegetable contents and sauce all around, then pile up your green salad on the side. Hey presto, dinner is served!

Browse this and other recipes by picture on my pinterest page: country walks in ketosis pinterest.

Thanks for reading and bon ap!

Adam.

Minute Steak with Red Leicester, Celery, Eggs & Caesar Leaves – a quick & delicious low carb lunch!

WP_20150117_15_51_58_Pro

Low carb food can be incredibly quick – take this delicious minute steak salad for example; from pan to table in less than 10 minutes!

The key to a good salad is not only taste, but texture! Celery is always a great addition as it provides instant crunch. This contrasts wonderfully with the firm bite of the cheese, the velvety lightness of eggs and the moreish ‘density’ of the beef steak. This is truly the perfect balance; as rich in flavour as it is in consistency. And so simple, you’ll want to cook it time and time again!

You can buy good quality Caesar dressing, but to be honest; making your own is so quick and easy, why would you want to compromise on taste? In this recipe I’ve used Red Leicester cheese because I love its nutty flavour and cheery brightness. Any firm, full bodied cheese will work just as well however. This can be done with cheddar, Emmental or even Manchego. The world is your oyster!

This recipe contains virtually no carbohydrate. As such it’s great for diabetics and those on a ketogenic diet. There’s also no gluten, so coeliacs and those with an intolerance need have no concerns. If you’re on a paleo-regime then you might wish to hold back on the cheese; but why deny yourself, is what I say…? Take advantage of the rich palette of low-carb foods available and you can’t go wrong!

Start by making your dressing. I have a separate post on this (Caesar Dressing recipe), but I’ve quickly outlined the process below for speed and convenience…

In a small food processor, whizz up a couple of anchovies and half a clove of garlic. The flavour of the garlic intensifies over time, so if you’re not going to eat all the dressing straight away, it’s best to err on the side of restraint. Add to this a small squeeze of lemon juice, a small handful of grated parmesan cheese, half a cup of good olive oil and half a cup of double cream. You can also add an egg yolk if you like, but bear in mind that raw egg will shorten the shelf-life. Give these a good blitz in the processor until smooth and emulsified, then taste to adjust the seasoning if required.

Toss you salad leaves in the dressing then pile these up into an impressive mound on your serving plate. Shave a few curls of parmesan cheese over the top to ‘add theatre’, then slice your Red Leicester and stack this up the side, like steaks on a bonfire.

Place a heavy-based saute-pan onto the hob and drizzle in a little oil, followed by a knob of butter. Season your steaks on both sides, then fry in the pan for one minute each side (hence the name!) until pleasingly browned but not overcooked! Lift these out, then arrange on your serving-plate next to the salad in an attractive fan (yes; I was born in the 1970s!).

Finally, crack a couple of eggs and lightly fry these in the remaining butter and steak-juices. When done to your liking, scoop them out with a fish-slice and place them atop your steaks to seal in the heat.

Voila! Your low-carb lunch is ready. Serve up onto generous plates and dig right in!

Browse this and other recipes by picture on my pinterest page: country walks in ketosis pinterest.

Thanks for reading and bon ap!

Adam.

Souffléed Bacon & Egg ‘Cheddar Bake’ – a quick & elegant twist on the traditional ‘low carb’ breakfast!

WP_20150118_13_36_17_Pro

I’m always heard to say ‘you can’t improve on a classic’; well sometimes you can give it a holiday! And this is precisely what I’m doing with this classic English breakfast dish: bacon and eggs! What’s the twist? Souffléing the eggs to give a small touch of French refinement and add variety to this much loved, everyday British staple.

Eggs and bacon will always be the friend of any ketogenic / low-carb dieter. A breakfast of healthy proteins is the best way to start the day; but first thing in the morning, the frying-pan sometimes feels a little much, a little too soon for the stomach to warm up to! Well this variant takes away all the mess and odour of frying, and is the perfect dish for a lazy weekend breakfast, or when friends & family come to stay. You can even prepare it as a quick late night supper; at dusk or dawn it’s equally delicious and promises success every time!

People are often scared of the word ‘soufflé’. But it’s actually an incredibly easy technique; all you have to do is understand the process, then you’re off and away!

When you cook an egg it turns from liquid to solid. You see this when you fry an egg, scramble it, poach it &tc. It’s the protein which solidifies in heat; and a soufflé is no different from this. The act of a soufflé rising is the same as a cake. Hot air rises, which lifts the mixture upwards. Then, once the right temperature is reached, the heat solidifies the egg-proteins and the air-bubbles are ‘locked’ in place. Meringue has the same process – the proteins form a hard, crystalline structure which supports and holds up the rest of the mixture – quite simple, and quite marvellous!

If the egg-whites hold something up, what is it they’re holding? The answer to this is your soufflé mix, which carries the flavour of whatever you’re cooking. In this recipe I’ve chosen grated cheddar cheese and Dijon mustard, but the process is the same for all. Whatever your ‘flavour-bearing mix’ is made of, you need to ensure that it’s the texture & consistency of melted chocolate. It’s that easy. Follow this rule of thumb and you’ll have perfect soufflés every time!

Before I jump the gun and detail the recipe in full, it’s worth noting that these are wonderful for a ketogenic diet, as they contain virtually no carbohydrate! This makes them ideal for diabetics or those who do not include gluten in their regime. You can make soufflés with no ‘solids’ at all; just the basic ingredients. This means they’re cheap, versatile and incredibly quick! Now do you see why I love them?

Start by laying your bacon rashers into the bottom of a baking dish. Place this into a hot oven for 10 minutes until the bacon is cooked through and turning crispy around the edges. I allowed 6 rashers for 2 people.

Whilst the bacon is cooking, you can start your egg-whites. In a clean mixing-bowl (I use a copper bowl as this stabilises the whites far better than anything else); separate 4 eggs, placing the yolks in a smaller bowl to form your mix. When it comes to separating eggs, I must admit to ‘not being flashy’. I simply crack them on the side of the bowl and strain the white through my fingers.

Once your eggs are separated, whisk the whites until they form stiff peaks. Volume should be minimum 8 times what you started with, and you should be able to upturn the bowl over your head and the mixture stays in situ (if it doesn’t then you have only yourself to blame!). The whisking forms valuable aerobic exercise for the cook. I strongly recommend that you do it by hand and don’t cheat by using an electric whisk! This way, you get to ‘understand’ the ingredients more, and get a true feel of how things work.

Into the bowl with the egg-yolks, season well & scatter in a generous handful of grated cheese and a half-dessertspoonful of Dijon mustard. Now bear in mind my rule of thumb above. You want this mix to be the consistency of melted chocolate. To achieve this, mix in double-cream until you have the right texture. You shouldn’t need much; three or four tablespoons maximum.

Now scrape some of your egg-whites to the side of their bowl and add your soufflé-mix. This will need to be folded into the whites with a good metal spoon. If you simply mix this in, you’ll knock out all the air. Folding is exactly as it sounds – you turn the mixture over on top of itself, so that gravity does the work, not your spoon! At no point should you be cutting through the middle of the mix, you just want to continue lifting and turning until the two are incorporated. It should be a pleasing, yellow, moussey texture, with traces of white still visible and air bubbles prevalent throughout.

Take your bacon out of the oven and ladle your egg-mix all over. Into the hot oven it goes for circa ten minutes. If your oven has a glass-front, you can have the joy of watching it rise. I’m fortunate enough to have an aga, which means I can open the door and peek in with no danger of the temperature falling.

You’ll know it’s ready when well risen and lightly firm to the touch. The surface should be evenly coloured a light ‘caramel’ shade.

Serve up straight from the oven. The top will sink down within a couple of minutes, so make sure your admiring onlookers are already in place at the table when you take the dish out of the oven! All in all, incredibly straightforward, fuss-free and delicious – oh, and yes; a trifle grand!!

Browse this and other recipes by picture on my pinterest page: country walks in ketosis pinterest.

Thanks for reading and bon ap!

Adam.

Succulent ‘Crispy Crackling’ Roast Pork with Buttered Leeks, Spinach & Celeriac – warming, filling & substantial, plus delciously low-carb

WP_20150108_20_36_41_Pro

There’s something truly mouth-watering about succulent roast pork, topped with a thick crunchy layer of crackling. This is winter ‘comfort food’ at its very best; just the thing to eat in front of a roaring fire when all outside is icy & unforgiving.

During these long, cold & dark evenings, food fulfils a greater role than sustenance alone. The heart and soul both crave a break from the grey monotony; and food provides this – it satisfies and nurtures, keeping the chill at bay and bringing a sense of warmth to more than just the stomach alone! And the cook is the provider of this relief. There’s a great joy in the hearty fare of winter, and preparing food like this is a way of showing love and care for friends & family. The appreciation & gratitude it receives is more than ample reward; as are the empty plates, scraped clean in indication that ‘you’ve done well’ and your efforts were worthwhile!

On a low-carb diet however, food can sometimes lack this feeling of filling, substantial warmth. All too often, the dieter will fall back on quick dishes of green vegetables and salad; both delicious in their own right, but ill-suited to the ravages of winter and the simple, robust fare it requires!

On a ketogenic diet, fat provides the principal sense of satiety, so pork-crackling can be tucked into without guilt or fear of piling on the pounds! Diabetics and those on a paleo-regime can equally reap these rewards, as can those with an intolerance to gluten, because this dish contains no wheat or carbohydrate beyond the natural fibre-based cellular-carbs in the celeriac itself.

Start by bringing the pork to room temperature on a plate in the kitchen for an hour or so before cooking. Pat the surface of the meat dry and season the skin liberally with rock salt and black pepper. Place a heavy-based pan on the hob and heat a little butter and oil until it’s good and hot, then add your pork, skin-side down, enjoying its splutter of protest as the meat hits the pan.

Continue to seal this on the hob for a few minutes on each side until all is golden and brown; then add a roughly chopped onion and a couple of cloves of crushed garlic. Once these have had a couple of minutes of high heat, pour on a glug of white wine or dry vermouth to lift the flavour from the bottom of the pan, then top up the liquid with chicken stock (or water and stock-cubes) until the meat sits waist-high in liquid. Now simply transfer the pan to a hot oven to roast for an hour or so, until the skin is deliciously crisp and caramelised.

Whilst this is in the oven, prepare your celeriac. Peel ‘the big ugly’, then dice it into 1cm chunks. In a sauté-pan heat a little more butter and oil and add finely sliced onion and a roughly chopped leek. Cook these until translucent, then tumble in your diced celeriac & crushed garlic, stirring well to prevent it sticking. Cover the pan’s contents with chicken stock and leave  to reduce, stirring occasionally until the liquid has all but evaporated.

At this point, lift out a piece of celeriac and (giving it a good blow) test the vegetables for tenderness and seasoning. We want it so that the celeriac is ‘melt in the mouth’ and tenderly soft. If there is still resistance, add more water and continue to reduce as before until the desired texture is reached.

Once the texture is as we want it, take your pork out of the oven to allow it to ‘rest’. Cover the joint with a double layer of tinfoil to prevent it getting cold, then you can start on your spinach.

Rinse this well, then add it to the pan, retaining whatever water is still clinging to the leaves. Stir this in, then allow to cook for a further 5 minutes until the spinach has wilted thoroughly and all water is staved off. I never cease to be amazed at how much spinach shrinks down in volume. My only point of comparison is my food budget at the end of the month! It’s always equally surprising how that diminishes so quickly; leaving me with a mere fraction of what I started with!

When all is cooked, stir a knob of butter through the vegetables and grate on a fine shaving of parmesan cheese to add a salty counterpoint to the richness of chicken-stock and leeks. Serve up your pork onto a pre-heated plate and spoon the vegetables to one side, garnishing the lot with freshly chopped herbs.

Cut the cracking into chunks and eat with your fingers, enjoying each crunch as it comes! Truly delectable in every way!

Browse this and other recipes by picture on my pinterest page: country walks in ketosis pinterest.

Thanks for reading and bon ap!

Adam.

Pot-Roasted Half-Leg of Lamb with Peppery Wasabi Cauliflower Cheese – low carb winter comfort food to warm the heart & soul

WP_20150112_21_26_46_Pro

It’s amazing how a small twist on a classic recipe can give a ‘once familiar dish’ a whole new lease of life & take it to new heights! Well this reinterpretation of cauliflower cheese is one such example.  The addition of wasabi-paste to a simple cheese-sauce completely revamps an already delicious recipe; but one that can sometimes verge on the bland and unexciting…

The hot peppery taste of wasabi goes brilliantly with lamb. It serves to cut through the richness and lift the flavour, the same reason why lamb is often served with a vinegary mint-sauce. I wouldn’t team wasabi with many roast meats; but lamb has a depth of flavour which is strong enough to carry it off. Chicken or pork would risk becoming ‘lost’ when faced with such a powerful bedfellow; but lamb is more than up to the challenge, and for this reason, I salute it!

The other strong advantage to lamb is that it’s at its best when simply left to do its own thing. You can leave it all day in a low oven and it just gets better and better! The meat becomes unctuously soft and melts off the bone at the merest suggestion of a nudge with a wooden spoon. The kitchen is also filled with the rich savoury aroma of roasting meat, which is truly mouthwatering! Amidst the cold of winter, we need food like this! Food that is filling, substantial and robust (a thing which low-carb recipes can often lack!).

Cauliflower is brilliant on a low-carb diet however. With only 1.5g net carbs per 100g, there’ll be no insulin-spiking or raise in blood-sugar levels, which makes it perfect for diabetics or those on a ketogenic-plan. It’s paleo-friendly and gluten-free, so its deliciousness and versatility can also be enjoyed by coeliacs. For this reason it’s become a firm favourite of my low-carb kitchen and I cannot recommend it highly enough!

Start by seasoning your piece of lamb on all sides and sealing the meat in a mix of butter & oil on a high heat in a heavy-bottomed pan. Once the joint is coloured and golden on all sides, tumble in chopped onion, leeks & a couple of cloves of crushed garlic, and continue to sauté these until the vegetables turn soft to the touch with a wooden-spoon.

At this point, stop stirring the mix and allow the heat to build up. After a minute or two, deglaze the pan with a good glug of port or red wine and crumble in a stock-cube or two for background flavour. Then pour on water until the pan’s contents are ‘waist-deep’ in liquid. Add a couple of bay-leaves and some dried herbs, then transfer the pan to a slow oven (circa 140-150°c) for 3-4 hours until the meat is soft, tender and succulent. If you have concerns that the meat may dry out, place a lid on the pan and turn down the heat slightly – every cooker is different; I have an aga so there’s none of the risk of air-scorching the meat which can sometimes occur in a fan-oven.

If you take the ‘lid-on approach’, remove the lid for the final half-hour of cooking. This means that the lamb will develop a crisp, delicious crust on top – delightful in every way! When ready, remove the pan from the oven and cover with the lid or tinfoil to allow the meat to ‘rest’ for 20 minutes. This should be done for all roasted meats, which would otherwise lack that ‘melt in the mouth’ quality if eaten straight from the oven.

An hour before you’re ready to eat, bring a large saucepan of water to the boil, filled to a couple of inches depth. Place in your cauliflower, then steam it through with the lid on until a knife goes in with a slight resistance. In this instance I left the cauliflower head whole, but you can equally cut this into florets if you wish to save time or want more or a ‘gratin effect’. Once cooked, drain the water from the pan and place to one side.

In a second heavy saucepan, add a cup and a half of double cream to the pan and place this onto a low heat. Grate a good whack of cheese and sprinkle a generous handful into the cream, to melt slowly. Season the sauce, then spoon a half-dessertspoonful of wasabi paste into the mix. If you prefer things a little less intense, feel free to add less; simply taste the sauce, adding the wasabi at intervals until you get to a flavour-strength that’s right for you. Leave the sauce on the hob, stirring occasionally for 5 minutes or until the cream has thickened to the texture of a rich custard.

Now simply ladle your sauce over the pre-cooked cauliflower and top the lot with your remaining grated cheese. Dust the top with a sprinkle of dried herbs, then into a medium oven it goes for circa 30 minutes until the surface is golden brown and bubbling.

Hey presto, your dinner is ready! Rush both lamb and cauliflower to the table and dig in with aplomb! Few dishes can be more delicious than this. If you have guests, it’s nice not to tell them about the wasabi-sauce – you can then watch their faces transform with wonder and surprise at the unexpected intensity of this wolf in sheep’s clothing!

Browse this and other recipes by picture on my pinterest page: country walks in ketosis pinterest.

Thanks for reading and bon ap!

Adam.

Wintry Pork ‘Bangers’ with Leeks, Savoy & Paprika – satisfying, filling & low carb!

WP_20150117_21_23_44_Pro

In Winter, food should be satisfying, filling and plentiful! When it’s cold outside, the heart & soul crave something with substance; and this dish is the perfect thing to ward off the chill! It’s robust in flavour, yet quick and easy to prepare; plus has that ‘added bonus’ of being a ‘one-pot-dish’, so you won’t be standing over the sink for hours or juggling 10 different pans at once! It’s one of those dishes which can simply be ‘left on the hob’ for 20 minutes, whilst you get on with something else (like write a blog…).

There’s truly a wonderful affinity between sausages and cabbage. It’s a combination that can only be described as ‘hearty’, both in texture and taste! The flavoursome ‘warmth’ of leeks and bacon provides a delicious background depth; all topped by a generous sprinkle of parmesan cheese, which melts in slowly & adds a delicious salty ‘tang’. This is definitely one of those dishes to ladle into bowls and eat curled up on the sofa in front of a favourite film. As such, it’s the perfect dinner for a cold Winter’s evening, when all you want is honest, rustic comfort-food!

Because savoy cabbage is wonderfully low in carbs (1.57g per 100) this dish is great for a ketogenic-diet or those on a paleo-plan. There’s no gluten, so coeliacs can tuck in without qualms; as can diabetics, who won’t experience any impact to blood-sugars or have to ramp up their insulin-levels to account for it! My one word of advice concerns the sausages. Read the packet carefully, as many sausages contain breadcrumbs. Most supermarkets stock a gluten-free variant however, or ask your butcher who’ll be more than obliging! Low-carb sausages are in no way difficult to find, you just have to check before you buy that what you’re buying is right! It’s important to remember the net-cabs rule too (see here for details).

Start by cutting your smoked-bacon into a fine dice. If you can get pre-cut lardons, all the better! Place a heavy-bottomed pan onto the hob and melt in a little butter and a dash of oil to stop it burning. Then tumble in your bacon and seal this on a high heat for 2 to 3 minutes.

Roughly slice your leek and add this to the pan, along with your sausages. Continue to cook these for circa 5 minutes, until the sausages start to brown slightly and the leeks begin to collapse with the press of a wooden-spoon.

Meanwhile, thinly slice your savoy cabbage and give it a good rinse. Once the sausages begin to colour, deglaze the pan with a little port or red-wine, then stir-in your cabbage. Crumble in a chicken stock-cube and sprinkle over a good teaspoon of paprika. Follow this with a generous sprinkle of dried herbs (sage, oregano or thyme are perfect) and a dessert-spoonful of Dijon mustard. Depending on how much water was left on the cabbage, pour in boiling-water until you have circa 1/2 a centimetre’s depth, then place the lid firmly on the pan and simmer for 10 minutes until the cabbage wilts down and turns tender. Then remove the lid and continue to cook on a low heat until the liquid is all but evaporated.

Once the water is staved off, stir well and check for seasoning. Sprinkle a generous handful of freshly grated parmesan over the top and tear over some basil leaves to garnish.

Then simply ladle into bowls and enjoy… delicious!

Browse this and other recipes by picture on my pinterest page: country walks in ketosis pinterest.

Thanks for reading and bon ap!

Adam.

Port-Braised Pheasant with Celeriac Forestière & Buttered Broccoli – low carb winter comfort food

WP_20150110_21_25_25_Pro

In January, local game is in plentiful supply. Pheasants, pigeons & partridges have had a joyous time, feeding off the rich Autumn harvest for three long months. The fruit of the fields & hedgerows has developed in them a fine deep flavour, plus contributed an insulating layer of fat. This lends them succulence & tenderness in the pot, which game-birds bagged earlier in the season tend to lack. This is truly ‘free range food’ at its best, and nature’s wildness can be tasted in every mouthful!

When all is cold and grey outside; the kitchen becomes a place of sanctuary. Its warm oven & bubbling pans make it the perfect haven to ward off the season’s bitter chill. In January, we need satisfying comfort food like this dish, to nurture us through the dark months and break the monotony of food which often seems to lose its vibrancy.

Pheasant can have a tendency to be on the dry side; as such it requires careful cooking. This doesn’t mean that it’s difficult or fiddly to cook; simply that it needs plenty of liquid and sumptuous lashings of butter to bring out its best! Here I’ve paired it with buttered broccoli & celeriac ‘forestière’. Forestière is a traditional French dish, taking its name from the woodlands where mushrooms are grown & foraged. The recipe traditionally also uses bacon, onions, herbs and garlic. This makes it deeply rich in flavour, with a ‘taste of the wild’ which compliments our pheasant perfectly! This dish can also be adapted to the more classical usage of chicken – but I feel we can go one better than that!

The use of celeriac makes this recipe wonderfully low in carbohydrate. With a net-carb value of circa 5.5g per 100; it’s a vegetable which can be enjoyed by ketogenic-dieters, diabetics, paleo-fans or simply anyone just wishing to avoid the stodge of potatoes! They’ll be no impact to your blood-sugar and none of the ‘bloat’ which classically accompanies a high-carb meal. The flavour of celeriac is also absolutely delicious, with a sweet, nutty taste that enriches stocks, sauces and even salads when eaten raw. The low-carb kitchen can’t get enough of it, so put it on your weekly shopping list!

Start by liberally seasoning your pheasant. Place a heavy bottomed pan on the hob and melt in a knob of butter and a little oil. Once this is piping hot, seal the pheasant, turning after a minute or two on each side until all is golden.

Now add diced bacon lardons to the pan and a finely sliced onion. Once the onion has softened and turned translucent, crush in a clove or two of garlic and chopped mushrooms. I used chestnut mushrooms and a small handful of dried porcinis. If you’re lucky enough to have morels, then I envy you, as these makethe perfect dish! Sauté all for a further couple of minutes to build up the heat. Now deglaze the pan with a generous glug of port (I advise placing your nose into the whooshing cloud of steam. You’ll be rewarded with a richly alcoholic ‘sigh’ – the cook’s true perk, and one which should never be passed up).

Once the port has reduced by half in volume, add diced celeriac (chopped to cubes of circa 1cm) and pour on chicken stock (or water and two stock cubes) to a depth that is ‘waist-high’ to the pan’s contents. Sprinkle in fresh or dried herbs and give the pan a good stir. I opted for thyme and sage because of their warmth of flavour. I always feel however that herbs are a matter of personal preferance – use what you like and you can’t go wrong! Then into a hot oven it goes for circa one hour, making sure to turn the pheasant over half-way through to brown the topside.

Once cooked remove from the oven and check for seasoning. Cover the pan with tinfoil and leave the pheasant to ‘rest’ for ten minutes, so that the meat can ‘relax’. Meanwhile bring a centimetre of water to the boil in a pan and steam your chopped broccoli for a couple of minutes until tender, but still retaining its bite. Drain this and top with a generous spoonful of butter. Placing a lid on the pan and giving it a good shake will ensure that the vegetables are all finely coated.

Then simply transfer your pheasant to a pre-heated serving dish and ladle the sauce all around. Pile your broccoli to one side and dig in! January comfort-food doesn’t get any better or more delicious than this! Hearty, satisfying warmth – truly food for the soul!

Browse this and other recipes by picture on my pinterest page: country walks in ketosis pinterest.

Thanks for reading and bon ap!

Adam.

Light & Delicate ‘Classic Vanilla Soufflés’ – the perfect low carb pudding!

WP_20150110_21_29_07_Pro

Soufflés are truly the perfect low carb pudding! Light, airy & indulgent; few things can be more delicious or quick to prepare. The texture is melt in the mouth, like eating ‘a cloud’; and when you break the surface with a spoon, the most delicious scented ‘sigh’ emerges, resplendent with delicate aromatic vanilla. It’s definitely one of those ‘me moments‘, which we all need more of in life!

People are often afraid of soufflés, believing them to be difficult or high risk! Well that belief couldn’t be further from the truth. If you’ll excuse the pun: they’re a piece of cake! All you have to do is understand the process, then you’re off and away!

When you cook an egg it turns from liquid to solid. You see this when you fry an egg, scramble it, poach it &tc. It’s the protein which solidifies in heat; and a soufflé is no different from this. The act of a soufflé rising is the same as a standard cake. Hot air rises, which lifts the mixture upwards. Then, once the right temperature is reached, the heat solidifies the egg-proteins and the air-bubbles are ‘locked’ in place. Meringue has the same process – the proteins form a hard, crystalline structure which supports and holds up the rest of the mixture – quite simple, and quite marvellous!

If the egg-whites hold something up, what is it they’re holding? The answer to this is your soufflé mix, which carries the flavour of whatever you’re cooking. In this recipe I’ve chosen classic Madagascan vanilla, as I find the soft, perfumed aroma perfectly suits the light, cloud-like texture of the soufflé itself. You can use any number of things however – lemon, orange, chocolate, coffee; you can also make savoury soufflés (watch this space…!) with ham, cheese, garlic &tc. The process is the same for all. Whatever your ‘flavour-bearing mix’ is made of, you need to ensure that it’s the texture & consistency of melted chocolate. It’s that easy. Follow this rule of thumb and you’ll have perfect soufflés every time!

Before I jump the gun and detail the recipe in full, it’s worth noting that these are wonderful for a ketogenic diet, as they contain virtually no carbohydrate! This makes them ideal for diabetics or those who do not include gluten in their regime. I use almonds in this recipe, but you don’t even need those. You can make soufflés with no ‘solids’ at all; just the basic ingredients. This means they’re cheap, versatile and incredibly quick! Now do you see why I love them?

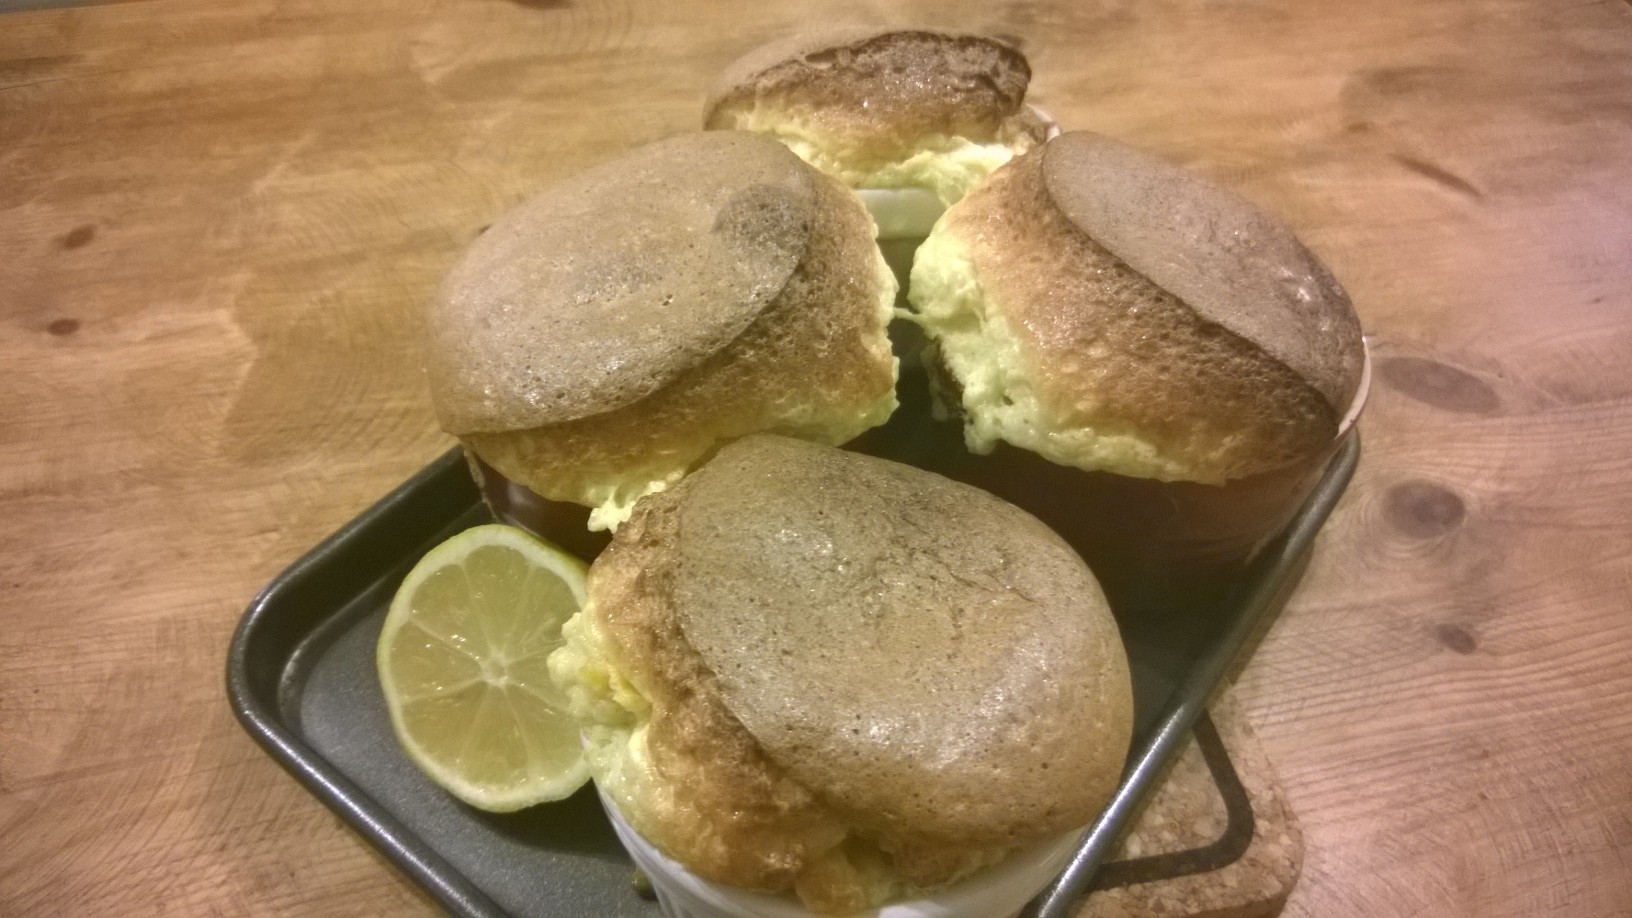
Start by preparing your soufflé dishes. Butter these liberally with a piece of greaseproof-paper. Your soufflés will rise better if you give them something to climb up, other than just butter. What do I mean? They’ll climb the walls of the dish a lot more reliably if they get a handhold – sprinkle some ground almonds or sweetener around the ramekin, all over the butter. This gives them a ‘rough surface’ to grip to as they rise. I must confess in this recipe however, I did these with just butter. I wanted to demonstrate that you can still get great results if you simply follow the principals of the exercise, without insisting on rigid doctrine & process to the letter! My aim is to demonstrate flexibility, not a sequence of off-putting rules! They’ve therefore risen higher on the side with the greatest heat – you’ll find that the rising will be more uniform if you treat them a little better than I did, and give them a ‘trellis’ to climb up!

Once your dishes are ready, you can start your egg-whites. In a clean mixing-bowl (I use a copper bowl as this stabilises the whites far better than anything else); separate 4 eggs, placing the yolks in a smaller bowl to form your mix. When it comes to separating eggs, I must admit to ‘not being flashy’. I simply crack them on the side of the bowl and strain the white through my fingers. Once your eggs are separated, whisk the whites until they form stiff peaks. Volume should be minimum 8 times what you started with, and you should be able to upturn the bowl over your head and the mixture stays in situ (if it doesn’t then you have only yourself to blame!). The whisking forms valuable aerobic exercise for the cook. I strongly recommend that you do it by hand and don’t cheat by using an electric whisk! This way, you get to ‘understand’ the ingredients more, and get a true feel of how things work. As you will however – no-one’ll ever know if you cheat!

Into the bowl with the egg-yolks, pour in a half-teaspoonful of good vanilla-essence or powdered vanilla-seeds. If using essence, make sure to check the label to see that it contains no sugar. Add a tablespoon or so of ground-almonds & half a cupful of sweetener, then whisk well. I always use xylitol in baking. In my experience, it’s the only sweetener which retains its sweetness once cooked; and its granular texture means that it behaves exactly like sugar in recipes. Now bear in mind my rule of thumb above. You want this mix to be the consistency of melted chocolate. To achieve this, mix in double-cream until you have the right texture. You shouldn’t need much; three of four tablespoons maximum.

Now scrape some of your egg-whites to the side of their bowl and add your soufflé-mix. This will need to be folded into the whites with a good metal spoon. If you simply mix this in, you’ll knock out all the air. Folding is exactly as it sounds – you turn the mixture over on top of itself, so that gravity does the work, not your spoon! At no point should you be cutting through the middle of the mix, you just want to continue lifting and turning until the two are incorporated. It should be a pleasing, yellow, moussey texture, with traces of white still visible and air bubbles prevalent throughout.

Ladle the mix into your prepared ramekins until they are a few millimetres shy of the top. Place these onto a tray and into hot oven they go for circa ten minutes. If your oven has a glass-front, you can have the joy of watching them rise. I’m fortunate enough to have an aga, which means I can open the door and peek in with no danger of the temperature falling.

You know they’re ready when well risen over the surface of the ramekin. The top should be lightly firm to the touch and evenly coloured. I always like to have a slight crispness on top, to contrast with the smooth inner, but that’s up to you. Experiment with your results – you’ll soon find out how you like them best.

Serve up straight from the oven. They’ll sink down within a couple of minutes (trying to photograph them before this happened was not easy and they were a little more magnificent than this when first out of the oven). A drizzle of cream on the serving plate will add a little richness, or whip more vanilla into double cream and serve up a dollop on the side. Either way – pure heaven in a pot!

Browse this and other recipes by picture on my pinterest page: country walks in ketosis pinterest.

Thanks for reading and bon ap!

Adam.

Pizza – the ketogenic way! The low-carb food revolution continues!

WP_20150103_20_59_12_Pro

When I first started the ketogenic-diet, I thought “that’s it – you’ll never have pizza again!”. A period of food-mourning ensued, but now I’ve welcomed it back with open arms; and as always, it’s a true pleasure greeting familiar old friends! How can you eat pizza on a low-carb diet? Cauliflower pizza-base. Yes, that’s right; you’ve read it correctly: cauliflower!

I was a little sceptical when I first read about this. It sounded complicated, fiddly and didn’t overly promise much on the taste front… But having tried it, I’m now a firm convert! It’s no more labour-intensive than any other pizza-recipe; in fact, it’s a little bit easier, as there’s no faffing around with yeast or flouring kitchen-surfaces to roll out the base &tc.

Is it exactly the same as traditional flour-based pizza? Not exactly, but that in no way diminishes it; it’s simply different. The topping tastes just the same as you’d expect; the one difference is that the base isn’t ‘crisp’ like wood-fired pizza; it’s more chewy and firm in texture; which is certainly good enough for me. Any way, to be able to eat pizza without the associated ‘food-guilt’ is a wonderful thing. Second helpings? No problem with this recipe!

Diabetics, paleo-fans and those with a gluten-intolerance can also throw open the doors to this old favourite, because the carb-content is incredibly low. There’s no flour, no ‘bloat’, no soaring blood-sugars and no insulin-ramping to worry about – just delicious healthy food (I never thought I’d be saying that about pizza!!).

Start by making the base. Half a large cauliflower will make 1 dinner-plate sized pizza. Being me, I used two whole cauliflowers as I wanted some leftovers for lunch the next day. Pulse your cauliflower florets in a food processor until you have the consistency of breadcrumbs. Then simply place this into a large mixing-bowl and microwave for circa 8 minutes until the cauliflower is cooked through. This staves off moisture and cooks the vegetables through, so that the base doesn’t go into the oven ‘from raw’. Depending on your microwave, check after 6 minutes to see how things are going. To test that it’s done, taste a bit. You don’t want it to be cooked to point of being mooshy; just ‘biteable’ without the texture of rawness. When this is achieved, stir through to dissipate the heat and leave to cool down thoroughly.

At this point, start on your topping. Finely chop an onion and sauté this in olive oil with chopped garlic until the onion turns translucent. Ramp up the heat and deglaze the pan with a glug of red wine or port. If you wish to add peppers or other vegetables, feel free to do so; but all you really need is a can of tomatoes. Empty this into the pan once the liquid has been added. Season well and stir in chopped herbs and a vegetable stock-cube. Leave this on a low simmer until the contents reduce, then add a squeeze of tomato-purée. Hey presto; your sauce is done. Leave this also to stand for 20 minutes to cool down slightly.

No let the grating begin! Start with parmesan. Finely grate a good couple of handfuls for the base, then however much cheese you feel is gratuitously acceptable for the topping! Transfer these to a bowl until you’re ready to use them.

Now for the base. Add your parmesan cheese and season the cauliflower liberally. Next time I do this, I think I’ll add more parmesan than I used for this particular batch. Why? It’s the parmesan which melts and ‘firms up’ to give the base its crispness. I get the feeling that more parmesan will deliver more ‘bite’. Give it a go and let me know how you get on! Next beat some eggs in a bowl and add these slowly. I used 4 eggs for 2 cauliflower heads. You want the mix to be ‘shapeable’, not soggy. Picture the texture of cooled porridge! Pile the mix onto a silicone baking-sheet or greaseproof paper and pat into your desired shape, at about a 1/3 cm thickness. You don’t need a rolling-pin, just use your hands. The mix is not ‘elastic’ like a flour-base, so there’s no stretch. All you need do is ensure a thin covering across your surface area, and you’re done! The top picture was a square base, to cut up for lunch the next day. The picture below was the first ’round’ one (we made two of these for dinner – one each!).

When your base is the required shape, spoon on your tomato-topping and gently spread flat with the back of a spoon. Then pile on whatever keto-friendly ingredients you see fit! This dish is great for using up any bits and bobs you have lying around the fridge which are insufficient in quantity to ‘stand on their own two feet’. I used sliced mushrooms, courgette, mozarella, ham, salami, chorizo, peppers, olives and chilli. Whatever you use, chop the ingredients finely so that they’ll cook through nice and quickly, then scatter across the surface of your pizza.

Top the lot with generous handfuls of grated cheese, sprinkle on a few dried herbs then transfer the pizza with a paddle (if you have one) to the base of the oven. I have an aga, so I cooked this on the floor of the oven. You can equally use a pizza-stone, a slab of marble preheated in the oven, or simply a baking-tray. Make sure that the oven is good and hot, then in goes the pizza for 10 minutes until the top is bubbling, melted and golden brown, and the base is cooked through and caramelised around the edges.

Hey presto, your low-carb pizza is ready! Cut into slices at the table, or fold into wedges whilst watching a favourite film! Either way, it’s absolutely delicious! You won’t be disappointed!

Browse this and other recipes by picture on my pinterest page: country walks in ketosis pinterest.

Thanks for reading and bon ap!

Adam.

WP_20150103_20_15_03_Pro

Fiery Malaysian Laksa with Crisp Pork Belly – low carb goes East!

laksa

This recipe whoops a ‘grand huzzahin tribute to the splendid, vicious firework that is the scotch-bonnet chilli! In isolation, it must be considered a pungent, mean & unpleasant beast; one which doles out penance to all those who countenance it. But when tempered by a little sweetness & warmth; its unremitting intensity is bridled and the ‘beast is tamed’!

Much like a tiger, chilli is a thing of beauty; something to be admired yet very much treated with respect. But once the cook has learnt this skill, the two will become firm friends for life, with most pleasing results!

Laksa is a delicious dish from Malaysia, which carries considerable influence from other Oriental cuisines. The origin of the name is unknown, but thought to stem from either Persian or Sanskrit. There are a myriad versions of the recipe, but this one is based on the wonderful, keto-friendly foundation of coconut-milk and chicken-stock. These two mild and velvety ingredients are just what’s required to sooth the vicious, bad temper of the chillies; delivering a perfectly balanced & mouth-watering equilibrium of taste! This is heightened by the addition of coriander leaves and lemon/lime juice, which add just the right touch of sourness to complement the sweet coconut. Some dishes have a perfect flavour-profile; and this is one of them!

The original dish is made with thin rice-noodles (vermicelli). These are not ideal on a ketogenic-diet, due to their high carbohydrate content. This recipe therefore uses courgette-noodles, or ‘zoodles, which make a delicious alternative to their high-starch counterpart. This renders the dish infinitely accessible to diabetics, gluten-intolerants, or those who quite simply want a break from the stodge! The carb-content is very low, so there’ll be no impact to blood-sugars or insulin ramping – you can tuck in to your heart’s content!

In this version, I use pork-belly slices because of their crispness in contrast to the noodles. Should you wish however, you can equally replace these with chicken, other poultry, game or even fish. The true beauty of this dish lies in the sauce, everything else plays ‘second fiddle’. As a result, my choice of meat is guided by texture rather than taste. I leave any variants up to your own creative instinct therefore. If you have any special successes, make sure to write back and tell me how you got on!

So, to work! Start by cutting your pork-belly slices into inch chunks and placing-these onto a baking-tray. Season well and place into a hot oven for 30-40 minutes, or until crisp and golden brown.

If you have a ‘mini-food-processor’, destalk 1-2 scotch-bonnet chillies and whizz these up until finely chopped. Add two cloves of garlic and a large pinch of salt, then follow these with your coriander stalks and a grind of pepper. Blend these as fine as possible, then scrape out with a spatula. If you don’t have a food-processor, chop the lot with a sharp knife on a sturdy wooden board. If you choose this option, make sure not to touch anywhere near your eyes for a good long while – it hurts!!!!

Place a wok or broad-based pan onto the hob and add a good glug of oil. Sunflower- or rapeseed-oil are perfect; olive oil has a lower burning point so cook a little more slowly if you use this. Sauté the mix for a couple of minutes, then add a chopped onion and a diced pepper. Soften these for a minute, then pour in a half-cupful of chicken-stock, or water and stock-cubes (to taste). The mix should burst into an aromatic cloud of steam, that fills the room with a sharp chilli-garlic fragrance! This is delicious, but powerful; so don’t place your head directly over pan when adding the liquid!

The water will start to evaporate fairly quickly under the high heat. Before this happens, open a can of full-fat coconut milk and stir this into the mix, making sure to scrape the can clean with a spatula. If more water is required, add this in and season well. You want the liquid to be the consistency of a thin soup. As the dish simmers, it will soon thicken up.

Take 2-3 courgettes and cut into ‘zoodles’ with a spiraliser or julienne-peeler (see the following link for more details – courgette-noodles). Add the noodles to the sauce and simmer for 5 minutes until cooked through. At this point, squeeze in the juice of one lemon or lime and sprinkle in your chopped coriander leaves, reserving a few to garnish.

By this time, the sauce should be rich, thick and glossy. Taste to adjust the seasoning (including ‘warmth’ of flavour by crumbling in another half chicken-stock-cube) and then add powdered sweetener to ‘round’ the taste-profile. I suggest a small half-teaspoon, but this will naturally depend on how much chilli you used and your personal preference. Once all is to your liking, remove the pork from the oven, ladle the laksa into bowls and arrange the pork-pieces on top. Finish the dish by garnishing with a sprig of coriander and a slice of lime. Truly delectable in every way!

Browse this and other recipes by picture on my pinterest page: country walks in ketosis pinterest.

Thanks for reading and bon ap!

Adam.

Cheeseburger ‘Des Vosges’ with Chorizo, Green Beans & Mangetouts – ‘cultured’ low carb fast food

WP_20150105_20_29_43_Pro

I’ve always been a firm believer that you ‘can’t improve on a classic’! But I equally believe that you can give it a holiday! This dish does exactly that. The humble cheeseburger packs its passport and a weekend bag and departs on a European jaunt… one that takes in the best of culinary Spain and France all in one recipe!

Fromage Des Voges originates from the Alsace region of France. This territory has swapped ‘ownership’ countless times in history between Germany and France. As a result, it’s truly the ‘crossroads of Europe’ and steeped in heritage which presents a peculiar cultural identity. Its food is pleasing in its breadth and diversity and the cows which produce this cheese graze on what I can only term as a ‘herby cud’, inclusive of the odd pine-needle. The cheese’s depth of flavour is therefore second to none, with a dense almost chewy bite and mellow soft rind; just the thing to lend our cheeseburgers an interesting cultural twist and give them a story to tell after their travels! Naturally however, if you can’t get hold of ‘des vosges’; any full-bodied soft French cheese will hold its own admirably!

As for chorizo, this is always a ketogenic-dieter’s best friend! It’s low in carbs and possesses the remarkable ability to ‘pep’ up other ingredients by its delicious deep, savoury taste. I always keep some in the fridge to lend pizzaz when my vegetable supplies are getting low or simply border on the mundane. The cured sausage’s distinct ‘smoked paprika’ flavour, means that just a little goes a long way; making it the perfect store-cupboard staple for use in a vast array of recipes.

As always on this blog, this recipe is low-carb and great for diabetics and those on a ketogenic-diet. There’ll be no impact to blood-sugars or any change to insulin-levels (a good thing for us all!). There’s also no gluten, so those with an intolerance will be fine.  This recipe has another string to its bow however – it’s incredibly quick and easy; from fridge to plate in 20 minutes! This makes it a great dish for a week-night, when you’re late home from work and want something that’s fast yet packed with flavour! One final attempt to convince you…? It tastes wonderful in every way!

Start by preparing your vegetable accompaniment. Slice your chorizo into half-centimetre chunks and sauté in olive oil in a broad-based pan until the chorizo starts to brown. At this point add a finely sliced onion and a red pepper cut up into bitesized pieces. Soften these in the chorizo oil then crush in a clove or two of garlic and add a bit of chopped chilli to taste. Cook on a high heat then deglaze the pan with a generous slug of red wine or port. Top and tail your green beans and tumble these into the pan, adding a half-centimetre’s depth of water to the vegetables. Crumble in a stock-cube or two to provide some background flavour then leave to simmer on a low heat for 10 minutes or until the beans are cooked through.

Meanwhile heat a heavy-based pan or skillet on the hob then drizzle in a small amount of oil. When sizzlingly hot, place in your burgers and cook for two minutes on each side until brown. A comment I always make is ‘not to mother your food’. Don’t poke and prod at it; meat is ready to be turned once it comes away freely from the bottom of the pan., If you attempt to do this before the surface has sealed and caramelized, the meat will rip; and you’ll be left with an unattractive mess. Simply ‘nudge’ the burgers with a wooden-spoon; they’ll come away when they’re good and ready. Not before.

Having turned the burgers it’s time to layer on your cheese. Be generous here; no-one likes a miser. Once the cheese is piled up resplendently on top, transfer the pan to the oven to allow the topping to melt. At this stage, add your mangetouts to the vegetable pan and place the lid on firmly.

Cook both the burgers and greens for circa two minutes, until the vegetables have ‘lost their rawness’, yet still retain a defiant crunch. The cheese should be oozingly melted and delicious. Serve these up in jiffy and enjoy!

Browse this and other recipes by picture on my pinterest page: country walks in ketosis pinterest.

Thanks for reading and bon ap!

Adam.

Top 10 Low-Carb Starters

If you’re just starting a ketogenic- or low-carb diet for the New Year, food choices can sometimes seem a little daunting!

Never fear however; County Walks in Ketosis has a huge library of delicious LCHF recipes to help along the way.

The ketogenic-diet has no restriction on calories, portion-control or the quantity of food you eat. As a result, delicious starters are very much to be enjoyed, as long as they adhere to the broad range of keto-friendly foodstuffs. This range is so wide however, that the only problem you’ll experience is deciding what to cook first!

To provide a little inspiration, I’ve assembled my top 10 ‘starter’ recipes from this blog. Simply click on the title/hyperlink below to take you straight to the relevant page.

All recipes can be browsed by picture on my pinterest page: country walks in ketosis pinterest.

Top 10 salads:

1. King-Prawn, Courgette & Mascapone Roulade

2. Oven-Warmed Camembert with Truffled Bresaola & Rocket Leaves

3. Thai Smoked Haddock Fish-Cakes

4. Creamy Broccoli & Stilton Soup

5. Smoked Salmon, Prawn & Quail’s Egg Florentine

6. Asparagus, Cream-Cheese & Parma-Ham Tartlets

7. Timbale of Leek, Parmesan & Crayfish Tails

8. Norfolk Crab, Avocado & Brown Shrimps

9. Fiery Padron Peppers

10. Pan-Seared Fillet of Cod in Vermouth & Basil

Enjoy browsing and thanks for reading. Bon ap!

Adam.

Top 10 Low-Carb Puddings / Desserts

If you’re just starting a ketogenic- or low-carb diet for the New Year, food choices can sometimes seem a little daunting!

Never fear however; County Walks in Ketosis has a huge library of delicious LCHF recipes to help along the way.

Life isn’t complete without puddings! And unlike a low-fat diet, the ketogenic-plan permits a full range of delicious, indulgent and fuss-free desserts, which will still allow you to lose weight and enjoy your food to the max!

To provide a little inspiration, I’ve assembled my top 10 pudding recipes from this blog. Simply click on the title/hyperlink below to take you straight to the relevant page.

All recipes can be browsed by picture on my pinterest page: country walks in ketosis pinterest.

Top 10 salads:

1. Velvety Vanilla Cheesecake

2. Malibu, Coconut & Chocolate Brownie Pots

3. Tira Misu Cake (personal favourite!)

4. Chocolate Almond Roulade with Brandy Cream

5. Sparkling ‘Gin Fizz’ Jellies

6. Indulgent Dark Chocolate Layer-Cake

7. Madagascan Vanilla & Pecan Crowns

8. Rich Spiced Cranberry Cheesecake with Macadamia Crunch

9. Chocolate Orange Mousse with Almond Stars

10. Dark & Delicious Coffee & Walnut Cake

Enjoy browsing and thanks for reading. Bon ap!

Adam.

Top 10 Low-Carb Salads

If you’re just starting a ketogenic- or low-carb diet for the New Year, food choices can sometimes seem a little daunting!

Never fear however; County Walks in Ketosis has a huge library of delicious LCHF recipes to help along the way.

Salads are great as a quick low-carb lunch, healthy starter or side-accompaniment to a main-course. They’re ready in minutes and are bright, colourful and fuss-free!

To provide a little inspiration, I’ve assembled my top 10 salad recipes from this blog. Simply click on the title/hyperlink below to take you straight to the relevant page.

All recipes can be browsed by picture on my pinterest page: country walks in ketosis pinterest.

Top 10 salads:

1. Paprika-Chicken, Bacon, Edam & French-Beans

2. Spinach, Asparagus & Goat’s Cheese

3. Emmental, Smoked Ham & Avocado

4. ‘Russian Millionaire’s’ Salad (you’ll quickly see what I mean)

5. Padron-Peppers with Parmesan & Salami

6. Greek Chicken & Aubergine

7. Smoked Mackerel & Green Beans

8. Avocado, Bacon & Blue Cheese

9. Prawn, Pepper & Celeriac

10. Classic Caesar Salad

Enjoy browsing and thanks for reading. Bon ap!

Adam.

Warm Paprika-Chicken, Bacon, Edam & Green-Bean Salad with Tangy French Vinaigrette – a fast, delicious keto lunch!

WP_20150102_12_41_11_Pro

This dish is everything a salad should be – fast, effortless and full of flavour! Just the thing for a delicious low-carb lunch or nutrient-packed starter!

I always feel that salads should be as visually pleasing as they are rich in flavour. The addition of bright yellow and red cherry-tomatoes serve to lift the dish and provide a splash of much needed ‘cheery colour’ amidst the grey of winter!

All ingredients are low in carbohydrate, so are suitable for a ketogenic diet, or those with diabetes or a gluten-intolerance. But as always, the contents of this salad can be varied in line with whatever you have available at the time. Chicken, bacon and cheese however form a delicious taste-combination which delivers outstanding results every time!

Details of how to make the vinaigrette can be found under the following link: classic French vinaigrette. I strongly urge you to give this a try. It’s incredibly easy and will rapidly become a store-cupboard staple. You can use it to dress pretty much any salad, as well as a lot of hot dishes, to include vegetables such as celeriac, winter cabbage or sautéed peppers. Its moreish tangy flavour will complement a huge range of ingredients – no kitchen-cupboard can be complete without it!

Start by pan frying your bacon in a little butter to prevent it sticking. Once nice and crisp, lift out of the pan and place on kitchen-paper to drain. Add your chicken to the pan (I used leftovers from another dish, but you can equally use thinly sliced strips of chicken breast or finely diced brown meat, such as thigh or leg). As soon as the chicken is in the pan, dust it lightly with a generous sprinkle of paprika and season well. Continue to sauté, stirring occasionally, for a good 5 minutes, until the outsides start to crisp. Then lift the chicken out of the pan and set to one side to cool slightly.

Keep the pan on the heat and turn up your stove to the highest temperature. Pour in a centimetre of water and bring this to the boil. Whist the water is coming to the boil, top and tail French beans then add them to the pan when the water is ‘rolling’. Cook for two minutes then plunge into cold water so that they retain their vibrant colour and crispness.

The final usage for your pan is to cook a couple of eggs (I love one-pan dishes – it really economises the washing-up!). I used quails eggs because we had them in after Christmas, but hens’ eggs are an equal delight! The cooking method is quite up to you – you can poach, fry scramble or make into an omelette then slice to form strips. I opted for the quick sautéing method – one minute and they’re done! Once cooked, transfer the eggs to kitchen-towel to drain.

Into your salad bowl, place a good couple of handfuls of fresh green salad and follow this with your drained green-beans (I always pat them dry with kitchen-paper to avoid a ‘watery salad). Ladle a couple of spoonfuls of vinaigrette over the top and mix in well with your hand or a spoon. Season enthusiastically, then start to layer up your bacon and chicken.

Disperse the above with slices of cherry tomato and thinly chopped Edam cheese. If you don’y have Edam, any comparative cheese will do. Preferably you want something with a bit of texture, to serve as a contrast against the other ingredients. For this reason alone I’d avoid soft cheese, but I certainly shan’t judge you if you over-rule this advice!

Once all your ingredients (chicken, bacon, cheese, tomatoes, salad-leaves and eggs) are stacked into a delicious pile; finish the dish with a final flourish of vinaigrette and some chopped basil.

Low-carb doesn’t get much better than this! And all in 10 minutes!

Browse this and other recipes by picture on my pinterest page: country walks in ketosis pinterest.

Thanks for reading and bon ap!

Adam.

Classic French Vinaigrette – the ultimate salad dressing (plus it’s low carb!)

WP_20150102_12_27_16_Pro

You can’t beat a classic! French vinaigrette must be the definitive dressing for salad. Rich, thick and tangy, it’s incredibly versatile and can be served with a myriad of different things. As such, it’s a store-cupboard staple, and no kitchen can be considered complete without it!

Despite its wonderful taste and ease of preparation, few people seem to get it right. The dressing should be thick and emulsified; more of a coating than a pouring dressing. The flavour should have just the right amount of sharpness, thereby able to cut through strong ingredients such as cheese, smoked fish and cured meats. I always think it’s at its best when served simply however; tossed over crisp green leaves or crunchy French beans. When topped with a light shaving of parmesan, such dishes become a delicious meal in themselves!

A common mistake with vinaigrette is the use of olive oil. This will result in an unattractive suspension which quickly separates. You’re left with a green sludgy liquid which tastes as bad as it looks. In my experience, the best oil to make vinaigrette is sunflower oil. It’s light in flavour, which allows the other ingredients to deliver the taste. If all you can taste is oil then there’s very little point! You may as well stick with that and save yourself the effort!

Another positive is that French dressing is also incredibly low in carbohydrate. This makes it brilliant for a ketogenic diet, and eminently suitable for diabetics or those with a gluten-intolerance. Keep it in the cupboard to ‘dress up’ a quick low-carb lunch or starter. You’ll soon wonder how you ever got by without it!

The recipe is incredibly cheap and easy to follow. I always make it in a big batch, as it keeps for months. The below makes just over a pint and a quarter, so you can keep it in a sealable Kilner jar, ready on hand for whenever you need it.

Into a food-processor with the blade attachment, rip in a good handful of fresh parsley leaves and crush in two cloves of garlic. The parsley serves to ‘calm’ the taste of the raw garlic, thereby delivering a light, mellow flavour, rather than a dressing which tastes of garlic alone. Sprinkle on a large pinch of coarse-salt and grind in a good whack of pepper.

Pulse these in the food-processor until the parsley is finely chopped. At this stage, spoon in two large tablespoonsful of Dijon mustard and squeeze in the juice of one lemon. Measure 100ml of white-wine vinegar and pour this on top, then start the motor to form a busily whirring pale-yellow mix.

Into a jug, measure out 600ml of sunflower oil and then pour this very slowly into the processor’s funnel, the motor going all the time. You want the oil to be added as a constant drizzle. Too much to quickly will mean the mix separates and does not emulsify. The dressing will soon thicken to a thick mayonnaise-like consistency. Once all the oil is incorporated, stop the motor and give the dressing a taste,

The flavour should be pleasantly sharp, but not so vinegary as to make you wince. If it needs more oil, add this slowly until the flavour tastes right. Hey presto, your dressing is done!

Spoon the vinaigrette into a Kilner-jar and then gaze lovingly at it with pride! Your salads will soon become the envy of all your friends and lunches need never taste flat again!

Browse this and other recipes by picture on my pinterest page: country walks in ketosis pinterest.

Thanks for reading and bon ap!

Adam.

Crispy Roasted Duck with Aromatic Almond & Saffron Cauliflower-Rice – a delicious, indulgent low carb treat!

WP_20141223_21_10_44_Pro

Some dishes are just so delicious there won’t be a scrap left on the plate. So much so, you’ll want to cook them time and time again. Well this recipe is certainly one of those! Crispy spiced duck with cauliflower-rice, studded and jewelled with almonds and saffron.  Quite simply sublime!

Duck is a particularly succulent meat, with a strong rich flavour. When cooked in the right way, the skin goes ‘cracklingly’ crisp, whilst the meat below remains tender and meltingly soft. There’s also a wonderful sense of pride when you carry a plump golden bird to the table. It’s majestic in its finery and remains one of those rare dishes which truly feels like a special treat. The cook’s reward is an army of empty plates, scraped ‘clean as a whistle’ – strong testament indeed that the meal was both appreciated and expertly cooked!

This dish may sound complicated, but is actually incredibly easy to do. All you need is a little time and a good hot oven. This simplicity is echoed in the cauliflower-rice, which is every bit as tasty as the duck itself. The delicate scent of saffron perfectly complements the robust flavours of the duck, and the rice looks truly beautiful when studded with almonds and bright coloured peppers.

Orange-flower water and zest add to the dish’s aromatic profundity; indeed duck and orange is a flavour-partnership which has endured for centuries! All the above is elegantly lifted by the lightest whisper of chilli, which serves to cut through the richness and balance the flavour… a veritable ‘symphony of taste’!

Duck is perfect for a ketogenic diet. Low carb dishes can sometimes lack that satisfying ‘filling’ quality, but this delivers on all levels! There’s no gluten, so those with an intolerance to wheat will be fine; as will diabetics and those on a paleo-regime because there’s no dairy. Everyone is welcome at the table – the more the merrier!

Start by preparing your duck. Make sure it’s at room temperature, then dust the skin lightly with a mix of equal-quantities of garlic-salt and smoked paprika. Season all over and then leave to sit for 20 minutes to develop in flavour. You can leave this over-night if you like, but I’m impatient! Once rested, season all over then sprinkle a little dried oregano over the skin. Place the bird breast-side down into an oven-dish, then into a hot oven it goes for 40 minutes to an hour, until the skin on the underside goes crisp.

Roasting the duck upside down at first will mean that all the fat and juices sink down into the breast, preventing it from being dry. Once golden and brown on the underside, turn the bird over and re-season the top, making sure to provide enough salt that the skin crisps up and turns a fine, succulent bronze. This will take a further half hour to 45 minutes.

Once the duck has been turned, you’re ready to start on the cauliflower-rice. Cut the cauliflower into florets and pulse these in a food-processor until the texture is as per rice grains. It’s best doing this is batches, so that the food-processor doesn’t turn the lot into purée!

Once chopped, place a wok or wide-bottomed pan onto the hob and add in butter & a little olive-oil (so the butter doesn’t burn). Sauté a finely sliced onion and garlic for around four minutes, then add chopped chillies and a small sprinkle of cumin (quantity subject to preference for both). We don’t want this to be too overpowering, so tread lightly (I used a de-seeded green chilli, finely sliced and half a teaspoon of spice). Thinly slice half a green, red and yellow pepper and add these at the same time as the chilli.

Cook the vegetables through for a couple of minutes, then pour in your cauliflower-rice. Stir authoritatively, so that the whole lot is well-coated in butter, then sprinkle on grated orange zest and your saffron strands. Follow this with a couple of chicken stock-cubes for background flavour, and a small capful of orangeflower-water. If you don’t have this, the orange-zest should suffice. I use it because it provides a delicate ‘floral’ note, which adds to the exotic, aromatic quality of the dish.

Whilst this is cooking through, toast a handful of flaked almonds under the grill until they start to char and smoke around the edges. The aroma from this is mouthwatering. For some reason it always reminds me of Christmas & hot roasted chestnuts!

Meanwhile, take your duck out of the oven and cover well with tinfoil to rest for circa 15-20 minutes. It should be richly bronzed, and slightly red from the paprika. The aroma should speak for itself; there’s no need to describe to you how good this will be!

Taste the rice to adjust the seasoning and check that the cauliflower is cooked through. We’re looking for tender, but still keeping its bite. Sprinkle the toasted almonds on top and remove the pan from the heat.

Transfer the duck to a pre-heated serving platter and pile your rice all around. Garnish with a final flourish of toasted almonds, chopped herbs and few strands of orange-zest for colour.

Carry to the table with pride and ‘dig in’ whilst the duck is still piping hot! Delicious!

Browse this and other recipes by picture on my pinterest page: country walks in ketosis pinterest.

Thanks for reading and bon ap!

Adam.

Creamy Broccoli & Stilton Soup – hearty, filling & low carb…

soup

Winter is a time when food must be hot, hearty and plentiful. It’s cold outside, and the kitchen provides the perfect remedy to that; both in terms of the cooking itself and the delicious dishes it produces.

Whenever I think of Winter, hot mugs of soup come immediately to mind. Soup is incredibly easy to make and wonderfully filling. It’s also very economical and a great way to use up any leftovers which can’t quite make it in quantity to stand on their own two feet!

This broccoli and stilton soup makes a hearty low-carb lunch or starter. As such, it’s great for diabetics or those on a ketogenic diet because the only carbohydrate in the whole thing is cellular, coming directly from the broccoli itself (2.13g net carbs per 100g = very low!). It will keep for several days in the fridge, but I very much doubt it will last that long!

If you don’t have stilton, any firm blue cheese will do (danish blue, st agur, roquefort &tc). You don’t need much, which is why this dish is great for using up odds and ends. We always buy lots of stilton & blue cheese at Christmas time, so often end up with various assorted bits of this and that. They all go in however, with simply stunning results!

Take a large onion and roughly dice. Place a deep casserole onto the hob, with butter and a little oil, then add the onion and cook this until it starts to turn translucent.

Whilst the onion is looking after itself, chop your broccoli and rinse lightly. In it goes to join the onion, then pour on water so that the vegetables are well submerged. Don’t go overboard on the water – it’s easy to add more, but you’ll end up with watery soup if you add too much. Rule of thumb? Just enough to cover the contents; more later…!

Crumble in a couple of chicken stock-cubes & dried herbs, then place the lid on the pan and simmer for 20 minutes until the vegetables are soft enough to collapse when pressed against the side of the pan with the back of a wooden spoon.

Finely dice your blue-cheese, then sprinkle this in (quantity to taste). Stir around, so that the cheese begins to melt; then go in with a stick-blender until smooth. Pour in a splosh of cream, then taste to check for seasoning. If you need a little water to thin things down, then add this in small quantities until your reach the desired consistency.

Ladle into bowls and eat whilst piping hot. Just the thing for a cold, winter’s day!

Browse this and other recipes by picture on my pinterest page: country walks in ketosis pinterest.

Thanks for reading and bon ap!

Adam.

Classic Beef Bourguignon with Celeriac & Mange Tout – low carb perfection!

WP_20141230_20_56_32_Pro

Anyone who says that a low carb diet is difficult to follow is obviously not doing it properly! Take this dish for example… Generous chunks of 30-day matured beef, sautéed in butter then slowly simmered in red wine with garlic, mushrooms and herbs. Few things could be more delicious or more appetising! There’s a reason that this dish has been so universally celebrated for so long… quite simply, it’s perfection itself!

Because it’s very low in carbs, this dish is ideal for diabetics and ketogenic-dieters alike. You never know, paleo-fans or gluten-intolerants may want to give it a go too. The more the merrier!

The name bouguignon takes its roots from the French red wine of Burgundy, where the dish originates. The wine is soft, velvety smooth and rich in flavour (most definitely my favourite!). Without this, purists would argue that it can’t be called a bourguignon. In all honesty however, any good French red will yield equally pleasing results; they’ll just lack the authenticity and a bit of the smoothness of the original.

Don’t be put off by thinking this may be too complicated. The dish itself couldn’t be simpler. All you need is good quality ingredients and a reliable heavy-based casserole. When people refer to French cookery, they don’t mean a list of complex ingredients or fiddly, time-consuming recipes. They’re actually referencing a way of cooking. French cuisine is a methodology; a time-honoured discipline, designed to bring the best out of ingredients. When the French refer to the ‘art of cookery’; art in French means type or style. The ‘French-style’ requires the mastery of a few basic techniques which, once learnt; will deliver consistently outstanding results.

One of these competencies is the classic French method of cooking meat. There’s a stately ritualism to this process, which is almost comforting in its cadences. The succulent sealing-in & caramelisation of the meat is followed by the slow softening of shallots & garlic; then deglazing the pan with a magnificent whooshing ‘sigh’, as wine hits the thirsty metal-surface of the pan. As the kitchen fills with the delicious aroma of melting butter, fresh herbs and pan-seared meats, you’ll begin to feel like an alchemist creating pure gold from the very simplest of ingredients. It’s truly an art worth learning!

Start by sealing your beef. This must be room temperature and dry to the touch.  Heat a metal-lined sauté-pan on the hob (non-stick doesn’t deglaze with pleasing results) and throw in a knob of salted butter followed by a dash of oil. The sizzle should be a rewarding sensation in itself, as should the aroma.

Add your beef to the pan and seal on each side until it’s golden brown and deliciously caramelised. You must excuse me for constantly repeating myself, but it needs to be said…! Do not fuss around with the meat in the pan or move it until it’s good and ready. No-one likes to be mothered; why do it to your dinner?! When the beef is ready to be turned, it will release itself of its own accord in response to the merest touch with finger or wooden-spoon. If it sticks, it’s not ready. We want the meat to caramelise and brown; not steam! And do not crowd it in the pan or the same will happen!

Once the meat is beautifully golden on each side, lift out of the pan and tip in sliced shallots & chopped garlic. Soften these until translucent and just starting to brown, then add sliced mushrooms and simmer these until coloured. Once done, crank up the heat as high as you can. This is not some obscure act of retribution, you simply want the pan to be as hot as possible for when you pour in the wine. That way, you’ll deglaze with the maximum effectiveness, lifting all the caramelised flavours straight off the bottom of the pan.

Once it’s good and hot pour in a large glass full of red wine, making sure to stand over the pan and enjoy the cloud of sweet, alcoholic steam which billows beautifully out into the kitchen! Once the liquid has all but evaporated, place your beef back into the pan and pour in a enough beef stock (or water and stock cubes) to ensure that the meat is just submerged. Dissolve a small teaspoon of Dijon mustard into the pan and add a bay-leaf or two for warmth. Simmer for 10 minutes then stir in a good handful of chopped parsley, place the lid onto the pan and put the casserole into a medium oven for 1-2 hours (the slower the better!).

In the last hour of cooking, prepare your celeriac. Peel ‘the big ugly’ and dice into 1cm chunks. Add a spoonful of butter to a broad pan and sauté the celeriac for a couple of minutes on a medium heat. Finely slice an onion and a clove of garlic then add these to the pan and cook for a couple more minutes until the onion starts to soften. At this point, pour in chicken stock (or water and some stock cubes) until the liquid just covers the vegetables. Season well and simmer for circa 40 minutes more until the liquid had reduced and the celeriac starts to break down when pressed with a wooden spoon. If you like, you can add a handful of grated cheese. Cheddar, emmental or gruyere would be perfect. Take the pan off the heat and garnish with a sprinkle of herbs.

Remove the casserole from the oven and place onto the hob on a very low heat. In a mixing bowl, add one small teaspoon of cornflour and whisk in enough water to form a thin ‘pourable’ paste. Make sure to whisk sufficiently to avoid any lumps. These will ruin the sauce and be unpleasant to eat. You may wonder at the addition of flour for a low carb diet. Cornflour is an incredibly potent thickener. The amount you’re using will provide only a tiny quantity of carbs, circa 5-10g for the whole dish. Per portion it will only be a couple of grammes! If you’d rather leave it out, I’d quite understand, but as everything else is very low in carbohydrate, I don’t see this small sacrifice as a problem – the results will be worth it! Stir the cornflour paste into the beef and simmer for a minute or two until the sauce thickens.

All that remains is to ladle the bourguignon into bowls and spoon on your celeriac mix. Few dishes could be more luxurious and resplendently rich than this one. Be sure to enjoy every last mouthful. We certainly did!

Browse this and other recipes by picture on my pinterest page: country walks in ketosis pinterest.

Thanks for reading and bon ap!

Adam.

Creamy Bacon, Mozzarella & Courgette Bake with Oven Roasted Pork Loin – the best of a low carb diet!

WP_20141229_20_30_01_Pro

Anyone on a ketogenic diet will soon learn to appreciate courgettes as a delicious, reliable staple. They’re incredibly adaptable and can be used in an infinite number of dishes: zoodles, roulade, rosti, or equally a simple weeknight recipe such as this; courgette & mozzarella bake.

Courgettes pick up the favour of anything they’re cooked with, so garlic and bacon form the perfect backdrop for this rich and velvety smooth dish. The zucchini turn buttery soft in the oven, and baked mozzarella complements this wonderfully. Melted cheese is mouthwatering at the best of times – here it blends into the cream to form a decadent, indulgent sauce which is truly delicious!

Because the gratin is so smooth in texture, I’ve teamed it with roasted pork belly. This goes wonderfully crisp in the oven, and serves to contrast and counterpoint the softened courgettes and cream. The combination is incredibly moreish – we had no leftovers whatsoever, all plates were scraped clean! This is music to any cook’s ears; as such, this dish comes highly recommended.

The carb-count is very low, so diabetics and ketogenic-dieters need have no concerns over impact to blood-sugars. There’s no gluten, so those with an intolerance needn’t worry also. Above all however, it is quick and easy to prepare, so can be done any night of the week. In this cold wintry weather, we all crave comfort-food, and it couldn’t get more comforting than this! Give it a go and make sure to tell me how you got on…

Start by sautéing diced bacon in a thick-bottomed gratin-dish or casserole. I used butter and a drizzle of oil to prevent the butter from burning. Add a finely sliced onion and cook until this starts to turn translucent. At this point add chopped garlic and 2 large sliced courgettes (one per person). Continue to cook these on the hob for 5 minutes or so, until the courgettes start to brown and soften.

Meanwhile heavily season your pork belly strips and place onto a baking tray. Oven bake these at the top of the oven until they go crisp and succulent. This should take circa 30-40 minutes in a hot oven.

Once the pork has gone in to roast, crumble a couple of chicken stock-cubes into your sautéing courgette mix for background flavour.  Then stir in double cream until the whole lot is just submerged. Dice mozzarella and mix this in so that it’s evenly distributed throughout. Season well and top the lot with a large handful of grated hard cheese such as cheddar or parmesan. This gives the dish that delicious brown ‘crispness’ on top. A quick sprinkle of dried herbs, then into the oven it goes for circa half an hour until the top is golden and bubbling.

Once all is ready, serve up the lot whilst still piping hot. You can also serve salad or green vegetables alongside if you like, but one thing is definite: big hearty bowlfuls are a must! There’s no better way to enjoy comfort food like this, so huddle up warm and dig in!

Browse this and other recipes by picture on my pinterest page: country walks in ketosis pinterest.

Thanks for reading and bon ap!

Adam.