Fiery Malaysian Laksa with Crisp Pork Belly – low carb goes East!

laksa

This recipe whoops a ‘grand huzzahin tribute to the splendid, vicious firework that is the scotch-bonnet chilli! In isolation, it must be considered a pungent, mean & unpleasant beast; one which doles out penance to all those who countenance it. But when tempered by a little sweetness & warmth; its unremitting intensity is bridled and the ‘beast is tamed’!

Much like a tiger, chilli is a thing of beauty; something to be admired yet very much treated with respect. But once the cook has learnt this skill, the two will become firm friends for life, with most pleasing results!

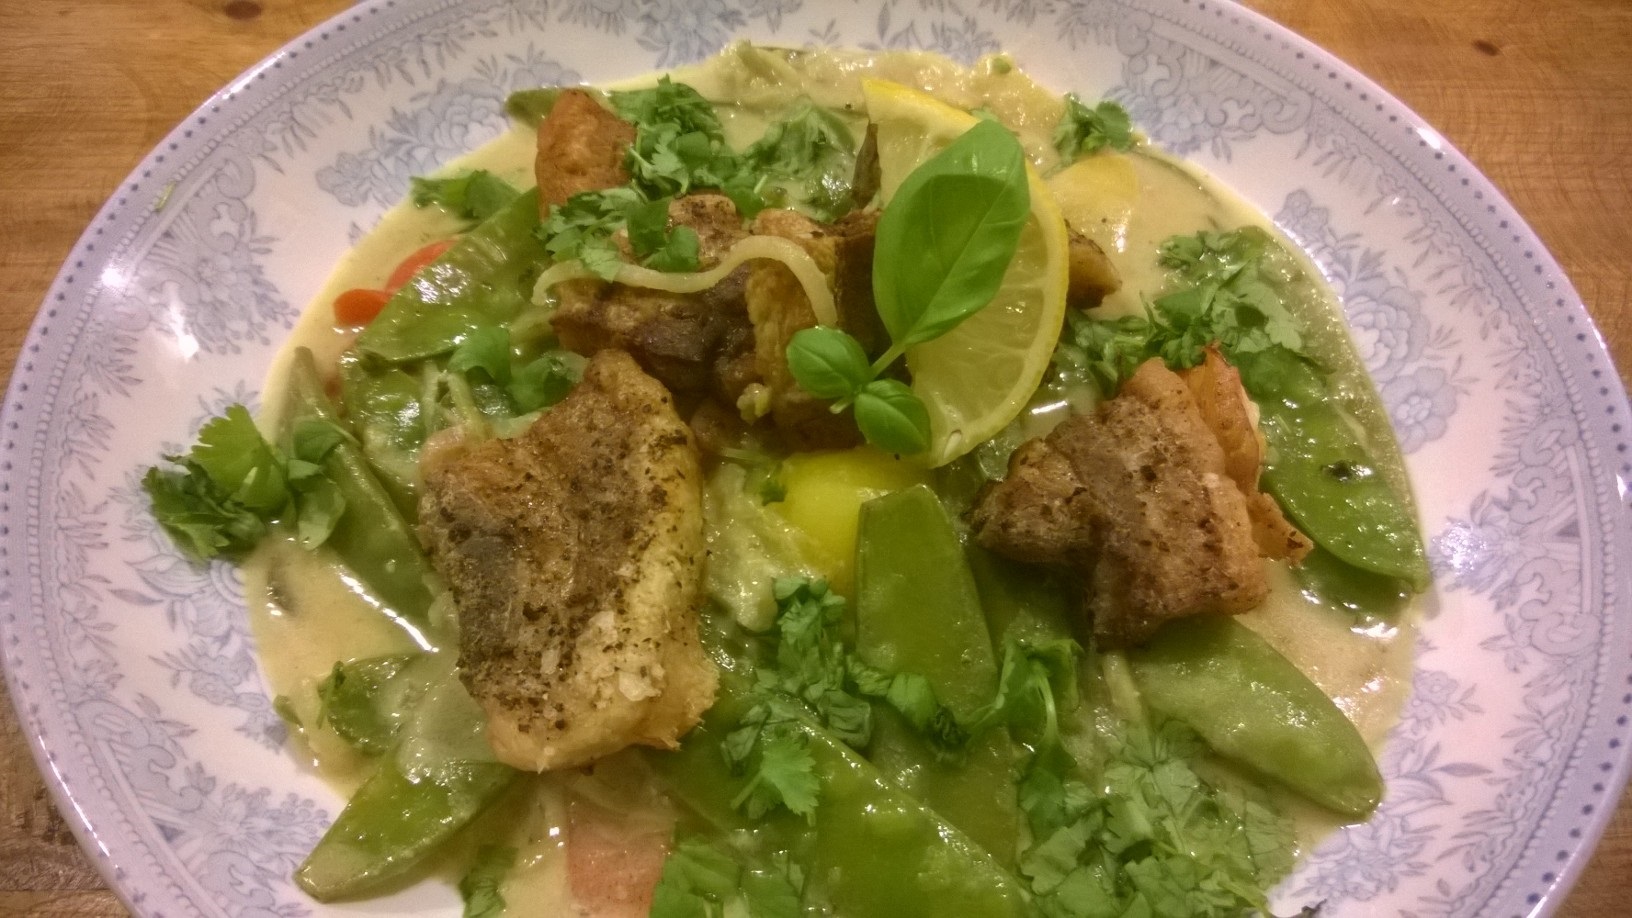
Laksa is a delicious dish from Malaysia, which carries considerable influence from other Oriental cuisines. The origin of the name is unknown, but thought to stem from either Persian or Sanskrit. There are a myriad versions of the recipe, but this one is based on the wonderful, keto-friendly foundation of coconut-milk and chicken-stock. These two mild and velvety ingredients are just what’s required to sooth the vicious, bad temper of the chillies; delivering a perfectly balanced & mouth-watering equilibrium of taste! This is heightened by the addition of coriander leaves and lemon/lime juice, which add just the right touch of sourness to complement the sweet coconut. Some dishes have a perfect flavour-profile; and this is one of them!

The original dish is made with thin rice-noodles (vermicelli). These are not ideal on a ketogenic-diet, due to their high carbohydrate content. This recipe therefore uses courgette-noodles, or ‘zoodles, which make a delicious alternative to their high-starch counterpart. This renders the dish infinitely accessible to diabetics, gluten-intolerants, or those who quite simply want a break from the stodge! The carb-content is very low, so there’ll be no impact to blood-sugars or insulin ramping – you can tuck in to your heart’s content!

In this version, I use pork-belly slices because of their crispness in contrast to the noodles. Should you wish however, you can equally replace these with chicken, other poultry, game or even fish. The true beauty of this dish lies in the sauce, everything else plays ‘second fiddle’. As a result, my choice of meat is guided by texture rather than taste. I leave any variants up to your own creative instinct therefore. If you have any special successes, make sure to write back and tell me how you got on!

So, to work! Start by cutting your pork-belly slices into inch chunks and placing-these onto a baking-tray. Season well and place into a hot oven for 30-40 minutes, or until crisp and golden brown.

If you have a ‘mini-food-processor’, destalk 1-2 scotch-bonnet chillies and whizz these up until finely chopped. Add two cloves of garlic and a large pinch of salt, then follow these with your coriander stalks and a grind of pepper. Blend these as fine as possible, then scrape out with a spatula. If you don’t have a food-processor, chop the lot with a sharp knife on a sturdy wooden board. If you choose this option, make sure not to touch anywhere near your eyes for a good long while – it hurts!!!!

Place a wok or broad-based pan onto the hob and add a good glug of oil. Sunflower- or rapeseed-oil are perfect; olive oil has a lower burning point so cook a little more slowly if you use this. Sauté the mix for a couple of minutes, then add a chopped onion and a diced pepper. Soften these for a minute, then pour in a half-cupful of chicken-stock, or water and stock-cubes (to taste). The mix should burst into an aromatic cloud of steam, that fills the room with a sharp chilli-garlic fragrance! This is delicious, but powerful; so don’t place your head directly over pan when adding the liquid!

The water will start to evaporate fairly quickly under the high heat. Before this happens, open a can of full-fat coconut milk and stir this into the mix, making sure to scrape the can clean with a spatula. If more water is required, add this in and season well. You want the liquid to be the consistency of a thin soup. As the dish simmers, it will soon thicken up.

Take 2-3 courgettes and cut into ‘zoodles’ with a spiraliser or julienne-peeler (see the following link for more details – courgette-noodles). Add the noodles to the sauce and simmer for 5 minutes until cooked through. At this point, squeeze in the juice of one lemon or lime and sprinkle in your chopped coriander leaves, reserving a few to garnish.

By this time, the sauce should be rich, thick and glossy. Taste to adjust the seasoning (including ‘warmth’ of flavour by crumbling in another half chicken-stock-cube) and then add powdered sweetener to ‘round’ the taste-profile. I suggest a small half-teaspoon, but this will naturally depend on how much chilli you used and your personal preference. Once all is to your liking, remove the pork from the oven, ladle the laksa into bowls and arrange the pork-pieces on top. Finish the dish by garnishing with a sprig of coriander and a slice of lime. Truly delectable in every way!

Browse this and other recipes by picture on my pinterest page: country walks in ketosis pinterest.

Thanks for reading and bon ap!

Adam.

Advertisement

Cheeseburger ‘Des Vosges’ with Chorizo, Green Beans & Mangetouts – ‘cultured’ low carb fast food

WP_20150105_20_29_43_Pro

I’ve always been a firm believer that you ‘can’t improve on a classic’! But I equally believe that you can give it a holiday! This dish does exactly that. The humble cheeseburger packs its passport and a weekend bag and departs on a European jaunt… one that takes in the best of culinary Spain and France all in one recipe!

Fromage Des Voges originates from the Alsace region of France. This territory has swapped ‘ownership’ countless times in history between Germany and France. As a result, it’s truly the ‘crossroads of Europe’ and steeped in heritage which presents a peculiar cultural identity. Its food is pleasing in its breadth and diversity and the cows which produce this cheese graze on what I can only term as a ‘herby cud’, inclusive of the odd pine-needle. The cheese’s depth of flavour is therefore second to none, with a dense almost chewy bite and mellow soft rind; just the thing to lend our cheeseburgers an interesting cultural twist and give them a story to tell after their travels! Naturally however, if you can’t get hold of ‘des vosges’; any full-bodied soft French cheese will hold its own admirably!

As for chorizo, this is always a ketogenic-dieter’s best friend! It’s low in carbs and possesses the remarkable ability to ‘pep’ up other ingredients by its delicious deep, savoury taste. I always keep some in the fridge to lend pizzaz when my vegetable supplies are getting low or simply border on the mundane. The cured sausage’s distinct ‘smoked paprika’ flavour, means that just a little goes a long way; making it the perfect store-cupboard staple for use in a vast array of recipes.

As always on this blog, this recipe is low-carb and great for diabetics and those on a ketogenic-diet. There’ll be no impact to blood-sugars or any change to insulin-levels (a good thing for us all!). There’s also no gluten, so those with an intolerance will be fine.  This recipe has another string to its bow however – it’s incredibly quick and easy; from fridge to plate in 20 minutes! This makes it a great dish for a week-night, when you’re late home from work and want something that’s fast yet packed with flavour! One final attempt to convince you…? It tastes wonderful in every way!

Start by preparing your vegetable accompaniment. Slice your chorizo into half-centimetre chunks and sauté in olive oil in a broad-based pan until the chorizo starts to brown. At this point add a finely sliced onion and a red pepper cut up into bitesized pieces. Soften these in the chorizo oil then crush in a clove or two of garlic and add a bit of chopped chilli to taste. Cook on a high heat then deglaze the pan with a generous slug of red wine or port. Top and tail your green beans and tumble these into the pan, adding a half-centimetre’s depth of water to the vegetables. Crumble in a stock-cube or two to provide some background flavour then leave to simmer on a low heat for 10 minutes or until the beans are cooked through.

Meanwhile heat a heavy-based pan or skillet on the hob then drizzle in a small amount of oil. When sizzlingly hot, place in your burgers and cook for two minutes on each side until brown. A comment I always make is ‘not to mother your food’. Don’t poke and prod at it; meat is ready to be turned once it comes away freely from the bottom of the pan., If you attempt to do this before the surface has sealed and caramelized, the meat will rip; and you’ll be left with an unattractive mess. Simply ‘nudge’ the burgers with a wooden-spoon; they’ll come away when they’re good and ready. Not before.

Having turned the burgers it’s time to layer on your cheese. Be generous here; no-one likes a miser. Once the cheese is piled up resplendently on top, transfer the pan to the oven to allow the topping to melt. At this stage, add your mangetouts to the vegetable pan and place the lid on firmly.

Cook both the burgers and greens for circa two minutes, until the vegetables have ‘lost their rawness’, yet still retain a defiant crunch. The cheese should be oozingly melted and delicious. Serve these up in jiffy and enjoy!

Browse this and other recipes by picture on my pinterest page: country walks in ketosis pinterest.

Thanks for reading and bon ap!

Adam.

Top 10 Low-Carb Starters

If you’re just starting a ketogenic- or low-carb diet for the New Year, food choices can sometimes seem a little daunting!

Never fear however; County Walks in Ketosis has a huge library of delicious LCHF recipes to help along the way.

The ketogenic-diet has no restriction on calories, portion-control or the quantity of food you eat. As a result, delicious starters are very much to be enjoyed, as long as they adhere to the broad range of keto-friendly foodstuffs. This range is so wide however, that the only problem you’ll experience is deciding what to cook first!

To provide a little inspiration, I’ve assembled my top 10 ‘starter’ recipes from this blog. Simply click on the title/hyperlink below to take you straight to the relevant page.

All recipes can be browsed by picture on my pinterest page: country walks in ketosis pinterest.

Top 10 salads:

1. King-Prawn, Courgette & Mascapone Roulade

2. Oven-Warmed Camembert with Truffled Bresaola & Rocket Leaves

3. Thai Smoked Haddock Fish-Cakes

4. Creamy Broccoli & Stilton Soup

5. Smoked Salmon, Prawn & Quail’s Egg Florentine

6. Asparagus, Cream-Cheese & Parma-Ham Tartlets

7. Timbale of Leek, Parmesan & Crayfish Tails

8. Norfolk Crab, Avocado & Brown Shrimps

9. Fiery Padron Peppers

10. Pan-Seared Fillet of Cod in Vermouth & Basil

Enjoy browsing and thanks for reading. Bon ap!

Adam.

Top 10 Low-Carb Salads

country walks in ketosis

If you’re just starting a ketogenic- or low-carb diet for the New Year, food choices can sometimes seem a little daunting!

Never fear however; County Walks in Ketosis has a huge library of delicious LCHF recipes to help along the way.

Salads are great as a quick low-carb lunch, healthy starter or side-accompaniment to a main-course. They’re ready in minutes and are bright, colourful and fuss-free!

To provide a little inspiration, I’ve assembled my top 10 salad recipes from this blog. Simply click on the title/hyperlink below to take you straight to the relevant page.

All recipes can be browsed by picture on my pinterest page: country walks in ketosis pinterest.

Top 10 salads:

1. Paprika-Chicken, Bacon, Edam & French-Beans

2. Spinach, Asparagus & Goat’s Cheese

3. Emmental, Smoked Ham & Avocado

4. ‘Russian Millionaire’s’ Salad (you’ll quickly see what I mean)

5. Padron-Peppers with Parmesan & Salami

6. Greek…

View original post 33 more words

Top 10 Low-Carb Puddings / Desserts

If you’re just starting a ketogenic- or low-carb diet for the New Year, food choices can sometimes seem a little daunting!

Never fear however; County Walks in Ketosis has a huge library of delicious LCHF recipes to help along the way.

Life isn’t complete without puddings! And unlike a low-fat diet, the ketogenic-plan permits a full range of delicious, indulgent and fuss-free desserts, which will still allow you to lose weight and enjoy your food to the max!

To provide a little inspiration, I’ve assembled my top 10 pudding recipes from this blog. Simply click on the title/hyperlink below to take you straight to the relevant page.

All recipes can be browsed by picture on my pinterest page: country walks in ketosis pinterest.

Top 10 salads:

1. Velvety Vanilla Cheesecake

2. Malibu, Coconut & Chocolate Brownie Pots

3. Tira Misu Cake (personal favourite!)

4. Chocolate Almond Roulade with Brandy Cream

5. Sparkling ‘Gin Fizz’ Jellies

6. Indulgent Dark Chocolate Layer-Cake

7. Madagascan Vanilla & Pecan Crowns

8. Rich Spiced Cranberry Cheesecake with Macadamia Crunch

9. Chocolate Orange Mousse with Almond Stars

10. Dark & Delicious Coffee & Walnut Cake

Enjoy browsing and thanks for reading. Bon ap!

Adam.

Top 10 Low-Carb Salads

If you’re just starting a ketogenic- or low-carb diet for the New Year, food choices can sometimes seem a little daunting!

Never fear however; County Walks in Ketosis has a huge library of delicious LCHF recipes to help along the way.

Salads are great as a quick low-carb lunch, healthy starter or side-accompaniment to a main-course. They’re ready in minutes and are bright, colourful and fuss-free!

To provide a little inspiration, I’ve assembled my top 10 salad recipes from this blog. Simply click on the title/hyperlink below to take you straight to the relevant page.

All recipes can be browsed by picture on my pinterest page: country walks in ketosis pinterest.

Top 10 salads:

1. Paprika-Chicken, Bacon, Edam & French-Beans

2. Spinach, Asparagus & Goat’s Cheese

3. Emmental, Smoked Ham & Avocado

4. ‘Russian Millionaire’s’ Salad (you’ll quickly see what I mean)

5. Padron-Peppers with Parmesan & Salami

6. Greek Chicken & Aubergine

7. Smoked Mackerel & Green Beans

8. Avocado, Bacon & Blue Cheese

9. Prawn, Pepper & Celeriac

10. Classic Caesar Salad

Enjoy browsing and thanks for reading. Bon ap!

Adam.

Warm Paprika-Chicken, Bacon, Edam & Green-Bean Salad with Tangy French Vinaigrette – a fast, delicious keto lunch!

WP_20150102_12_41_11_Pro

This dish is everything a salad should be – fast, effortless and full of flavour! Just the thing for a delicious low-carb lunch or nutrient-packed starter!

I always feel that salads should be as visually pleasing as they are rich in flavour. The addition of bright yellow and red cherry-tomatoes serve to lift the dish and provide a splash of much needed ‘cheery colour’ amidst the grey of winter!

All ingredients are low in carbohydrate, so are suitable for a ketogenic diet, or those with diabetes or a gluten-intolerance. But as always, the contents of this salad can be varied in line with whatever you have available at the time. Chicken, bacon and cheese however form a delicious taste-combination which delivers outstanding results every time!

Details of how to make the vinaigrette can be found under the following link: classic French vinaigrette. I strongly urge you to give this a try. It’s incredibly easy and will rapidly become a store-cupboard staple. You can use it to dress pretty much any salad, as well as a lot of hot dishes, to include vegetables such as celeriac, winter cabbage or sautéed peppers. Its moreish tangy flavour will complement a huge range of ingredients – no kitchen-cupboard can be complete without it!

Start by pan frying your bacon in a little butter to prevent it sticking. Once nice and crisp, lift out of the pan and place on kitchen-paper to drain. Add your chicken to the pan (I used leftovers from another dish, but you can equally use thinly sliced strips of chicken breast or finely diced brown meat, such as thigh or leg). As soon as the chicken is in the pan, dust it lightly with a generous sprinkle of paprika and season well. Continue to sauté, stirring occasionally, for a good 5 minutes, until the outsides start to crisp. Then lift the chicken out of the pan and set to one side to cool slightly.

Keep the pan on the heat and turn up your stove to the highest temperature. Pour in a centimetre of water and bring this to the boil. Whist the water is coming to the boil, top and tail French beans then add them to the pan when the water is ‘rolling’. Cook for two minutes then plunge into cold water so that they retain their vibrant colour and crispness.

The final usage for your pan is to cook a couple of eggs (I love one-pan dishes – it really economises the washing-up!). I used quails eggs because we had them in after Christmas, but hens’ eggs are an equal delight! The cooking method is quite up to you – you can poach, fry scramble or make into an omelette then slice to form strips. I opted for the quick sautéing method – one minute and they’re done! Once cooked, transfer the eggs to kitchen-towel to drain.

Into your salad bowl, place a good couple of handfuls of fresh green salad and follow this with your drained green-beans (I always pat them dry with kitchen-paper to avoid a ‘watery salad). Ladle a couple of spoonfuls of vinaigrette over the top and mix in well with your hand or a spoon. Season enthusiastically, then start to layer up your bacon and chicken.

Disperse the above with slices of cherry tomato and thinly chopped Edam cheese. If you don’y have Edam, any comparative cheese will do. Preferably you want something with a bit of texture, to serve as a contrast against the other ingredients. For this reason alone I’d avoid soft cheese, but I certainly shan’t judge you if you over-rule this advice!

Once all your ingredients (chicken, bacon, cheese, tomatoes, salad-leaves and eggs) are stacked into a delicious pile; finish the dish with a final flourish of vinaigrette and some chopped basil.

Low-carb doesn’t get much better than this! And all in 10 minutes!

Browse this and other recipes by picture on my pinterest page: country walks in ketosis pinterest.

Thanks for reading and bon ap!

Adam.

Classic French Vinaigrette – the ultimate salad dressing (plus it’s low carb!)

WP_20150102_12_27_16_Pro

You can’t beat a classic! French vinaigrette must be the definitive dressing for salad. Rich, thick and tangy, it’s incredibly versatile and can be served with a myriad of different things. As such, it’s a store-cupboard staple, and no kitchen can be considered complete without it!

Despite its wonderful taste and ease of preparation, few people seem to get it right. The dressing should be thick and emulsified; more of a coating than a pouring dressing. The flavour should have just the right amount of sharpness, thereby able to cut through strong ingredients such as cheese, smoked fish and cured meats. I always think it’s at its best when served simply however; tossed over crisp green leaves or crunchy French beans. When topped with a light shaving of parmesan, such dishes become a delicious meal in themselves!

A common mistake with vinaigrette is the use of olive oil. This will result in an unattractive suspension which quickly separates. You’re left with a green sludgy liquid which tastes as bad as it looks. In my experience, the best oil to make vinaigrette is sunflower oil. It’s light in flavour, which allows the other ingredients to deliver the taste. If all you can taste is oil then there’s very little point! You may as well stick with that and save yourself the effort!

Another positive is that French dressing is also incredibly low in carbohydrate. This makes it brilliant for a ketogenic diet, and eminently suitable for diabetics or those with a gluten-intolerance. Keep it in the cupboard to ‘dress up’ a quick low-carb lunch or starter. You’ll soon wonder how you ever got by without it!

The recipe is incredibly cheap and easy to follow. I always make it in a big batch, as it keeps for months. The below makes just over a pint and a quarter, so you can keep it in a sealable Kilner jar, ready on hand for whenever you need it.

Into a food-processor with the blade attachment, rip in a good handful of fresh parsley leaves and crush in two cloves of garlic. The parsley serves to ‘calm’ the taste of the raw garlic, thereby delivering a light, mellow flavour, rather than a dressing which tastes of garlic alone. Sprinkle on a large pinch of coarse-salt and grind in a good whack of pepper.

Pulse these in the food-processor until the parsley is finely chopped. At this stage, spoon in two large tablespoonsful of Dijon mustard and squeeze in the juice of one lemon. Measure 100ml of white-wine vinegar and pour this on top, then start the motor to form a busily whirring pale-yellow mix.

Into a jug, measure out 600ml of sunflower oil and then pour this very slowly into the processor’s funnel, the motor going all the time. You want the oil to be added as a constant drizzle. Too much to quickly will mean the mix separates and does not emulsify. The dressing will soon thicken to a thick mayonnaise-like consistency. Once all the oil is incorporated, stop the motor and give the dressing a taste,

The flavour should be pleasantly sharp, but not so vinegary as to make you wince. If it needs more oil, add this slowly until the flavour tastes right. Hey presto, your dressing is done!

Spoon the vinaigrette into a Kilner-jar and then gaze lovingly at it with pride! Your salads will soon become the envy of all your friends and lunches need never taste flat again!

Browse this and other recipes by picture on my pinterest page: country walks in ketosis pinterest.

Thanks for reading and bon ap!

Adam.

New Year’s Diet? Why not try the ketogenic plan? Lose weight & become a fitter, happier, healthier ‘you’!

Looking to lose a few pounds in the new year? Why not give the ketogenic diet a go…?

  • Delicious, satisfying food
  • No hunger pangs
  • Fast, sustainable weight loss
  • Great for diabetics
  • A diet you can physically ‘test’ to be sure it’s working (take the guesswork out of progress)
  • Increased energy levels
  • Stable blood-sugars – no more energy peaks and troughs!

Browse the following links to find out more:

What is the ketogenic diet?

How does it work?

What can I eat?

To give you a flavour of the mouth-watering food, take a look at my recipes & browse by picture on my pinterest page: country walks in ketosis pinterest.

Give it a go and feel for yourself the difference it can make!

Make 2015 a year of change!

Good luck and thanks for reading,

Adam.

Crispy Roasted Duck with Aromatic Almond & Saffron Cauliflower-Rice – a delicious, indulgent low carb treat!

WP_20141223_21_10_44_Pro

Some dishes are just so delicious there won’t be a scrap left on the plate. So much so, you’ll want to cook them time and time again. Well this recipe is certainly one of those! Crispy spiced duck with cauliflower-rice, studded and jewelled with almonds and saffron.  Quite simply sublime!

Duck is a particularly succulent meat, with a strong rich flavour. When cooked in the right way, the skin goes ‘cracklingly’ crisp, whilst the meat below remains tender and meltingly soft. There’s also a wonderful sense of pride when you carry a plump golden bird to the table. It’s majestic in its finery and remains one of those rare dishes which truly feels like a special treat. The cook’s reward is an army of empty plates, scraped ‘clean as a whistle’ – strong testament indeed that the meal was both appreciated and expertly cooked!

This dish may sound complicated, but is actually incredibly easy to do. All you need is a little time and a good hot oven. This simplicity is echoed in the cauliflower-rice, which is every bit as tasty as the duck itself. The delicate scent of saffron perfectly complements the robust flavours of the duck, and the rice looks truly beautiful when studded with almonds and bright coloured peppers.

Orange-flower water and zest add to the dish’s aromatic profundity; indeed duck and orange is a flavour-partnership which has endured for centuries! All the above is elegantly lifted by the lightest whisper of chilli, which serves to cut through the richness and balance the flavour… a veritable ‘symphony of taste’!

Duck is perfect for a ketogenic diet. Low carb dishes can sometimes lack that satisfying ‘filling’ quality, but this delivers on all levels! There’s no gluten, so those with an intolerance to wheat will be fine; as will diabetics and those on a paleo-regime because there’s no dairy. Everyone is welcome at the table – the more the merrier!

Start by preparing your duck. Make sure it’s at room temperature, then dust the skin lightly with a mix of equal-quantities of garlic-salt and smoked paprika. Season all over and then leave to sit for 20 minutes to develop in flavour. You can leave this over-night if you like, but I’m impatient! Once rested, season all over then sprinkle a little dried oregano over the skin. Place the bird breast-side down into an oven-dish, then into a hot oven it goes for 40 minutes to an hour, until the skin on the underside goes crisp.

Roasting the duck upside down at first will mean that all the fat and juices sink down into the breast, preventing it from being dry. Once golden and brown on the underside, turn the bird over and re-season the top, making sure to provide enough salt that the skin crisps up and turns a fine, succulent bronze. This will take a further half hour to 45 minutes.

Once the duck has been turned, you’re ready to start on the cauliflower-rice. Cut the cauliflower into florets and pulse these in a food-processor until the texture is as per rice grains. It’s best doing this is batches, so that the food-processor doesn’t turn the lot into purée!

Once chopped, place a wok or wide-bottomed pan onto the hob and add in butter & a little olive-oil (so the butter doesn’t burn). Sauté a finely sliced onion and garlic for around four minutes, then add chopped chillies and a small sprinkle of cumin (quantity subject to preference for both). We don’t want this to be too overpowering, so tread lightly (I used a de-seeded green chilli, finely sliced and half a teaspoon of spice). Thinly slice half a green, red and yellow pepper and add these at the same time as the chilli.

Cook the vegetables through for a couple of minutes, then pour in your cauliflower-rice. Stir authoritatively, so that the whole lot is well-coated in butter, then sprinkle on grated orange zest and your saffron strands. Follow this with a couple of chicken stock-cubes for background flavour, and a small capful of orangeflower-water. If you don’t have this, the orange-zest should suffice. I use it because it provides a delicate ‘floral’ note, which adds to the exotic, aromatic quality of the dish.

Whilst this is cooking through, toast a handful of flaked almonds under the grill until they start to char and smoke around the edges. The aroma from this is mouthwatering. For some reason it always reminds me of Christmas & hot roasted chestnuts!

Meanwhile, take your duck out of the oven and cover well with tinfoil to rest for circa 15-20 minutes. It should be richly bronzed, and slightly red from the paprika. The aroma should speak for itself; there’s no need to describe to you how good this will be!

Taste the rice to adjust the seasoning and check that the cauliflower is cooked through. We’re looking for tender, but still keeping its bite. Sprinkle the toasted almonds on top and remove the pan from the heat.

Transfer the duck to a pre-heated serving platter and pile your rice all around. Garnish with a final flourish of toasted almonds, chopped herbs and few strands of orange-zest for colour.

Carry to the table with pride and ‘dig in’ whilst the duck is still piping hot! Delicious!

Browse this and other recipes by picture on my pinterest page: country walks in ketosis pinterest.

Thanks for reading and bon ap!

Adam.