Oven-Warmed Camembert with Truffled-Bresaola & Rocket – Meltingly Delicious, Minimal Carbs!

camembert

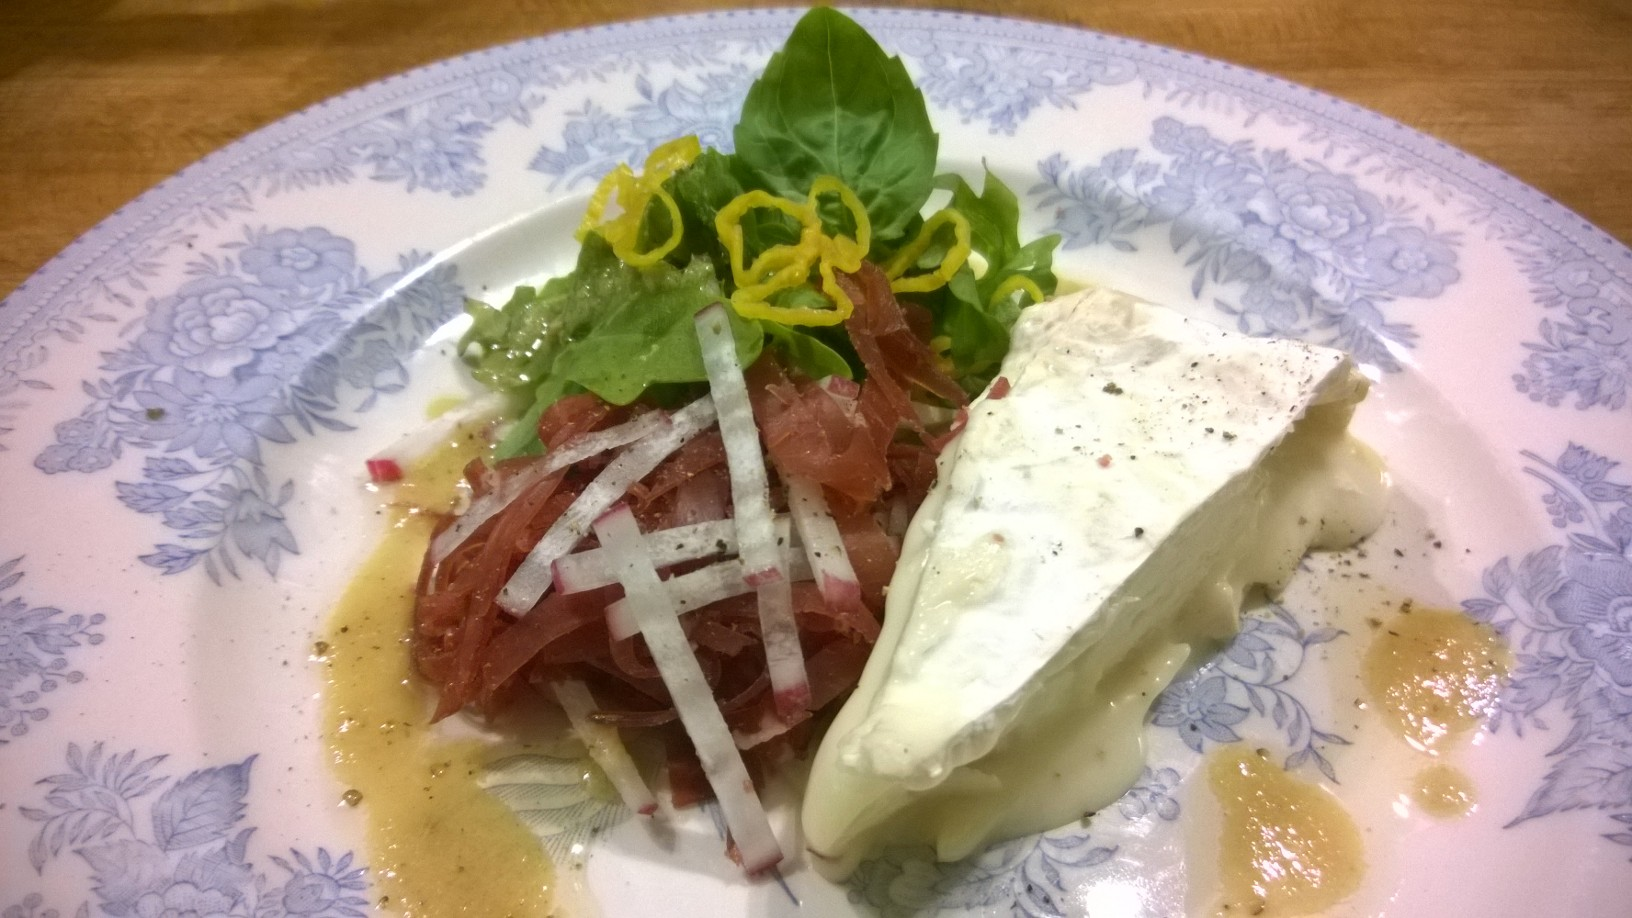
Who can resist the soft melt of warm camembert? It’s one of those things you can almost scoop off the plate! Its mellow, creaminess works incredibly well with stronger flavours. I’ve teamed it with the ripe taste of truffle-oil and the piquancy of chillies. It diffuses the heat of scotch-bonnets perfectly, and is further complimented by the nutty, peppery flavour of rocket.

To provide a bit of textural variation, I’ve added some finely sliced radish. This lends the salad a pleasing crunch. The rich heaviness of Bresaola counterpoints the other ingredients, by providing that all important ‘density’. The result? A symphony of taste and texture that is both satisfying and filling. And all without carbs!

Start by making the dressing. Put a teaspoon of Dijon mustard into a mixing bowl. Using your eye as guide, add a double volume of white-wine vinegar and a small squeeze of lemon-juice (half mustard to liquid). Grind in pepper and salt and then whisk smooth. Now start to beat in your truffle-oil. I use half truffle-oil to light olive-oil, but it all depends on how extravagant you’re feeling. Whisk in the oil in slow drips, so that it incorporates immediately. Once you’ve got four times the volume than you had of mustard-vinegar mix; give it a quick taste to adjust for seasoning and tartness. We want it sharp, but not unpleasantly so!

Shred your Bresaola with a sharp knife and toss this in a little of your vinaigrette. Position off-centre on the plate, and do the same with your rocket. Finely slice a radish and then cut it into strips. Sprinkle this over the salad, then chop a little yellow-chilli to garnish the dish and add some colour.

Meanwhile, slice your camembert into wedges. Place onto a non-stick baking-tray and oven-bake for a couple of minutes (maximum) until the cheese starts to give way around the edges. Make sure you consistently check its progress throughout this time – every oven is different, and the last thing you want to end up with is a pool of cream on the oven-floor!

Once warmed through, lift onto your plate with a palate knife, then drizzle a final flourish of dressing around the lot!

There’s only one word for this dish – delectable! I hope you enjoy it.

Thanks for reading and bon ap!

Adam.

Casseroled Bavarian Sausages with Bacon, Savoy & Gouda. A Low-Carb ‘One-Pot’ Winter-Warmer Without the Stodge!

BRATWURST

At this time of year, food must be comforting and rich. This isn’t solely to ward off the chill. It’s equally down to the limited selection of seasonal vegetables we have available, and the slow cooking-methods required to process them. Gone are the long Summer days of late-dining and salads made of fresh, raw vegetables. Nature’s harvest in Winter is every bit as delicious, but just needs a little bit more cooking to deliver its best!

One of the long-standing problems with Autumn- & Winter-fare, is that it’s traditionally hugely carb-heavy. The mind immediately conjures up potatoes, pastry, root-vegetables and bread; all of which are ‘off limits’ on a healthy ketogenic-diet. They all send a diabetic’s blood-sugar soaring & you’d have to expend ‘Olympic levels’ of energy to stop your body from storing away all that glucose as fat!

Thankfully, there’s also a huge range of delicious ‘low-carb’ options available. These tick all the boxes in terms of ‘comfort-value’, but save us the bloat and instinctive urge to hibernate, which arises from glucose-overload!

This particular dish is a favourite of mine. I adore food from Bavaria and Southern Germany. The French tend to use red-wine in their cooking, whereas these areas of Germany err more towards the whites. This gives the food a comparative ‘lightness’ which is hard to beat! The strong, robust tastes of mustard and vinegar provide a ‘backbone’ to that lightness, which renders the food fresh-tasting but also hearty.

I used Nordhessische & Nürnberger Bratwurst (purchased from local supermarket), but good results would also be achieved with standard sausages. It’s mainly the wine, mustard and vinegar which contribute to the taste; the rest comes down to availability.

Start by placing a heavy-based casserole onto the hob. Add diced bacon (lardons) and fry until brown. If more fat is required to prevent the bacon from sticking, then add a knob of butter and a splash of oil. Meanwhile, chop onions or shallots into hearty chunks and add these to the pan. These can be followed by whichever vegetables you have to hand; I used celery, green pepper, mushroom courgette and leek. Please note – cabbage comes later!

Whilst the vegetables are sautéing, chop your large Bratwurst into inch-plus chunks. Add these to the pan, with the smaller Nürnberger to follow a couple of minutes later.

Finely chop garlic and parsley stalks and add these to the casserole, then leave it to build up heat for a minute or so, before you deglaze the pan with half a glass of crisp, clean white-wine (such as riesling, or dry  Gewürztraminer). Once the liquid has all but evaporated, top up the pan with water until the sausages are up to their necks in it! Add a good teaspoon or so of mustard and a small teaspoon of white-wine vinegar. Place the pan in the oven for 20 minutes with the lid off, which allows the sausages to brown on top.

Meanwhile finely slice your savoy cabbage (circa half). Wash and drain this, then add to the pan when the 20 minutes have elapsed. By this time, the liquid should have reduced by at least half. Sprinkle paprika atop the cabbage, season well, then replace the lid and put back into the oven for 15 minutes until the cabbage is cooked through and tender.

Give the dish a good stir & check for seasoning. Finish by mixing in a knob of butter for richness. Garnish with a generous topping of finely sliced Gouda, drizzle of cream and a sprinkle of parsley. This is most definitely best enjoyed in bowls, with a soup-spoon on hand to make sure you don’t miss out on the rich sauce!

Et voila! Dinner is served.

Thank you for reading and bon ap!

Adam.

Chilli-Beef Skewers with Quick Green Curry – Low-Carb Fast-Food That Tastes Anything But!

beef skewers

Making your own curry in no way means spending hours in the kitchen, grinding spices and copiously chopping. With the right recipe; fantastic results can be achieved in minutes, with no compromise on flavour.

I save this dish for a midweek, when I’m pushed for time. You can go from chopping-board to plate in half and hour, which is a real help if you’re late back from work. This recipe is low in carbs, which makes it perfect for diabetics, gluten-intolerants or those on a ketogenic-diet. Once you’ve tried it, you’ll start relying on it whenever you’ve got hungry mouths to feed in a hurry.

The curry can be served with any protein of your choosing; there’s no need to stick with beef. I accompany this with chicken, quorn, lamb, pork and even white fish. The world’s your oyster (okay so I fib; I haven’t tried that combination yet).

Sauté a sliced onion in oil over a medium heat. Chop chilli and garlic, then add these to the pan. Cook for a couple of minutes, add sliced mushrooms, then shake in 2 teaspoons of cumin, 1 teaspoon of ground coriander & a couple of stock-cubes. Cook for a further minute before pouring in sufficient water to cover the vegetables. Stir in a couple of handfuls of frozen spinach (if using fresh spinach instead then add this 2 minutes before serving) and reduce the liquid to half its volume. Once reduced, mix in half a can of coconut milk and simmer until the sauce has thickened.

Meanwhile, empty minced beef into a large mixing-bowl. Shake on a teaspoon of garlic granules and the same of chill powder. Season well, then mould onto skewers with your hands. Oil a piece of tinfoil and roll each skewer backwards & forwards like a cigar to give the kebabs a ‘professional’ shape and finish. Oven-bake in a hot oven for 10 – 15 minutes.

Two minutes prior to service, add mange-tout to the sauce and a good whack of chopped coriander. A generous squeeze of lime will lift the flavour and form a fuss-free substitute for lemon-grass.

Spoon the green-curry into bowls and take the kebabs out of the oven. Position these on top of the curry, and garnish the lot with more chopped coriander and lime.

Delicious low-carb food in no time!

Thanks for reading and bon ap!

Adam.

Creamy Celeriac, Celery, Cauliflower & Stilton Soup – low-carb, filling & delicious!

soup

If you enjoy cooking, then there’s no doubt that markets, butchers’, greengrocers’ & supermarkets are places of great promise. There’s a huge joy in deliberating what to buy next, and what wonders you can cook up with a ready supply of ingredients. But if you’re anything like me, the frequent food-shopping trips will inevitably leave you thinking “now what I am going to do with all this…?” At some time we all experience the situation where our larder is bigger than our stomachs!

A well run kitchen is one where left-overs are both planned for & managed; the low-carb kitchen is no different! Wastage of food is to be abhorred and never tolerated. It’s not only a waste of money, but also squanders environmental resources & is a slap in the face to those who live their lives without (are you getting the message that I don’t like wastage?).

To combat this, soup has always been the cook’s best friend! So many little bits of ‘this and that’ can go into the saucepan, in what can truly be a rags to riches exercise. The high vegetable content makes it incredibly nutritious; definitely a staunch contributor to your 5 a day! Another benefit of soup is that is freezes well and is great for lunches at work when time is short.

Anything puréed is not normally the best format for diabetics, as the cell structure is broken down prior to digesting the food. Carbohydrate is therefore released into the blood-stream far more rapidly as it doesn’t need to be processed further by the body. Thankfully, this recipe shouldn’t present that problem. The contents are extremely low in carbs, plus the addition of cheese serves to slow the absorption of what little glucose there is (fat slows down the body’s metabolism of carbohydrate).

This particular recipe is not only nutritious and delicious; it also posed the perfect solution to my ever-mounting pile of vegetables! I had a small bowl of cauliflower-rice that wasn’t enough to stretch to two portions, plus a small wedge of celeriac that was going nowhere on its own!  Any surplus vegetables would work wonderfully here, including spinach, broccoli (stalks too!), peas, rocket, watercress, courgette and mushrooms. About the only common vegetables which don’t make good soup are peppers, beans and aubergine.

Take a medium onion and roughly dice. Place a deep casserole onto the hob, with butter and a little oil, then add the onion. Chop your celery and celeriac and stir them in. If you’re using fresh cauliflower, slice into chunks and add this too (I used left-over cauliflower-rice, so put this in at the end because it was already cooked). Don’t allow the vegetables to burn, as this will muddy the taste.

Once the onions start to turn translucent, pour on water so that the vegetables are well submerged. Don’t go overboard on the water – it’s easy to add more, but sacrifices taste if you end up drowning them. Crumble in a couple of stock-cubes & dried herbs, then place the lid on the pan and simmer for 20 minutes until the vegetables are soft enough to collapse when pressed against the side of the pan with the back of a wooden spoon.

Finely dice your blue-cheese, then sprinkle this in (quantity to taste). Stir around, so that the cheese begins to melt, then go in with a stick-blender until smooth. Pour in a splosh of cream, then taste to check for seasoning.

Ladle into bowls and eat whilst piping hot. Just the thing for a cold, wintry evening!

Thanks for reading and bon ap!

Adam.

Thai Smoked-Haddock Fish Cakes with Chilli-Garlic-Spinach and Wasabi Mayonnaise – innocent indulgence without carbs!

fishcake

The rich strong flavours of oriental food form the perfect accompaniment to smoked fish. If either one is accompanied by something less robust, then the secondary element risks becoming lost or overpowered. A well executed dish aims to strike a balance between all components. Haddock and Thai-paste are therefore a match made in heaven!

Don’t be put off by the seeming complexity of this dish. It’s actually very simple and straightforward. Like a lot of low-carb dishes it’s quick to cook and 100% diabetic-friendly. Take the chilli-levels as high as you dare for a little extra punch. I was also ‘generous’ with the wasabi. Condiments are pretty scarce on a ketogenic-diet, so grab the chance when you can!

Start by making the fishcakes. Roughly chop your haddock and mix this with a can of drained tuna. Finely dice chilli, coriander stalk, lemongrass and a clove of garlic, then add these to the fish-mix. Season well and stir in a beaten egg. Using your hands, thoroughly combine the ingredients and form into balls, squeezing out any excess liquid. Fishcakes are far harder to make without flour or potato, so simply press them into submission. The egg will hopefully do the job of holding them all together.

Shallow fry the fishcakes in hot oil for a minute on each side until nicely browned. Then place onto a baking-tray and oven bake for 15 minutes.

Whilst the fishcakes are in the oven, microwave fresh or frozen spinach. After a minute or so, crumble in a chicken stock-cube, finely sliced chilli and a crushed clove of garlic. Grind in pepper and salt and put back into the microwave for a further 2 minutes or so, until the spinach is piping hot and cooked down. Fresh spinach will obviously be far quicker than frozen.

Serve the spinach onto plates, top with radish for colour and a small sprinkle of parmesan for richness. Take the fishcakes out of the oven and serve alongside the spinach. Add a generous dollop of mayonnaise and a good squeeze of wasabi. Finally squeeze a lemon-wedge over the lot and garnish with ripped coriander-leaves.

I also added a couple of quails eggs and steamed French beans. This is simply because I needed to use them up (I hate wasting food!!!!) but the recipe certainly doesn’t need them.

Mix a little wasabi with the mayonnaise prior to each mouthful. That way, your taste-buds receive the full onslaught of flavours all in one go!

Need I say it…? Delicious!

Thanks for reading and bon ap!

Adam.

Spiced Lamb Koftas with Aromatic Cumin-Roasted Vegetable Ragout – Maximum Flavour, Minimum Carbs!

lamb kofta

I’ve always loved cumin. It has a warm aromatic flavour that adds depth to a dish like no other. In Autumn, when the evenings turn cold, this is just the kind of food I want – bursting with flavour, yet quick and easy to prepare. The perfume of spices instantly transports you to warmer climes – if ever there was soul food, this is it!

This dish is perfect for those on a ketogenic- / LCHF diet, or equally diabetics & gluten-intolerants. What little carbohydrate there is comes solely from vegetables, so it’s bursting with goodness. For those with a higher carb allowance, add a half-can of chickpeas or starchier vegetables such as squash or pumpkin. The ragout is incredibly adaptable to whatever you have on hand – just the thing for a mid-week meal therefore – use up the leftovers!

Start by dicing your vegetables. I used onion, celery, peppers, aubergine & mushrooms. Shake on a generous dusting of cumin and mix in two crushed cloves of garlic. If you like chilli, finely chop as much as you can bear then season well. Pour on sufficient olive-oil to coat then roast in a hot oven for half an hour.

Meanwhile, make your koftas. Place lamb mince into a bowl and measure in a small teaspoon of garlic salt, the same of paprika and two teaspoons of ground cumin. Grind in pepper and crushed sea-salt. Give it a good mix with your hands, then form into balls, about the size of a golf ball. Oven bake for half and hour until brown and succulent.

When the meatballs go into the oven, remove your vegetables and add to these a drained can of chopped tomatoes. Squeeze in some lemon juice and crumble in a chicken stock-cube. Chop the stems of your coriander and stir these into the mix. Place back into the oven for the remaining time it takes to cook the lamb.

Once cooked, take the lamb out of the oven to rest for a couple of minutes. Remove the vegetables and stir in a generous handful of grated cheese. This adds richness and a bit of body to the sauce. Ladle the ragout into bowls, then pile up your koftas to one side. Garnish with ripped coriander leaves and a final squeeze of lemon.

The perfect way to bring a little warmth to a cold November night.

Thanks for reading and bon ap!

Adam.

Madagascan Vanilla & Pecan Crowns – Delicately Sweet; Deliciously Low-Carb!

pecan

The soft, smooth, warm taste of vanilla is a wonderful thing. So often people simply use it as a background flavour, which never quite does it justice. When allowed to take centre stage, it delivers stunning results.

This cake fills the kitchen with the true old-fashioned scent of baking. The sweet delicacy of vanilla goes perfectly with the chewy, nutty crunch of pecans. The combination is so delicious that you’d never know it’s low-carb. This makes it perfect for diabetics, paleo-fans, gluten-intolerants and those on a ketogenic-diet.

To make the cake, weigh up 5oz of ground-almonds and 5oz of dessicated coconut. Place in a sturdy mixing-bowl and stir in 1 teaspoon of bicarbonate of soda, plus the same of flaxseed. If you’re using vanilla-pods, scrape out the seeds of one pod and add to the mix. If you prefer dried vanilla powder (as I used), half a teaspoon should be more than enough. You can use vanilla-essence but this tends to contain liquid sugar-syrup, which isn’t ideal from a carb-perspective.

Measure 3oz of xylitol sweetener and add this to the mix. I always use xylitol in baking. In my experience, it’s the only sweetener which retains its sweetness once cooked; and its granular texture means that it behaves exactly like sugar in cake-recipes.

Set 2 large tablespoons of coconut-oil to melt by the range; or microwave it until liquid. Finely grate the zest of an orange and add both this and the coconut-oil to the mixing-bowl. Stir in 3 beaten eggs and a good handful of chopped pecans. Fold these in until you have an obliging dropping-consistency.

Spoon the cake-mix into your cake-tins. I used small, individual squares, but this can equally go into one larger tin; round or square to your preference. Bake in a moderate oven for circa 30 minutes, until risen, golden but not too brown. The cakes should be spongy and resistant to the touch, and rise back up when pressed lightly with the finger. Remove from the oven and cool until room-temperature.

Once the cake is thoroughly cooled (it needs to be cool, or your icing will melt); place 4 large tablespoons of cream cheese into a bowl. Add half a cup full of table-sweetener (this can be other than xylitol, because it’s uncooked) and a third of a teaspoon of vanilla powder. Fold through with a knife until vanilla seeds are evenly dispersed into the mixture. Make sure not to over-mix or it will go runny. Test for sweetness, adjusting vanilla or sweetener levels to your preference.

Layer the frosting generously atop the cakes with a palette-knife. Top with pecan nuts and lemon zest to decorate.

Serve with a light drizzle of cream for that extra touch of indulgence. Once you’ve made this cake, you’ll go back to it time and time again – it’s a true classic in the making!

Thanks for reading and bon ap!

Adam.

Velvety Baked Vanilla Cheesecake – diabetic-friendly, gluten-free & LCHF! Who needs carbs?

cheesecake

There are some low-carb puddings that taste like ‘diet food’. Take my word for it; this one doesn’t! Who’d have thought you could eat cheesecake and still lose weight? It’s things like this that make a ketogenic-diet a true pleasure to follow. And because it’s made with Xylitol & ground almonds, they’ll be no impact to your blood-sugar. This makes it diabetic-friendly and an excellent choice for those with an intolerance to wheat.

Did I mention it’s delicious?

Take a teacup full of ground almonds and half a cup of dessicated coconut. Mix this with half a cup full of Xylitol and then pour in double-cream until the mix clumps together but is not ‘wet’ (circa half a cup…?). The mixture should be shape-able.

Press the mix into the base of a buttered spring-form tin, making sure to bank some dough up against the sides. The aim is that this forms a watertight seal in the tin, and prevents the cream-cheese mix from leaking out.

Bake the base in a medium oven for 15 minutes, or until it’s very slightly brown and feels ‘just set’ to the touch.

Empty 2x 200g packets of cream-cheese into a bowl and crack in two eggs. Add half a cupful of Xylitol and a further half cup of double-cream. Now shake in a good half-teaspoon of powdered vanilla seeds or the equivalent of one pod. You can use liquid essence, but this tends to contain sugar-syrup. Whisk the mixture until ‘divinely smooth’ and give it a taste. It should taste rich, creamy, fragrant and perfect. If not, eat it all and start again!

Ladle the cream-cheese mix lightly on top of your base. Bake in a medium oven for 25 minutes, then turn the oven down to low and bake for a further 20 minutes. You want the mix to wobbly very slightly when the tin is nudged, but not appear liquidy.  It should only bear very light traces of brown on top. If golden or cracked, then you’ve unfortunately cooked it for too long or too high!

Leave the cheesecake to cool until room temperature, then remove from the tin. Refrigerate for one hour until lightly chilled. Serve with a dollop of whipped cream and strands of orange zest for additional fragrance.

Did I mention it’s delicious? Oh yes, I think I did.

It’s delicious!

Thanks for reading and bon ap!

Adam.

Wintry Slow-Braised Oxtail with Echalion-Shallots & Port; Served with Mange-Tout & Steamed Broccoli in a Blue-Cheese Béchamel – rich, satisfying & delicious. And all without carbs!

oxtail

Oxtail is one of those things that has rather gone out of fashion. Principally I think because supermarkets rarely stock it, and consequently you have to go to the butcher’s to get it. Also, cuts of meat which require long, slow cooking don’t tend to fit in with our modern ‘convenience-lifestyles’ particularly well. It’s not the kind of thing you can grill for 12 minutes then it’s done!

In spite of its image problem, oxtail is something which definitely deserves the effort. Like lamb, it has that rich, unctuous quality, where the meat literally collapses and melts onto the fork. Because it’s braised on the bone, slow-cooking releases the marrow’s sweet, gelatinous stock, which gently cooks out into the sauce. It consequently has that feeling of ‘casseroles of old’.

Few low-carb dishes have the mouth-feel of a ‘thickened sauce’. The good news is that oxtail does it automatically, so you get the feel of flour, without the carbs!

As the kitchen slowly fills with the scent of braised beef, and each family member in turn asks hungrily “what’s for dinner?”; you’ll truly feel that rare sense of achievement which so often gets lost in modern cooking. This dish is one of those things where good things come to those who wait. Trust me; it’s worth it!

Heat a heavy-based casserole on the hob and then throw in a knob of butter and a little oil (to stop it burning). Salt the oxtail and add it piece by piece to the pan; enjoying the rich sizzle & odour as the cool meat instantly caramelises against the hot metal. Turn the meat as each side seals, re-seasoning the pieces as you go. Remember not to over-crowd the pan. Meat is a solitary fellow when it browns; it doesn’t much care for company. Put too much in at once and the temperature of the pan will cool. At this point, all you’ll get is meat which steams. There won’t be a sniff of caramelisation in sight. That would be a horrid pity!

Once the meat is nicely sealed, add a good handful of eschalions (also known as banana shallots). Stir these in, then add a clove of chopped garlic. Don’t go too heavy on the garlic with this dish. It’s not coq au vin, where the blandness of the meat requires a hefty boost in flavour. The oxtail can very much hold its own in taste and richness – but you must give it a chance.

De-glaze the pan with a good glug of port, then once the liquid has reduced, top up with water until the oxtail is ‘up to its eyebrows’ in liquid. Shake in some dried herbs, a bay-leaf and add a good teaspoon of Dijon mustard. Place the lid on the pan and, when it comes to the boil; move into a low oven (circa 130˚) with the lid on for a good two and a half hours.

Following this, lift the lid and you should see a rich, ‘glossy’ sauce which has reduced by roughly half its volume. If there is still any fat remaining that hasn’t cooked out; upend those oxtail pieces in the pan, so that the fat is facing upwards (like fat on a roasting joint). Return the pan to a hot oven without the lid, so that the remaining fat browns and the sauce reduces down by a further half.

Meanwhile prepare your béchamel. When I say ‘béchamel’, this is really a sauce based on cream-reduction, as it uses no flour. The end result is still the same however – rich, creamy and smooth. Make up a full cup-worth of double-cream, diluted by half with water. Pour this into a thick-bottomed saucepan and place onto the simmering-plate. Crumble a handful of blue-cheese into the pan, season and leave to thicken for 20 minutes, stirring occasionally.

Chop your broccoli and steam with the mange-tout for a couple of minutes, until a sharp knife goes in but ‘meets resistance’ (we still want the vegetables to retain their bite). Take your oxtail out of the oven and ladle into a serving-dish. Pile the steamed vegetables next to this, and pour over your blue-cheese sauce. Serve in large bowls, making sure each portion gets a generous scoop of the thickened gravy.

Perfection itself!

Thanks for reading and bon ap!

Adam.

The ‘Big Breakfast’ Low-Carb Omelette – the joy of a leisurely Sunday breakfast every day of the week!

breakfast omelette

The ketogenic-diet can be problematic at one time of day – breakfast!

Trying to find time to cook healthy low-carb bacon and eggs, when you’re running late for work isn’t easy. Equally, when you’re still half asleep; it’s questionable whether you actually want to be standing over a hot stove! I’d rather be outside getting some fresh air and exercise, before I’m resigned to sitting behind an office-desk all day!

The solution I’ve found is to use the leisure and relaxed timescales of a Sunday morning to prepare a big hearty breakfast. The remainder of this can then be portioned up, to be eaten on those rushed mid-week mornings! The omelette can be eaten cold, or reheated in the microwave (1-2 mins) or oven (5 mins). This makes mornings a ‘piece of cake’. Diabetics and low-carbers, take heed.

Roughly chop smoked-bacon and add to a non-stick pan with a little butter. Following this, add chopped-up sausages or breadcrumb-free sausage-meat. Sauté until they begin to brown, then stir in sliced onion or leek (I prefer leek as it has a ‘softer’ taste for breakfast time).

Once these start to turn translucent, crank up the heat and add chopped mushrooms & courgette. Why raise the heat? We don’t want the mushrooms to leach their water – they need to fry to prevent this from happening. If the temperature is too low, they’ll just steam and release all their greyish liquid. This leads to a watery omelette and looks unappetising.

Once the vegetables are cooked, break six eggs into a jug and season well. You can add roughly chopped herbs to the mix if you like. Beat the egg with a fork then pour on top of your omelette ingredients. Incorporate the liquid routinely across the surface, by opening up gaps in the dry-ingredients, then closing them again once the egg-mix has seeped in to close the gaps. Then simply top the lot with grated cheese and place under the grill for 3 minutes until sizzlingly golden and brown.

Voila – breakfast is served. It couldn’t be easier.

Thanks for reading and bon ap!

Adam.

Creamy Italian Pesto, Smoked-Bacon & Mascapone Chicken with Fresh ‘Traffic-Light’ Salad – a green light for low carbohydrate!

pesto chicken

Sometimes, all we want from food is a sense of indulgence. When that’s your mood, it needs to be quick and fuss-free (you don’t feel very indulgent when you’re up to your ears in washing-up!).

Thankfully, Italian food comes up trumps on all these fronts. It’s light yet rich; packed with flavour, yet simple. I’m a huge fan, especially now that the evenings are getting so wintry and dark! Close your eyes and dream of Italy. Then feel smug as this won’t affect your waistline! It’s low-carb, gluten-free and won’t impact a diabetic’s blood-sugar. What more do you need? Give it a go.

In a sauté-pan, brown your chicken-fillets in a mix of butter and oil. Dice your bacon and add this to the pan. Slice half a leek & mix in, continuing to cook on a medium heat until soft. Finely chop a large clove of garlic and sauté this with the rest. After a couple of minutes, crank up the heat and de-glaze your pan with a very small amount of dry martini.

Add half a cup of water and a good tablespoon (at least) of pesto. Reduce this on the hob until the liquid is half its original volume. Stir through half a tub of mascapone and some chopped basil.

Meanwhile, finely slice red, yellow and green peppers, then mix these in a salad-bowl with crisp, fresh salad and a good glug of olive-oil. Sprinkle with parmesan-shavings, then serve piled up next to your chicken in a generous-sized bowl.

This is the sort of indulgent comfort-food that hits the spot each and every time. The carb-count means you can dive straight in for seconds, so what’s stopping you?!

Thanks for reading and bon ap!

Adam.

Russian Millionaire’s Salad! Quails’ Eggs, Caviar, Smoked Salmon & Truffle-Dressed Beans. Decadent, Indulgent & Low Carb!

millionaire

Diabetes and dieting are two serious things. But food doesn’t have to be! We jokingly call this our Russian Millionaire’s Salad, because if we were to buy the real ingredients, we’d need a millionaire’s budget to afford it!

But this dish very much proves that luxury doesn’t necessarily command a high price tag. The caviar is not sturgeon; rather Atlantic lump-fish roe. Truffles come in the form of inexpensive truffle-oil, mixed into the vinaigrette-dressing. The salmon is by far the dearest thing on the plate (but no-one needs know that).

So place your vodka bottle in the freezer for a couple of hours, and dig out your finest cut-lead-crystal glasses. Imperial Russia may be long gone, but we can still drink nostalgically to its memory! The second toast can be to ketones – salads don’t come much lower in carbohydrate than this; so diabetics, gluten-intolerants and LCHF-dieters can all dig in with aplomb!

Place a pan of water on to boil, and cook the beans for two & a half minutes until al dente. Lift out of the pan and plunge into cold water, so they keep their colour and crunch. Do exactly the same with the quails’ eggs. Any longer than 2 1/2 minutes will mean they’re hard-boiled. I like a slight softness to the yolk, but this is to preference. Once the eggs have sat in cold water for circa 5 minutes and are cool to the touch; shell, rinse and pat dry with paper-towel.

Now for the dressing. Put a teaspoon of Dijon mustard into a mixing bowl. Using your eye as guide, add a double volume of white-wine vinegar and a small squeeze of lemon-juice (half mustard to liquid). Grind in pepper and salt and then whisk smooth. Now start to beat in your truffle-oil. I use half truffle-oil to light olive-oil, but it all depends on how extravagant you’re feeling. Whisk in the oil in slow drips, so that it incorporates immediately. Once you’ve got four times the volume than you had of mustard-vinegar mix; give it a quick taste to adjust for seasoning and tartness. We want it sharp, but not unpleasantly so!

Toss your beans in the truffle-dressing and place onto your serving-dish. Stand the eggs at intervals and sprinkle these with paprika. Layer on your smoked salmon and dollop a good tablespoon of caviar beside this. Sprinkle on sliced radishes for colour and bite, followed by a good squeeze of lime.

Slice a celery-stick into inch-chunks and top with salmon-pâté (salmon off-cuts blitzed up with lemon-juice and crème-fraîche). Serve these at intervals around the side, again sprinkled with paprika.

This dish feels incredibly decadent, yet it’s actually really straightforward and quick. Sometimes it’s nice to prepare something that’s just a little bit different; and this recipe certainly qualifies as that! It can also be eaten for breakfast; indeed we’ve had it on Christmas morning a couple of times.

Whatever the occasion, you’ll feel like a millionaire every time you have it. For most of us, it’s the closest we’ll ever come!

Thanks for reading and bon ap!

Adam.

Cauliflower Rice – the Low-Carb Food Revolution Continues!

cauliflower rice

Much like zoodles, this is one of those things that will change the way you eat forever! Cauliflower rice.

No matter which diet you’re following, nutrient-rich vegetables should make up the principal portion of your dinner-plate. This just got even easier with cauliflower rice.

Diabetics, gluten-intolerants and those on an LCHF regime can tuck into this with vigour. It’s incredibly low in carbs and couldn’t be simpler to make. It even reheats well! You’ll wonder how you ever got by without it!

Enjoy it with curries, Middle-Eastern dishes, West Indies, recipes from the South Pacific – the list is endless. It also makes the base for a brilliant salad in the lunch-box for work. I can’t get enough of the stuff  Once you’ve made it; you’ll soon see why!

All you do is cut the cauliflower head into florets. Pulse these in a food-processor until the texture is as per rice grains (see the picture above). It’s best doing this is batches, so that the food-processor doesn’t turn the lot into purée!

Once chopped, sauté in butter with a little olive-oil (so the butter doesn’t burn) for around four minutes. Taste to adjust the seasoning and check that the cauliflower is cooked through. We’re looking for tender, but still keeping its bite.

Et voila! Your cauliflower rice is ready! We’re taking the above batch to a dinner party this evening. Pre-cooked, then a minute or two in the microwave and all done. Few things could be easier!

Thanks for reading and bon ap!

Adam.

Padron Peppers… Who’ll get the hot one???

padron

I’ve touched on these briefly in a previous post; but that was using them as a salad-ingredient. Time now to give them a little one-to-one attention, as they certainly deserve it!

Padron is a municipality of north-west Spain. The peppers which take its name, are principally used in Tapas dishes. I can very much see why, as they make the perfect low-carb accompaniment to drinks, or served alongside a selection of other ‘light-bites’ for a dig-in-and-share kind of meal.

Why are they so special? One in ten of them is hot and fiery like a chill-pepper; the remaining nine are sweet, smooth & mild like the classic capsicum. This adds a fun element of ‘Russian Roulette’ into the diner-time-equation. And besides that; they taste wonderful!

Padron peppers are really easy to cook. Heat a glug of good quality olive-oil in a pan. Throw in your peppers, and season with rock-salt and ground pepper. Move them around in the pan until all sides blister into pander-spots (see picture above). Once they’re soft and look as if they’ve aged 100 years in two minutes (the blistering looks like wrinkles); remove them from the heat and shave on a generous peel of Manchego. Failing this, you can use Parmesan, but it would seem somehow disrespectful to our Spanish cousins to make that the default option!

Serve either direct from the pan or in a thick earthenware bowl.  Try to make sure each pepper is eaten with some of the cheese – the salty sweet combination is sublime!

Thanks for reading and bon ap!

Adam.

P.S. – I was given a most beautiful Mauviel copper sauté-pan for my birthday yesterday by NJ. Padron Peppers were its true baptism of fire! Nothing cooks like copper. I love it; so expect to see a lot more of it on this blog!

You’re the cream in my coffee…

coffee

When Marlene Dietrich sang “you’re the cream in my coffee, you’re the salt in my stew” it was obvious to those in the know, that she was following a ketogenic-diet!  That would also explain her perfect skin and figure!

One of things which may seem incredibly alien when first starting a ketogenic-diet, is the switch over from milk to cream in your morning-coffee.

I’ve never been a big fan of cream, so it was quite a big thing for me. Milk is most certainly off the cards, due to its high carb-content. Far better to allocate the daily carb-allowance to roasted celeriac or a generous serving of pudding; than squander it on a quick drink. But then how to get round the coffee issue?

Two things I’m not keen on….

1. Drinks that are so hot they take the roof off your mouth for the next three days

2. A normal white coffee that ends up tasting like a latte because the cream over-rides all taste of coffee-bean.

To avoid the former, you have to put so much cream in that you may as well be drinking a milk-shake!

To fix this, I’ve taken to diluting the double-cream with water, half and half. This means it behaves more like milk in lowering the temperature; but lacks the carbs. It also makes it more economical, as daily cream can get a little pricey!

A small thing I know, but if someone had suggested this to me when I first ‘made the switch’; it would have made my first week a little easier!

Thanks for reading and enjoy the day,

Adam.

Braised Lamb-Shanks with ‘Binham Blue’ Cabbage – fine dining without the carbs!

shank

When lamb-shanks are done well, there can be few things to rival them. The lamb should be unctuously tender, and fall from the bone at the merest suggestion of a fork. Although the meat should be meltingly soft on the inside; that tenderness is countered by a thick, stickily-glazed crust. Succulent, brown, & caramelised is what we’re aiming for. The only word is mouth-watering!

Because lamb is so rich, I always tend to accompany it with ‘plainer’ vegetables. Whatever you use needs to provide a sharp contrast in texture with the softness of the meat; al dente cabbage is both seasonal and incredibly fresh-tasting, to counter out the depth of the lamb.

One trick with lamb is that it requires a generous amount of salt. To provide this, and equally introduce a third and final flavour to round off the other two; I’ve added blue cheese. This gives the dish that all important ‘saltiness’; yet is strong enough to hold its own against the lamb and cooked greens. Be careful not to choose a ‘blue’ which goes runny with heat (e.g. Gorgonzola). We don’t want the cabbage to be swimming in cream-sauce (that would compromise its freshness). Instead, we want little ‘taste-explosions’, so that the cheese doesn’t over-power the dish; rather ‘punctuate’ it.

I used a local cheese ‘Binham Blue’, which is artisan-made and has that slightly ‘chewy bite’ which doesn’t crumble or turn to liquid. For a blue-cheese, the taste is ripe & robust, but also mellow & delicate. I highly recommend it if you ever find yourself in these parts. Any blue you like will be fine however; as long as you bear in mind how the texture will respond to heat.

Start by seasoning your shanks. Seal these on a high heat until the surface starts to brown. Add a sliced onion and continue to seal in a hot oven for 20 minutes. Bring back to the hob and turn your oven right down to low (140-150º max). Deglaze the pan with a little port or red wine, then add a bayleaf, chopped herbs and a small amount of water. Place the lid firmly on the pan and roast in the slow-oven for ideally three hours. At this point, remove the lid and check the meat for tenderness by ‘nudging it’ with your spoon. The bone should have retracted by one quarter of the original and the meat should ‘threaten’ to fall off the bone if moved. Sprinkle a final amount of seasoning on the meat, then back into a hot oven with the lid off the pan for 20 minutes to ‘crisp up’ on top.

Meanwhile shred your cabbage. Steam for 5 minutes until tender but still with bite. Season, sprinkle in chopped herbs, then your diced cheese. A small knob of butter or ‘shake’ of oil with give the cabbage a shine and keep it glossy. Keep the stirring to a minimum to preserve the shape of the cheese, then pile up in the middle of your serving-plate. I like to add a small squeeze of lime to lift the cabbage.

Take your shanks out of the oven and position each one atop its cabbage-bed. Drizzle a few of the pan-juices around the bowl then voila! Dinner is served.

I needn’t tell you how good this is – you must try it yourself! The dish is suitable for a ketogenic-diet (LCHF), but also diabetics and gluten-intolerants. There’s no excuse therefore; everyone can get stuck in with gusto! And they’ll all agree it was worth the wait!

Thanks for reading and bon ap!

Adam.

Spatchcocked Roast Chicken Satay with Buttered Greens & Cauliflower Rice – a low-carb masterpiece!

spatch

Spatchcocking poultry is far easier than it looks. But why go to all the effort? Quite simply, the meat will cook far more quickly, as a greater surface-area is exposed to the heat. This makes the manifest joys of dishes like roast chicken easily accessible on a week-night! What would normally take two hours in the oven, only takes one, which is much needed when you’re late home from work!

Cauliflower rice is my new big discovery! I shall devote a specific post to its wonders later in the week; but trust me when I say, it’s one of those low-carb, diabetic and gluten-free dishes that will change your life! It adds that all important “fill-factor”, which can sometimes be missing on a ketogenic diet. Expect to see it cropping up a lot on this site therefore!

Satay is always a pleasure to cook. The thick, richness of the sauce is aromatic and truly satisfying. Above and beyond that, it’s incredibly easy to make! This dish may look carb-heavy and time-consuming, but in actual fact, it only takes an hour and couldn’t be simpler! Take my word for it – it will soon become a staple in your low-carb repertoire!

Start by spatchcocking your chicken. This is done by cutting down the length of the breastbone with a very sharp knife. This will open the chest-cavity, which you then break back on itself to flatten the bird out. Once done, trim the parson’s nose and neck-end, so that you have a nice neat butterfly. It’s worth noting that with a sharp knife, this is simple and takes 2 minutes. With a blunt knife, you’ll be hacking for hours and the finished product will very much reflect that. Like all things therefore, preparation pays off! Sharpen your knife.

Season the skin-side, applying a liberal amount of rock-salt and a good shake of dried herbs. Into a hot oven it goes for one hour, or until golden and crisp.

Meanwhile, slice an onion and sauté in butter / oil until translucent. Then add chopped chilli and garlic and cook for a further two minutes. Shake in a good teaspoon of ground-cumin and coriander then, once the mix starts to clump, pour in a cupful of water. Add 2 chicken stock cubes and reduce to half its volume. Once reduced, stir in two large tablespoons of natural, unsweetened peanut butter and simmer on a low heat until thickened. If it gets too dry, pour in a little water. The texture we’re aiming for is melted chocolate. Immediately prior to serving, add a good squeeze of fresh lime-juice and chopped coriander. This lifts the dish and adds a freshness which cuts through the rich density of the peanut-butter.

If you’re having additional vegetables (I used mange tout), steam them for two minutes then toss in butter.

Whilst the sauce is reducing, pulse cauliflower-florets in a food-processor until they’re finely chopped to the size of rice-grains. Experience dictates that one cauliflower is best done in two batches to prevent purée! Sauté your ‘riced’ cauliflower in butter for 2-3 minutes, checking the texture at intervals to ensure it doesn’t over-cook and go soft. Once the required texture is achieved, pile onto your serving-dish and place the chicken beside it.

Spoon your sauce over the rice and chicken, then garnish with a flurry of chopped coriander. Rush to the table and serve piping hot. Delectable!

Thanks for reading and bon ap!

Adam.

Warm ‘Greek-Style’ Chicken Salad with Roasted Aubergine, Courgette, Basil & Halloumi – Low-carb Autumn-fare that clings to the taste of Summer!

salad

When we think of traditional Autumn-fare, the mind conjures up thick stews and casseroles; roasted pumpkins, soups and sausages; all served up in thick chunky bowls to warm the hands and heart.

But that doesn’t mean we’re limited to such dishes. There can still be variety that’s both hearty and fresh, paying tribute to the last of the Summer. This recipe is exactly that!

The final solitary tomato from my garden has been sacrificed for this dish. Aubergines are still readily available and herbs staunchly retain their perfume, undiminished by the mists and encroaching chill.

Because this is a ‘warm salad’, it truly offers the best of both worlds! The fresh flavours of Summer are present in the basil, rocket and rich tang of olive-oil; but the comfort-qualities of Autumn equally abound, with oven-baked vegetables, salty griddled cheese and hot, succulent roast-chicken.

This tribute to the change in seasons can be enjoyed by diabetics, gluten-intolerants, paleo-fans and ketogenic-dieters alike! Curl up by the fire, but eat a taste of the sun. We need it in food; as darkness & cold slowly rob it from all place else!

Place your chicken-pieces into a roasting-tray and generously salt and pepper the skins. Sprinkle on some dried oregano and oven for one hour until the chicken is golden and brown.

Meanwhile, roughly dice your aubergine, courgette and red-onion and glug over some good quality olive-oil to coat. Mix in crushed garlic, chopped Greek-basil and season well. Place into the oven and bake for the same duration as the chicken.

Slice your halloumi and place it onto a baking-sheet, ready to be grilled 10 minutes before serving.

Arrange a mixture of lettuce, rocket-leaves, diced tomato, olives, peppers and radish in your salad-bowl. Leave a well in the centre to pile up your hot ingredients, so that the salad doesn’t wilt.

Take your chicken and vegetables out of the oven and set them aside for ten minutes, so that they lose a little of their heat. Then place your halloumi under the grill, with a light drizzle of oil. Turn once halfway through so that both sides get their share of the suntan.

Tumble the vegetables into the centre of your salad-bowl, then arrange the cooked cheese at reliable intervals. Top this with your chicken-pieces, more chopped Greek-basil and a final salute of olive-oil.

Hey presto! Dinner is served! And I can honestly say, if you don’t like this, then there’s no pleasing you!

Thanks for reading and bon ap!

Adam.

Keto-Cocktails – Gin is ‘in’!

gin

Alcohol is never great for a diet, but let’s face it; we’re all human! As long as a degree of moderation is applied, a little bit of what you fancy won’t go too far astray! When first starting a diet, it’s best to avoid alcohol for two weeks; but after that, it can start making the odd guest appearance of an evening. I’ve lost 11 pounds in 5 weeks, drinking alcohol from week 3. The proof is therefore in the pudding!

I must admit to being partial to a good stiff tipple. The carb-count of beer and wine is prohibitive for weight-loss; but thankfully one of my firm favourites is well and truly on the cards – the majestic & dependable gin & tonic.

This has been a stalwart of English life for the past 300 years. Also known as “mother’s ruin”; I can think of few things I’d rather be ruined by than this. Sadly, so many people get it wrong, and produce something which is wholly disappointing and indifferent at best. Like everything in life, gin must be done properly. There’s no excuse for failure.

Crisp, clean and refreshing is what you’re aiming for. The glass must be long, with lots of ice and a good squeeze of lime. Nothing else will do. I’m not snobby about which gin you use. Yes, some are better than others; but how you make it is by far the most important factor.

The bottle states 0g of carbohydrate; the Atkins website states 0.1g net carbs per 100ml. Either way it’s no great shakes! A couple of these whilst preparing dinner, adds verve and pizzaz to the cooking experience. So try it my way, and get back to me with the results!

Take a tall glass. Yes, tall. Half fill with ice, then run a lime wedge liberally around the rim of the glass. Pour in your gin, then squeeze the lime wedge over the gin and swirl the glass. Fill to the brim with fresh, fizzy Indian tonic-water (diet), then take a good long sip whilst the bubbles are still effervescent enough to tickle your nose.

Heaven in a glass!

Thanks for reading and bottoms up!

Adam.

P.S. – one gin and tonic; two gins and tonic. Getting this wrong in polite English society will mean you’re never invited back!

The Low-Carb Shopping-List – Keto-GO-GOs!

Shopping can be a little intimidating when starting a low-carb, ketogenic diet. A once-familiar supermarket can suddenly become an alien place, full of ‘out-of-bounds-foods’ and temptation.

To ease this process, I’ve put together a shopping-list to cover all the main areas; fresh-produce, meat, dairy & store-cupboard. This list is also applicable to diabetics and those on a gluten-free diet.

For specific items which may not be on this list; remember to follow the golden-rule of net-carbs. I hyperlink this below for reference.

Further information on carb-content for specific vegetables can be found on the second link.

Calculating Net Carbs

List of Low-Carb Vegetables

Keto-GO-GO Shopping List:

Fruit & Vegetables
Aubergine
Avocado
Blackberries (few)
Blueberries (few)
Broccoli
Cabbage
Cauliflower
Celeriac
Celery
Chillies
Courgette
Cucumber
Garlic
Green Beans
Herbs
Leeks
Lemons
Lettuce (all sorts)
Limes
Mange Tout
Mushrooms
Onions
Peppers
Radishes
Raspberries (few)
Spinach
Sugar-Snap Peas
Watercress

Dairy
Butter – Salted & Unsalted
Cheese – Blue e.g. Stilton
Cheese – Hard e.g. Cheddar
Cheese – Hard Grating e.g. Parmesan
Cheese – Slicing e.g. Emmental
Cheese – Soft Salad e.g. Feta
Cheese – Soft Rinded e.g. Brie
Cheese – Spreading e.g. Philadelphia
Double Cream
Eggs

Meat
Bacon
Beef
Chicken
Cured Meats e.g. Salami (check label for carbs)
Duck
Game – e.g. Pheasant
Ham
Lamb
Pork
Sausages

Fish
Crab
Lobster
Mackerel
Mussels
Prawns / Crevettes
Salmon (Smoked & Fresh)
Scallops
Shrimp
Sole
Squid
Tuna (Fresh)

Store-Cupboard / Larder
Anchovies
Bicarb of Soda
Cocoa
Dried Herbs
Dried Spices – All e.g. Paprika
Flaked Almonds
Flaxseed
Ground Almonds
Maccadamia Nuts (few)
Mayonnaise
Mustard (Unsweetened)
Oil – Olive
Oil – Sesame or Stir-Fry Oil
Oil – Sunflower
Olives
Seasoning (Salt / Pepper)
Stock Cubes
Suet
Sweetener – Baking e.g. Xylitol
Sweetener – Table e.g. Splenda
Tinned Tuna
Vanilla Pods / Seed Powder

The list is by no means exhaustive, but it should serve as a fairly comprehensive guide to the basics. There’s no need to buy it all at once. That would bankrupt most of us! Especially for the store-cupboard section; if you don’t already have something, then stock up your larder week by week.

It all may seem a little expensive in comparison to the cheap, high-carb nasties. It’s worth keeping in mind however, that after a week or so, the volume of food you’re consuming will decrease rapidly. This is because saturates make you feel full on a smaller quantity and the ketogenic-diet is brilliant at suppressing hunger-pangs! After a month, it should all balance out nicely, as your food-cupboard & fridge gets fully stocked with the basics.

I hope this helps. Happy shopping and thanks for reading!

Adam
.