Classic Lamb & Aubergine Moussaka – just low carb!

WP_20150211_20_38_39_Smart

Moussaka is one of my favourite dishes! The richness of minced lamb, combined with the fresh taste of sun-ripened tomatoes and sharp tang of yoghurt is truly sublime! Best made the day before; it’s one of those great dishes you can cook and prepare ahead of time! This makes it ideal for dinner-parties, when you want the kitchen to be clean and tidy for when people arrive; or simply if you know you’ve got a busy schedule coming up and want something you can simply heat through in the oven, which still feels like a substantial meal!

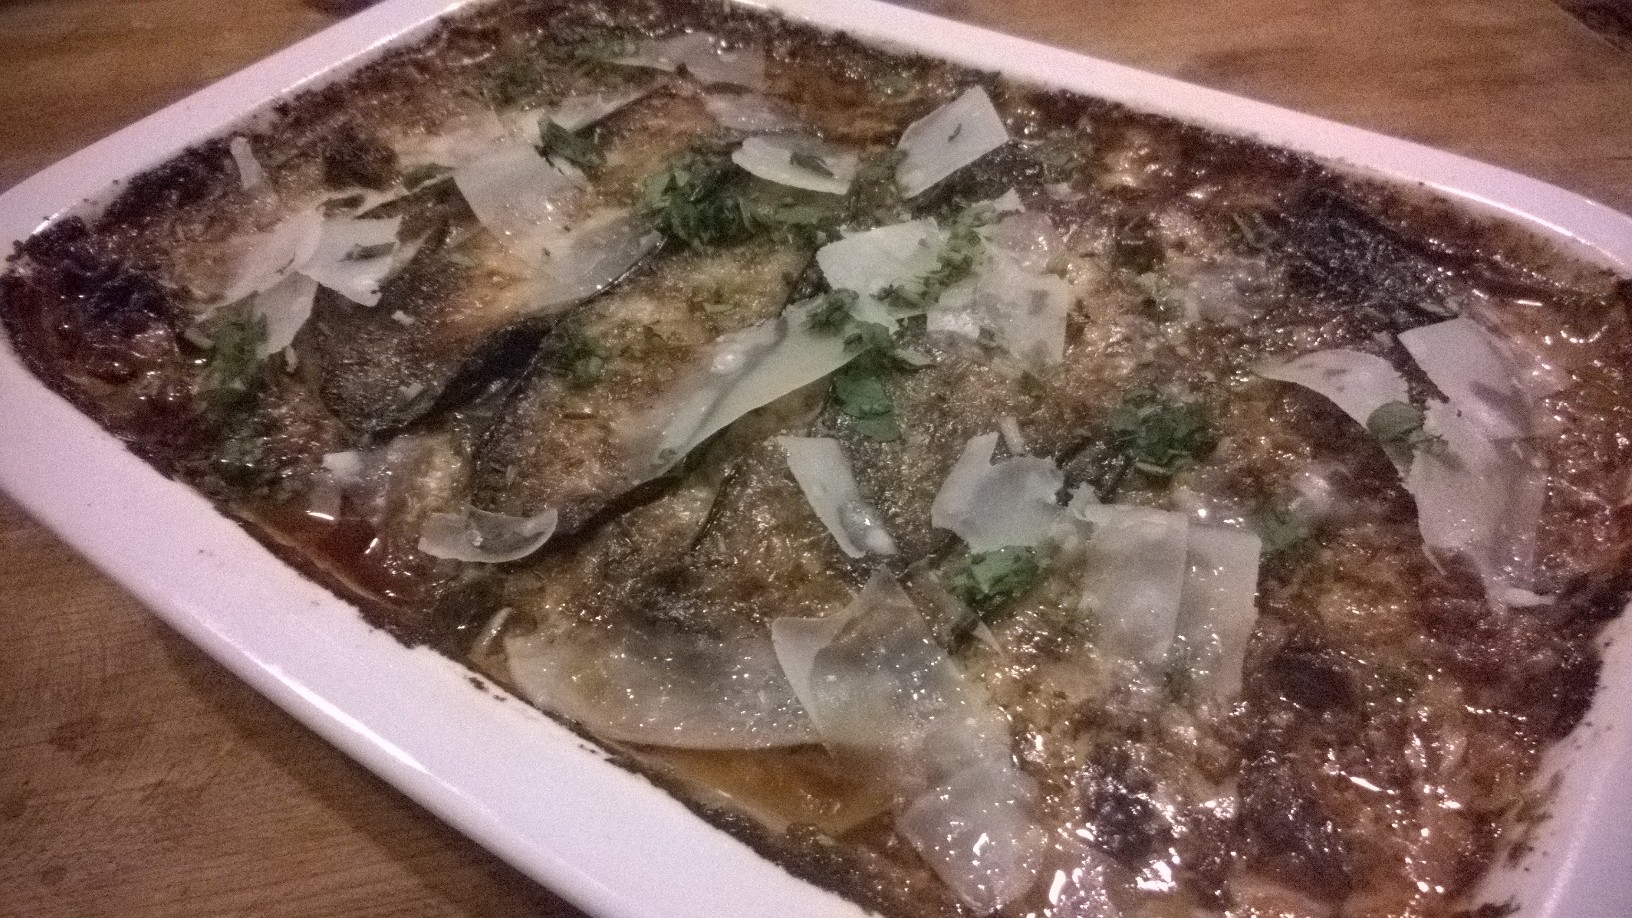
And okay – I freely admit that I browned this a little too long in the oven. We’re all human and the Low Carb Kitchen is by no means immune to the cooking mishaps which plague us all! I am sure yours will look better than the above; but take my word for it – it tasted absolutely heavenly; despite the over-colouration of the yoghurt! Send me a picture of your own creation, and I can do a bit of ‘photo-substitution’; piggy-backing off your own success and expertise!

All ingredients here are incredibly low in carbohydrate. As a result, this moussaka is great for a ketogenic diet, paleo-plan, diabetic-LCHF regime or for those with an intolerance to gluten. All dietary-requirements are welcome at the Low Carb Kitchen!

Start by slicing your aubergines into thin, half-centimetre slices. Depending on the size of your dish, you want at least 3 layers of aubergine. I used a large rectangular oven-dish, enough for 6 people. This warranted 4 large aubergines; you want each layer to just cover the footprint of the dish. I always think it’s best to err on the side of caution and buy ‘one to many’, just in case!

Place the slices onto a lined baking-tray, then drizzle these with olive-oil and grind on some salt and pepper. It doesn’t matter if they overlap or are half-piled on top of each other – the end result will taste the same! Into a hot oven they go for circa half an hour, until the aubergine is soft and pliable, and just starting to brown. Remove the tray from the oven and set to one side to cool.

Whilst the aubergines are cooking, place a heavy casserole onto the hob and add a small spoonful of oil. Season your lamb-mince with sea-salt and black-pepper; then when the oil is good and hot, tumble in your lamb, enjoying the ‘sizzle’ as it hits the pan. Seal this thoroughly, stirring occasionally to prevent it sticking; then add in 2 finely sliced onions, 3 crushed cloves of garlic and any other vegetables you have needing to be used up! Mushrooms are great, as are leeks, peppers and courgettes. In terms of quantity; I used 500g of mince for 6 people. Feel free to adjust accordingly in response to size or requirement!

Sauté the vegetables for 5 minutes or so, then pour in a good glug of port or red wine for richness. Given the succulence of lamb, you’ll likely not achieve the whooshing sizzle of the traditional de-glazing process; the wine is there more for taste than any other additional benefits! Crumble in 2 stock-cubes for background ‘warmth’ and add a generous spoonful of dried herbs (rosemary or oregano are just perfect!). Then drain two cans of tinned tomatoes (pouring off the liquid) and add these to the pan. Keep the mix on the simmer for 20-25 minutes until the liquid has reduced down and all ingredients have thoroughly cooked through. Then squeeze in a good squirt of unsweetened tomato purée and incorporate lavishly with a wooden spoon. Taste to adjust the seasoning, adding more herbs, salt, stock-cubes or pepper as appropriate. When done to your satisfaction, lift the pan off the heat, ready to layer up into your serving-dish.

Whilst the mince-ragout is on the simmer, pour a cupful of double cream into a saucepan. Follow this with half a cup of water, one cup of grated cheese (cheddar, parmesan or mix of both) and a tablespoon of Dijon mustard. Season well, then place onto the hob on a low heat, stirring occasionally until the sauce is thick and smooth. The reason you add the water is to help gauge when it’s ready. Once the water has evaporated (circa 15 minutes), you’ll end up back with the consistency of double cream. If you didn’t put the water in, the reduction would have nowhere to go and the pan’s contents would burn. When ready, simply remove from the heat and commence to layer up your moussaka.

Into your oven-dish, cover the base with a layer of aubergine, then top this with a fine coating of cheese-sauce. Now ladle on your lamb-mix until the white sauce is all covered. Repeat the process, aubergine > sauce > mince until the three components are all used up. Take note however – we want the top layer to end with aubergine and sauce – no mince! So bear that in mind when portioning your ingredients.

Once the top layer of aubergine and sauce has gone on, spoon on 3-4 tablespoons of Greek yoghurt. This provides a wonderful sour tang, which counteracts the richness of the cheese and lamb to perfection. Smooth this flat then sprinkle on a dusting of grated cheese and dried herbs to complete the dish. When all is ready, cover the dish with tinfoil and leave in a cool place overnight for the dish to settle and the ingredients to develop in flavour.

The next day, 40 minutes before you’re ready to serve dinner; transfer the covered dish to a moderate to hot oven. Learn a lesson from my mistakes – keep the tinfoil on to prevent the yoghurt from browning too soon. After 20-25 minutes, remove the tinfoil and check the temperature with a probe thermometer (we want 65ºc plus…). If you don’t have one of these, you can easily trust your eyes – if the centre is bubbling and piping hot, you’ll be well on your way! Return the dish to the oven uncovered for a final ten minutes to brown up nicely on top and reach the requisite 72ºc plus!

Once nice and brown, transfer to the table, and serve up with a crisp green salad to provide textural variation. You’ll find this recipe so delicious, you’ll want to cook it time and time again! (Preferably with better results than the picture above!).

Browse this and other recipes by picture on my pinterest page: country walks in ketosis pinterest.

Thanks for reading and bon ap!

Adam.

Advertisement

Pot-Roasted Beef Brisket with Creamy Cumin Chou D’Alsace – a sumptuous low carb feast!

WP_20150206_21_11_17_Pro

There’s something infinitely wonderful about slow-cooked food at this time of year. Over the weekend, when time is precious; food you can simply leave in the oven all day is a true delight! When you return home, a richly delicious smell is ready to greet you at the door, and dinner is all but ready! What could be easier or more convenient than that?

Some cuts of meat are more suited to slow-cooking than others. Brisket is the perfect cut of beef for such a treatment. Rather interestingly, cows do not not have collar-bones. This means that their entire front-body weight (and they’re heavy!!!) is carried by their chest muscles. Brisket is one of these ‘pectorals’, and as a consequence, it’s entirely built for strength. The muscle contains a high proportion of collagen, making it incredibly tough if cooked quickly. The fibres need to slowly break down over a long period of time. When achieved, the meat is unctuously delicious and practically dissolves under the fork with the merest pressure. Time is all it needs; therefore let the cooker do the work, so you don’t have to! You could even cook this overnight, to reheat the next day – few dishes are this flexible; so enjoy that flexibility where you can!

I’ve teamed this with Alsation cabbage. “What is that?” I hear you ask… Alsace’s history is a curious mix of sometimes German, and sometimes French occupational rule. The food is a delicious yet peculiar mix of flavours; part Anglo Saxon & part Roman. A number of Alsation dishes take advantage of this crossover, in championing the surprisingly sublime taste-combination of bacon, garlic, cream and cumin in their preparation. This mix is warm, rustic, earthy and delicious; I for one certainly can’t get enough of it! I strongly urge you to give at a go; you won’t regret it!

The only carbohydrate here is the 1.5g of cellular net carbs contained within the savoy cabbage. This low level  makes it a wonderful dish to serve to those on a ketogenic diet, but it’s equally fitting if you’re gluten-intolerant, are following a paleo-plan, or just simply want a break from ‘the bloat’. In summary then, it’s simple, fuss-free and nutritious. So give it a go!

Start with the beef. Bring this up to room-temperature and season well on all sides. Place a heavy-based casserole onto the hob and spoon in a little butter and oil to heat through. Then lower in your brisket-joint, enjoying the sizzle as the meat hits the pan.

Seal and brown the beef on all sides, then tumble in a chopped onion and a bit of leek if you have it, for good measure! Whilst these are sautéing, spear a garlic-clove with a cocktail-stick and rest this on top of the vegetables. The reason for this is that you can then simply lift it straight out afterwards. It then provides a beautiful, soft mellow infused garlic flavour to the dish, which is utterly sublime in every way! The subtle background perfume of bay also goes beautifully with beef, so add a couple of bay-leaves, then deglaze the pan with a generous glug of port or red-wine.

Add sufficient water to at least three quarters cover the beef, then crumble in a stock-cube for a little warmth of flavour.  Place the pan into a low-oven to cook for at least four hours. Whether you place a lid on the pan depends on the heat-source you’re using. Fan-ovens tend to dry-cook food, evaporating the liquid, which can result in ‘dry’ or tough meat. If you’re using one of these, I’d advise putting a lid on the pan to prevent moisture loss. If you’re cooking on gas or an aga, you’ll be fine to leave the dish uncovered to maximum 140ºc.

I left the beef in the oven for 8 hours. Upon returning home, the liquid had only reduced by an inch and the meat was sublimely tender. The top had developed a glossy crust; which locks all the juices into the meat, preventing them from evaporating upwards during cooking. When ready, remove the speared garlic, drain off all but a half-centimetre of the liquid and return the pan to the low oven with the lid off to crisp the top even further.

To make the cabbage, place a second casserole onto the hob and melt in a little butter and oil. Add some finely chopped bacon (or lardons if you have them) then finely slice an onion.  Sauté this alongside the bacon for a couple of minutes, before crushing in a generous clove of garlic or two. Now add an enthusiastic teaspoon of cumin and a small shake of paprika. The smell should be savoury and delicious; mouthwatering in every way! Then glug in a glassful of vermouth or white wine to deglaze the pan. The kitchen will witness few more enchanting aromas than this!

Whilst the liquid is bubbling away, finely slice and rinse your cabbage. Add this to the pan, retaining any water which remains on the leaves after rinsing. Sauté for a couple of minutes, then crumble in a chicken stock-cube to perk up the flavour. If you need to add a little more water, do so by all means. We want the cabbage to be waist-deep in liquid. Sprinkle in some dried herbs (sage, oregano or thyme are wonderful) then place a lid on the pan to simmer for ten minutes, allowing the cabbage to soften before you reduce the liquid.

When the 10 minutes are up, take the lid off the pan and taste to adjust the seasoning. Give the pan a good stir, then leave the lid off to allow the moisture to evaporate. At this point, take your beef out of the oven to rest until the stock has all but reduced from the vegetables.

Finally, stir a swirl of double-cream around the cabbage and remove from the heat. Transfer both the beef and the vegetables to your serving plate, then finely slice or grate some nutty emmental or other ‘mild’ cheese into thin strips.  Sprinkle these all over the savoy, then if you’re feeling indulgent (and I was), you can also tumble on some brie or other soft-rinded cheese to add richness. This is by no means essential, so I leave the choice entirely up to you!

Garnish the lot with a drizzle of the delicious pan-juices and a final flourish of chopped herbs. When you dig in with a knife, the beef will literally collapse into tender, soft chunks. The cabbage will be earthly and aromatic in flavour, providing just the right level of bite to compliment the melt-in-the-mouth consistency of the beef . Few dishes can be so perfectly balanced or more delicious than this! – it’ll be well worth the wait!

Browse this and other recipes by picture on my pinterest page: country walks in ketosis pinterest.

Thanks for reading and bon ap!

Adam.

Currywurst with Courgette Gratin ‘Chaource’ – a fast, delicious low carb treat!

WP_20150203_21_23_25_Pro

Variety is the spice of life; and in the cold winter months, we all need a little bit of spice to pep things up! We also need food that’s fast and filling, which keeps the home fires burning and holds the cold at bay. Well this dish fits the bill on all fronts. It’s ready in under 30 minutes, yet tastes like you’ve toiled for hours! This makes it the perfect week-night dinner for when you’re back late from work but still want to enjoy a good home-cooked meal that’s all about food not just fuel

The ingredients I use here may sound exotic, but they can be substituted for anything you have to hand. I used German Bratwurst (very quick to cook & absolutely delicious), plus French Chaource cheese. But any robust pork sausage and firm white-rinded cows’ or goats’ cheese will do the job. Try this with brie or camembert; bangers or hotdogs. The principals are the same for whatever you choose – so enjoy the freedom and go with what’s simple. The best food is never overly complicated!

The only real carbohydrate here comes from the courgettes. But at 1.3g of net carbs per 100g, you’ll have no worries about going overboard on the starch! This makes the dish perfect for diabetics or those on a low-carb regime, such as the ketogenic diet or paleo-plan. Dependent on your sausages there’s no gluten either, so those with an intolerance or coeliacs will be well catered for.

Start by slicing an onion and sautéing this a little butter and oil. Add in chopped celery then a good teaspoonful of pre-prepared red-curry paste or dried curry powder. If you like things hotter, add some chilli powder or a finely chopped red chilli. Then simply pour in a can of chopped tomatoes, crumble in a chicken stock-cube, crush in a clove of garlic & stir the lot round, making sure to season it well. Finally sprinkle on a little sweetener to ‘brighten’ the chilli; lay your bratwurst on top, then into a hot oven it goes for 20 minutes until the sausages are golden brown and cooked to perfection!

Meanwhile, slice your courgette into thin yet handsome chunks, and sauté in a good spoonful of butter. Crush in another clove or garlic and sprinkle on some dried herbs (oregano, basil, sage or thyme are ideal). Once the vegetables have started to soften (circa 2 minutes), slice your cheese and lay this in thick wedges over the surface. Then simply transfer the pan to the top of the oven for 15 minutes to allow the cheese to melt and turn golden brown and bubbly.

Voila! Your low-carb feast is prepared! Serve it with a generous spoonful of good quality mild mustard and dig in whilst the lot is still piping hot! Minimum effort; maximum reward. What could be better!

Browse this and other recipes by picture on my pinterest page: country walks in ketosis pinterest.

Thanks for reading and bon ap!

Adam.

Sweet Chilli Chicken with Buttery Egg-Fried Cauliflower Rice & Cheese Griddled Aubergines – delicious, low carb fast food!

WP_20150126_21_21_45_Pro

Especially in Winter, with its long, dark evenings; sometimes all you want is something quick and easy, which in no way compromises on taste. Well this sweet chilli chicken recipe will certainly add a touch of hot and spicy ‘zing’ to a cold winter’s night! In fact, it’s a winner all year round!

This dish is incredibly easy to prepare and has that real ‘comfort food factor’, which we all crave at this time of year. Because it’s served with cauliflower-rice, it feels encouragingly substantial and filling; despite the fact it’s incredibly low in carbohydrate! The aubergine is by no means essential (I’m often accused of cooking enough to feed an army!); but I find the contrast between the fiery hot chillies and delicious mellow smoothness of the cheese & egg-plant a truly irresistible combination!

If you’re a regular visitor to this blog, you’ll know that cauliflower-rice is a much cherished staple of the low carb kitchen, and eggs are always brilliant on a low carb regime. In fact, the only real carb content in this dish comes from the cellular-carbohydrate locked up in the cauliflower itself. And with a net carb value of 1.5g per 100g, they’ll be no insulin-racking or impact to blood-sugars. As a result, diabetics and ketogenic-dieters needn’t hold back, neither should gluten-intolerants or those following a paleo-plan. Even if you’re not an adherent of any of these programmes, and simply want a ‘break from the bloat’ which carbohydrate often induces; I strongly urge you to give this recipe a try. You won’t be disappointed!

Start with your aubergine. Place a heavy-based pan on the hob and drizzle in a little oil, followed by a generous spoonful of butter. Slice the aubergine into rounds and sprinkle with salt. Sauté these in the hot oil for a couple of minutes each side, until the pale flesh starts to brown. Once cooked, lift these out of the pan and lay onto a baking-tray. Make sure to reserve your the pan to one side to cook your chicken! Top each aubergine-slice with a generous slice of hard cheese (cheddar or emmental would be perfect). Sprinkle lightly with herbs and then place into a medium oven for circa half an hour, until the cheese has melted to a delicious brown crust and the aubergine is velvety soft.

Now move onto your cauliflower-rice. Prepare this by blitzing the florets in a food-processor (precise instructions can be found under a separate post by clicking the following hyperlink:cauliflower rice). Once your cauliflower is chopped finely enough, transfer to one side whilst you continue with the chicken.

Return your pan to the hob and add a little more oil and butter. I’ve used cut breast-fillets for this dish, but you can equally use whole fillets, diced chicken-thigh or any other white meat such as turkey or pork. Whatever your choice, season the meat generously and then seal in the hot oil until each piece is a light golden brown and has started to caramelise.

I apologise in advance for constantly repeating myself, but if I can offer any words of advice, I feel honour-bound to do so. Do not fuss around with the meat in the pan or move it until it’s good and ready. No-one likes to be mothered; why do it to your dinner?! When the meat is ready to be turned, it will release itself of its own accord in response to the merest touch from a finger or wooden-spoon. If it sticks, it’s not ready. We want the meat to caramelise and brown; not steam! And do not crowd it in the pan or the same will happen! It’s such a shame to ruin food through ‘excess care’, when this is so easily avoided!

Once the chicken-fillets have sealed, add a chopped onion to the pan and a stick or two of finely sliced celery. Follow this with strips of pepper and a good crush of garlic (one to two cloves, however strong you like it!). Now sprinkle the lot with a generous shake of hot red chilli-powder and crumble in a chicken-stock cube. I’m always a fan of fresh ingredients, but sometimes their ‘dried counterparts’ possess their own unique properties, in preference over the fresh. In the case of chilli, the powdered form adds a pleasing colour to the dish and cooks down in an ‘earthy’ rustic way which enriches the sauce, both in terms of taste and texture. The dry powder also helps thicken the sauce, which the fresh form wouldn’t achieve.

Pour on a centimetre’s depth of water and season well. Add a squeeze of lemon juice and a teaspoon full of bake-suitable sweetener. Why sweetener? The heat of the chilli needs ‘calming and rounding’ a little. Sweetness lifts the taste and takes away any aggression left in the flavour. Make sure you don’t use table-top sweetener – this is not heat-stable and loses its sweetness with temperature. Xylitol is an excellent natural product, which I highly recommend for all uses. Leave this to simmer on a low heat for 5 minutes or so, whilst you cook your rice.

Sauté this in butter with a little olive-oil (so the butter doesn’t burn) for around four minutes. Taste to adjust the seasoning and check that the cauliflower is cooked through. We’re looking for tender, but still keeping its bite.

Whilst the rice is cooking, break four eggs into a bowl and whisk smooth. Now return to your wok and scrape the rice into a pile on one side. In the space you have cleared, drizzle in a little more oil then pour in the egg. Don’t stir it for a minute – we want to form autonomous clumps of egg. Only stir when the mixture in contact with the pan’s surface has had time to cook through. Then continue as per scrambled eggs. The reason you do it this way is to prevent the liquid egg from coating the rice and turning into an unattractive mess! If you simply poured the egg over the contents of the pan without clearing a space and cooking separately you’d just end up with a porridge-like mix, with no discernible clusters of egg – if this occurs, you may just as well not have bothered!

Once all is ready, pour your chicken and sauce all over the rice and form the cheesy aubergines into a pile on one side. Garnish the lot with fresh herbs and slices of lemon or lime for freshness. Then simply dig in! Truly sublime!

Browse this and other recipes by picture on my pinterest page: country walks in ketosis pinterest.

Thanks for reading and bon ap!

Adam.

Slow-Cooked Lamb-Shanks with Celeriac & Sugar-Snap Peas – delicious low carb splendour!

WP_20150125_20_14_20_Pro

People have often said to me they find slow-cooking ‘fussy’ and time-consuming; with the impression you have to plan your life around your food, not visa versa. In actual fact, this couldn’t be further from the truth! Slow-cooking is a wonderful way of preparing food. You simply put dinner in the oven, then go off and leave it. These lamb-shanks were in for 8 hours – I put them on in the morning and we went out for the day. Then arriving home in the evening, dinner was all but ready. What could be easier or more convenient than that!

Lamb lends itself perfectly to this treatment. Over time, the meat becomes so succulently tender it literally falls off the bone; at the same time developing a delicious chewy crust on top, which is moreish in the extreme! Any cut of lamb ‘on the bone’ will work for this recipe – I used shanks, but you can equally use shoulder, leg or even chops.  The technique can also be applied to pork or beef – ham hocks cooked this way are truly sublime, as is oxtail or ribs. With slow-cooking, the world is your oyster!

The only carbs her are the cellular carbohydrates locked up in the vegetables themselves. This is the best and most natural way of processing glucose – there’s a thick wall of fibre for your stomach to work through first before the energy is released; making what little carbohydrate there is slow release (this recipe is slow all round!). As such, it’s perfect for diabetics or those on a ketogenic diet. Gluten-intolerants and paleo-fans can also tuck in with gusto, and because this dish looks so beautiful, it’s the perfect thing to serve up at a dinner-party if any of your guests are following one of the above eating plans. In short – it’s a winner all round!

Start by seasoning your shanks. Place these in a heavy-based pan and seal in a hot oven for 15 minutes; or sufficiently long to brown the surface. Then turn your oven down to circa 120-130ºc and lift the pan out. If you have a fan oven or are cooking with gas, leave the door open for a minute to allow the temperature to drop.

Now tumble in a chopped onion and pour in a good glass of red wine or port. Add sufficient water to at least three quarters cover the shanks and then return these to the oven to cook for at least four hours. Whether you place a lid on the pan depends on the heat-source you’re using. Fan-ovens tend to dry-cook food, evaporating the liquid, which can result in ‘dry’ or tough meat. If you’re using one of these, I’d advise putting a lid on the pan to prevent moisture loss. If you’re cooking on gas or an aga, you’ll be fine to leave the dish uncovered.

As I detailed above, I left these shanks in the oven for 8 hours. Upon returning home, the liquid had only reduced by an inch and the meat was sublimely tender. The top had developed a glossy crust; which locks all the juices into the meat, preventing them from evaporating upwards during cooking. When ready, drain off all but a half-centimetre of the liquid and return the pan to the low oven with the lid off to crisp up even further.

Place a solid casserole onto the hob and melt in a little butter and oil. Finely slice an onion and sauté this for a couple of minutes, before crushing in a generous clove of garlic or two. Whilst these are cooking, peel and dice your celeriac into pieces of less that 1cm cubes. Turn up the heat a little and add these to the pan, stirring  as you do so to prevent the vegetables from sticking. Sauté for a couple of minutes and then pour in your lamb-stock until the vegetables are covered. If you need to add a little water to this, all well and good. Season the mix then crumble in a stock-cube for background warmth. Sprinkle in some dried herbs (sage, oregano or thyme are wonderful) then place a lid on the pan to simmer for ten minutes, allowing the celeriac to soften before you reduce the liquid.

When the 10 minutes are up, take the lid off the pan and taste to adjust the seasoning. Give the pan a good stir, then leave the lid off to allow the moisture to evaporate. You’ll need to stir this occasionally to prevent the contents from sticking. When you have approximately half a centimetre’s depth of liquid remaining, add your washed sugar-snap peas and stir in to cook through for the last five minutes.

At this point, take your lamb out of the oven to rest until the stock has all but reduced from the vegetables. If you’re feeling indulgent (I was), you can grate a handful of cheese and stir this through the celeriac to add richness. This is by no means essential, so I leave the choice entirely up to you!

Spoon your vegetables into broad bowls, then place one shank on each, with the bone standing upright like a bayonet to add a little theatre! Drizzle a spoonful of the lamb-juices over each portion, then garnish with chopped herbs and a cheery cherry tomato for colour!

Then simply dig in. Believe me, it’ll be worth the wait!

Browse this and other recipes by picture on my pinterest page: country walks in ketosis pinterest.

Thanks for reading and bon ap!

Adam.

Pork Vermouth with Cauliflower Gratin – low carb ‘classics’ from a country kitchen!

WP_20150124_20_40_12_Pro

Classic French cookery has a reputation for being difficult and time consuming. But trust me when I say this couldn’t be further from the truth!

When people refer to French cookery, they don’t mean a list of complex ingredients or fiddly, time-consuming recipes. They’re actually referencing a way of cooking. French cuisine is a methodology; a time-honoured discipline, designed to bring the best out of ingredients. When the French refer to the ‘art of cookery’; art in French equally means type or style. The ‘French-style’ requires the mastery of a few basic techniques which, once learnt; will deliver consistently outstanding results.

One of these competencies is the classic French method of cooking meat. There’s a stately ritualism to this process, which is almost comforting in its cadences. The succulent sealing-in & caramelisation of the meat is followed by the slow softening of onions & garlic; then deglazing the pan with a magnificent whooshing ‘sigh’, as alcohol hits the thirsty metal-surface of the pan. As the kitchen fills with the delicious aroma of melting butter, fresh herbs and pan-seared meats, you’ll begin to feel like an alchemist creating pure gold from the very simplest of ingredients. It is truly an art worth learning!

This dish calls on the classic aperitif ‘vermouth’ to bring out the sweetness of the pork and deliver depth to the sauce. A generous glug of this fortified wine reduced down in the pan certainly won’t impact the blood-sugar. What could be more welcoming on a cold Winter’s evening that this? And all is suitable for the ketogenic-diet, diabetes, coeliacs and the paleo-regime. Low carb cookery welcomes all!

Bring your pork to room-temperature and season well both sides. Heat a metal-lined sauté-pan on the hob (non-stick doesn’t deglaze with pleasing results) and throw in a knob of salted butter followed by a dash of oil. The sizzle should be a rewarding sensation in itself, as should the aroma. Add your pork to the pan and seal on each side until it’s golden brown and deliciously caramelised. You must excuse me for constantly repeating myself, but it needs to be said…! Do not fuss around with the meat in the pan or move it until it’s good and ready. No-one likes to be mothered; why do it to your dinner?! When the pork is ready to be turned, it will release itself of its own accord in response to the merest touch with finger or wooden-spoon. If it sticks, it’s not ready. We want the meat to caramelise and brown; not steam! And do not crowd it in the pan or the same will happen! There – consider yourself told!

Once the meat is beautifully golden on each side, lift out of the pan and tip in sliced onion, peppers, mushrooms & chopped garlic. Soften these until translucent and just starting to brown, then crank up the heat as high as you can. This is not some obscure act of retribution, you simply want the pan to be as hot as possible for when you pour in the spirits. That way, you’ll deglaze with the maximum effectiveness, lifting all the caramelised flavours straight off the bottom of the pan.

Once it’s good and hot, pour in a healthy serving of vermouth, making sure to stand over the pan and enjoy the cloud of sweet, alcoholic steam which billows beautifully out into the kitchen! Once the liquid has all but evaporated, pour in a 3/4 inch depth of chicken stock (or water and stock cubes) and place your pork back into the pan, ensuring it’s surface is not submerged. Dissolve a small teaspoon of Dijon mustard into the pan and add a bay-leaf or two for warmth. Place into a low oven to reduce down for 40 minutes until the sauce is barely lapping the base of the vegetables then stir in a good handful of chopped herbs (basil, thyme, sage, oregano or parsley are all ideal).

Whilst the sauce is reducing, cut your cauliflower into slices and bring to the boil in a wide-based pan. Then fit the lid on firmly. and steam through for five minutes, until tender, but still retaining its bite.

Once cooked, drain away any remaining water, and spoon crème fraîche in generous dollops all over the surface of the cauliflower. Grate a do whack of cheddar-cheese (or similar) and sprinkle this all over the surface. Dust with herbs, then into the oven it goes for 20 minutes until the cheese is a golden brown and bubbly.

When all is ready, spoon your pork into bowls and pour on the vegetables from the pan, along with a tablespoon of the pan-juices on each portion. Serve up your cauliflower gratin to one side then dig in whilst still piping hot! Classical comfort food at its best! The results certainly won’t disappoint.

Browse this and other recipes by picture on my pinterest page: country walks in ketosis pinterest.

Thanks for reading and bon ap!

Adam.

Smoked Bacon, Parmesan & Mozzarella Soufflés – low carb, high impact!

WP_20150123_21_01_31_Pro

This dish can only be described as a textural symphony! Picture eating something the texture of clouds, interspersed with pools of stringy, melted mozzarella & the chewy crunch of salty smoked bacon. Well this recipe has it all!

Don’t be put off trying these because you think soufflés are difficult or fiddly. They’re actually very simple to prepare; all you have to do is understand the process, then you’re off and away! So what is that process…?

When you cook an egg it turns from liquid to solid. You see this when you fry an egg, scramble it, poach it &tc. It’s the protein which solidifies in heat; and a soufflé is no different from this. The act of a soufflé rising is the same as a cake. Hot air rises, which lifts the mixture upwards. Then, once the right temperature is reached, the heat solidifies the egg-proteins and the air-bubbles are ‘locked’ in place. Meringue has the same process – the proteins form a hard, crystalline structure which supports and holds up the rest of the mixture – quite simple, and quite marvellous!

If the egg-whites hold something up, what is it they’re holding? The answer to this is your soufflé mix, which carries the flavour of whatever you’re cooking. In this recipe I use parmesan, mozzarella cheese and bacon, but the process is the same for all. Whatever your ‘flavour-bearing mix’ is made of, you need to ensure that it’s the texture & consistency of melted chocolate. It’s that easy. Follow this rule of thumb and you’ll have perfect soufflés every time!

Before I jump the gun and detail the recipe in full, it’s worth noting that these are wonderful for a ketogenic diet, as they contain virtually no carbohydrate! This makes them ideal for diabetics or those who do not include gluten in their regime. You can make soufflés with no ‘solids’ at all; just the basic ingredients. This means they’re cheap, versatile and incredibly quick! Now do you see why I love them?

Start by cutting 6 smoked bacon rashers into a fine dice. If you have pre-cut ‘lardons’, all well and good. Fry these in a little butter for 10 minutes, or until the bacon is brown and crispy around the edges. I used 6 rashers for 4 soufflés. Once ready, remove from the heat and drain the bacon on kitchen-towel.

Whilst the bacon is cooking, you can start your egg-whites. In a clean mixing-bowl (I use a copper bowl as this stabilises the whites far better than anything else); separate 4 eggs, placing the yolks in a smaller bowl to form your mix. When it comes to separating eggs, I must admit to ‘not being flashy’. I simply crack them on the side of the bowl and strain the white through my fingers.

Once your eggs are separated, whisk the whites until they form stiff peaks. Volume should be minimum 8 times what you started with, and you should be able to upturn the bowl over your head and the mixture stays in situ (if it doesn’t then you have only yourself to blame!). The whisking forms valuable aerobic exercise for the cook. I strongly recommend that you do it by hand and don’t cheat by using an electric whisk! This way, you get to ‘understand’ the ingredients more, and get a true feel of how different foodstuffs behave.

Now prepare your soufflé dishes. Butter these liberally with a piece of greaseproof-paper. Your soufflés will rise better if you give them something to climb up, other than just butter. What do I mean? They’ll climb the walls of the dish a lot more reliably if they get a handhold – sprinkle some grated parmesan around the ramekin, all over the butter. This gives them a ‘rough surface’ to grip onto as they rise; much like a trellis!

Into the bowl with the egg-yolks, scatter in a generous handful of grated parmesan cheese and a half-dessertspoonful of Dijon mustard. Follow this with your crisped bacon and season well. Now bear in mind my rule of thumb above. You want this mix to be the consistency of melted chocolate. To achieve this, mix in double-cream until you have the right texture. You shouldn’t need much; three to five tablespoons maximum.

Now scrape some of your egg-whites to the side of their bowl and add your soufflé-mix. This will need to be folded into the whites with a good metal spoon. If you simply mix this in, you’ll knock out all the air. Folding is exactly as it sounds – you turn the mixture over on top of itself, so that gravity does the work, not your spoon! At no point should you be cutting through the middle of the mix, you just want to continue lifting and turning until the two are incorporated. It should be a pleasing, yellow, moussey texture, with traces of white still visible and air bubbles prevalent throughout.

Ladle the mix into your prepared ramekins until it’s a few millimetres shy of the top. Cut a ball of mozzarella into half-inch chunks, and drop a few pieces of the cheese into each ramekin. These will sink slightly into the mix, but that’s exactly as we want things. The cheese ‘melts’ into the soufflé, forming pools of molten mozzarella beneath the surface. So if the cheese sits on top of the mix, we wouldn’t achieve the right effect!

Place the ramekins onto a baking-tray and into a hot oven they go for circa ten minutes. If your oven has a glass-front, you can have the joy of watching them rise. I’m fortunate enough to have an aga, which means I can open the door and peek in with no danger of the temperature falling.

You’ll know they’re ready when well risen over the surface of the ramekin. The top should be lightly firm to the touch and the surface should be evenly coloured a light ‘caramel’ shade. I always like to have a slight crispness on top, to contrast with the smooth inner, but that’s up to you. Experiment with your results – you’ll soon find out how you like them best.

Serve up straight from the oven. The top will sink down within a couple of minutes, so make sure your admiring onlookers are already in place at the table when you take the dish out of the oven! All in all, incredibly straightforward, fuss-free and delicious – oh, and yes; a trifle grand!!

Browse this and other recipes by picture on my pinterest page: country walks in ketosis pinterest.

Thanks for reading and bon ap!

Adam.

Yoghurt & Cumin ‘Chicken Skewers’ with Roasted Aubergine & Aromatic Cauliflower Rice – minimum carbs, maximum flavour!

WP_20150109_22_37_02_Pro

Skewers are a wonderful way of cooking food. Not only do they have an ‘exotic feel”; but practically anything can go into the mix, plus they’re quick, easy and economical to boot! There’s an enchanting, almost ritualistic feeling of layering up each kebab; first one piece, then the next, trying hard to get each skewer the same; but no matter how hard you try, you always end up with an unequal number of pieces on each one! They also look beautiful and have that delightful finger-food quality, which is great for sharing and really ‘digging in’; a thing I just love about food like this!

The ingredients I use here can be infinitely varied – the skewers can be made with peppers, mushrooms, celery, cherry tomatoes, any kind of meat, or even halloumi cheese! Whatever you have languishing in the fridge will go down a treat, offering huge versatility and choice; one of the reasons why dishes like this are just so great!

There’s virtually no carbohydrate in this dish, beyond the 1.5g per 100 found in the cauliflower and 3g from the yoghurt. A generous portion will definitively come in under 7g, which for an evening meal is pretty good going! This means that this dish is perfect for ketogenic-dieters, and diabetics alike. It could be that you’re simply wishing to avoid the bloat of carbs, or have a gluten intolerance – either way, this dish is for you! And let’s not rule out the paleo-community – there’s plenty of room at the table: the low-carb kitchen welcomes all!

Start by marinating your chicken. Place the raw chicken into a large mixing-bowl and spoon on full-fat yoghurt; enough to sufficiently coat the meat and then some! Sprinkle on two teaspoons of ground cumin and half a teaspoon of chilli powder. Squeeze in some lemon juice and season the mix liberally. Crush in a generous clove of garlic then stir with a robust spoon until all is dispersed and evenly coated. Leave to marinate for 20 minutes, whilst you prepare your other ingredients.

Dice your aubergine into 1cm chunks and tumble these into a roasting dish. Follow this with a finely sliced onion, some diced pepper and another crushed clove of garlic. Drizzle on olive oil and season the vegetables. Into a hot oven it goes for half an hour; leaving you time to assemble your skewers.

Slice a courgette into half-centimetre chunks, then cut a red onion into ‘spearable’ pieces. Then start to layer up your kebabs – courgette, chicken, onion; courgette chicken, onion &tc. Once these are ready, take your aubergine out of the oven and spoon any remaining marinade from the bowl on top of the vegetables. Then place the skewers over the rim of the dish, so that they’re supported  by the sides of the tray (see picture below). By doing this, all the succulent juices & flavour from the yoghurt marinade will drip down and infuse into the aubergine; making the marinade goes twice as far – a true double whammy!

skewers1


Return the tray to the oven for a further 25-30 minutes to cook the chicken. Meanwhile prepare your cauliflower rice (for full details click on the following hyperlink – cauliflower rice).

All you do is cut the cauliflower head into florets. Pulse these in a food-processor until the texture is as per rice grains. It’s best doing this is batches, so that the food-processor doesn’t turn the lot into purée!

Once chopped, sauté in butter with a little olive-oil (so the butter doesn’t burn) for around four minutes. Taste to adjust the seasoning and check that the cauliflower is cooked through. We’re looking for tender, but still keeping its bite.

When the chicken-skewers are browned to perfection; simply lift the tray out of the oven and spoon the aubergine mix over your rice. Place the skewers on top of this, and garnish the finished dish with a good squeeze of lemon-juice and a handful of chopped coriander.

Four words will sum this dish up – delicious, low carb perfection!

Browse this and other recipes by picture on my pinterest page: country walks in ketosis pinterest.

Thanks for reading and bon ap!

Adam.

Rich, Aromatic Crayfish & Coconut Mulligatawny Soup – a delicious low carb jewel!

WP_20150121_19_52_00_Pro

Food fulfils many functions in life. Beyond mere fuel, it can represent warmth, nurture, togetherness, nostalgia, adventure and sometimes even a challenge! And then on rare occasions, food can go beyond all these things and offer something more; something just that little bit special. At times, a dish can bring complete surprise and delight; it can make you forget everything, close your eyes and utter a blissfully contented ‘mmmm‘. At such times, food can be a real treat, pure and simple!

Well this recipe is certainly that; I truly can’t praise it enough! It’s warm, filling, indulgent, aromatic, rich, satisfying… the list goes on and on! But normally when food attracts this kind of praise, there’s three words you don’t expect to hear when describing it – quick, simple and straightforward!

The origins of this strangely named dish take root in the Anglo-Indian melting-pot of the 18th century. As the British Empire opened up spice-routes into London from the East; a brave new world of exotic flavours opened up, and the English love affair with Indian cuisine was born. The rapidly growing new wave of aspiring middle-classes were first to jump on this band-wagon; albeit with little understanding of this trend, or any actual knowledge of what they were eating. In the Sporting Magazine of 1798, one gentleman writes: “I supped … in his house on Mulagatoney or pepper-water.

Pepper was the one ‘known & recognised’ flavour that people of the time could latch onto. As a result, a myriad of rather queer and extraordinary recipes were published, attempting to capture the flavour of aromatic Eastern cuisine through the use of existing local or readily available ingredients such as peppercorns and onions. I laugh to think at how these first attempts as ‘kurrys’ must have been received; especially in light of the fact that no-one had any real point of comparison or yardstick against which the cook’s efforts were to be judged! Thankfully, today’s larder is much better stocked and we’re able to take full advantage of the world’s rich & varied food-palette at comparatively low cost and effort.

The words ‘ketogenic diet’ would seem as strange to 18th century ears as the word mulligatawny itself. Well this recipe is a perfect low carb dish. Blood sugars will remain stable, with no ramping of insulin-levels; making it the ideal concoction for diabetics, gluten-intolerants or those on a paleo-plan.  I strongly urge you to give it a try – you won’t regret it!

Finely slice an onion and two sticks of celery, then add these to a heavy-based saucepan with a splash of oil and a large spoonful of butter. Saute these on a medium heat for a few minutes, then add a crushed clove of garlic and sprinkle in the following: one teaspoon of chilli-powder, half a teaspoon of ground fenugreek, one teaspoon of cumin, a teaspoon of ground coriander and a good grind of pepper. Let these cook through for a minute or so, then pour in two pints of chicken stock (or stock-cubes and water) and bring to the boil.

Once the soup is at a rolling simmer, add the contents of a can of full-fat coconut milk, then lower the heat and leave this to reduce until the mix is thick and glossy, resembling the texture of single cream (circa 20 minutes).

Finely slice a generous handful of mange-tout and add these to the soup, cooking them until tender for a further 2 or so minutes. Then empty in your crayfish tails (or prawns if you prefer). Let these heat through for a further couple of minutes, then give it a good taste to adjust the seasoning. You’ll need to add a small sprinkle of sweetener to balance and round off the flavour. Do this a little at a time, until the levels are to your liking; then finish the dish with a good squeeze of lime or lemon-juice and a handful of chopped coriander.

Hey presto, your delicious low carb mulligatawny soup is ready! Ladle into bowls and eat whilst still piping hot! I’ll wager everyone will go back for seconds – there was not a drop left in the pan when I made this; and once you’ve tasted it, you’ll soon see why!

Browse this and other recipes by picture on my pinterest page: country walks in ketosis pinterest.

Thanks for reading and bon ap!

Adam.

Sausages & Broccoli in a Velvety Garlic & Herb Cream-Cheese Sauce – simple, delicious & low carb!

WP_20150119_21_00_07_Pro

I often feel that the real mastery of cookery lies in the ability to make everyday, storecupboard ingredients taste fantastic! Well this incredibly simple recipe is one such example! The true star of the show is the cream-cheese sauce – so easy to make, yet utterly delicious in every way! This dish is low cost & supremely quick, making it the ideal ‘mid-week meal’, when all you want is something quick and fuss-free. For this reason I strongly urge you to give this a go!

The broccoli and sauce can be served with anything you like. I teamed it with sausages simply because I had them in the fridge and they needed to be eaten up. But this would be absolutely wonderful alongside grilled chicken, salmon, pork-steaks, beef-steak or even lamb. Serve the sauce with your vegetable of choice to stunning result. I love recipes that are versatile like this – the world is your oyster!

The carb-content of this dish is incredibly low; coming principally from the cream-cheese (circa 3.5g net carbs per 100g) and the cellular carbohydrate locked into the broccoli (circa 2.1g net carbs per 100g). This makes it perfect for ketogenic-dieters, diabetics, gluten-intolerants or those following a paleo-plan. So ‘beat the bloat’ and go low carb!

Place your sausages onto a oven-tray and bake for circa 25-30 minutes, until golden-brown and cooked through. Once these are in the oven, you can start on the sauce.

Add a little butter to a heavy-based saucepan and sauté a couple of cloves of crushed garlic and a chopped red chilli (the chilli provides an interesting counterpoint to the creaminess of the cheese). Soften these in the butter for a couple of minutes, then add a finely chopped tomato, followed by a couple of tablespoons of full-fat cream-cheese.

Stir this in well, then pour in half a cupful of chicken stock (or water and a stock-cube), plus half a cup of double cream. Finely chop a generous handful of basil and add this to the mix, alongside a good grind of black pepper. Then simply simmer this on a low heat for 5-10 minutes until the water has reduced and the sauce is thick and glossy.

Bring a pan of water to the boil to one cm’s depth, and steam you broccoli for 3 minutes until tender. Strain this, and spoon onto your serving-plates. Remove your sausages from the oven and serve these alongside, then simply pour your sauce generously over the top. Hey presto, your delicious low-carb dinner is ready. Enjoy!

Browse this and other recipes by picture on my pinterest page: country walks in ketosis pinterest.

Thanks for reading and bon ap!

Adam.

Chilli & Coriander Turkey-Burgers with Egg-Fried Cauliflower Rice – delicious, succulent, spicy & low carb!

WP_20150120_20_53_25_Pro

Coriander, garlic and chilli are a wonderful flavour-combination that forms the heart of so many delicious dishes. And this low carb recipe uses them to best effect with stunning results! Whether beef, chicken, lamb, turkey of pork; home-made burgers are incredibly easy to make and with a bit of inspiration can incorporate no end of interesting and exotic flavours. These beautifully succulent turkey-burgers have an oriental feel; packed to the gunnels with garlic, red-chillies, fresh herbs and ground coriander. This follows through into the egg-fried-rice, which mirrors the flavours and rounds the dish off perfectly!

If you’re a regular visitor to this blog, you’ll know that cauliflower-rice is a tried and tested staple of the low carb kitchen; indeed I couldn’t live without it! It truly transforms the look and feel of a meal, providing ‘substance’ and adding that all important ‘fill-factor’ to dishes which might otherwise risk feeling a little anaemic!  Eggs are brilliant on a low carb regime, and the additional protein provides the final ‘cherry on the cake’ in terms of filling you up & adding luxury! No-one likes to leave the table still feeling hungry, so the fuller the better, is what I say!

The only real carb content in this dish comes from the cellular-carbohydrate in the cauliflower itself; and with a net carb value of 1.5g per 100g, they’ll be no insulin-racking or impact to blood-sugars. This means that diabetics and ketogenic-dieters can ‘fill their boots’, as can those with a gluten-intolerance or followers of the paleo-plan. There’s plenty to go around!

Start by forming your turkey-burgers. If you have a ‘burger-maker’ all well and good; if not, your hands are infinitely serviceable! Put your turkey mince (circa 1lb for 4 burgers) into a large mixing-bowl and season well. Finely chop a clove of garlic and a fresh chilli (including seeds if you like it hot), plus a good handful of fresh coriander leaves. Add these to the bowl, then crumble in a chicken stock cube and a teaspoonful of ground coriander seeds. Mix this all up ‘with commitment’, then form the mix into burger-shapes. The mixture should be coherent but loose throughout.

Place a wok or wide based pan onto a high heat and drizzle in some sunflower oil. Seal your burgers for a minute or two on each side until golden brown. Then lift them out and place onto a baking-tray whilst you prepare your rice. Take the wok off the heat, but keep it handy to cook the other ingredients in a few minutes.

Prepare your cauliflower rice by blitzing the florets in a food-processor (precise instructions can be found under a separate post by clicking the following hyperlink: cauliflower rice). Place this to one side and start chopping your rice-filling.

Finely slice a few rashers of smoked bacon and a small onion. Place your wok back onto the heat with a little more oil, then fry your bacon and onion until they start to colour. Crush in a couple of cloves of garlic, then follow this with as much chopped chilli as you can bear (I used x2 with seeds).

At this point, transfer your burgers to a hot oven, then continue to chop the other ingredients.

The exact filling for the rice is entirely up to you, and whatever vegetables you have to hand in the fridge. I used a stick of celery, a few mushrooms, half a leek and a bit of pepper. Slice these finely, then add to the wok and stir well. Tip in your rice, crumble in another chicken stock cube, and continue to sauté the lot on a medium heat for five minutes.

Whilst the rice is cooking, break four eggs into a bowl and whisk smooth. Now return to your wok and scrape the rice into a pile on one side. In the space you have cleared, drizzle in a little more oil then pour in the egg. Don’t stir it for a minute – we want to form autonomous clumps of egg. Only stir when the mixture in contact with the pan’s surface has had time to cook through. Then continue as per scrambled eggs. The reason you do it this way is to prevent the liquid egg from coating the rice and turning into an unattractive mess! If you simply poured the egg over the contents of the pan without clearing a space and cooking separately you’d just end up with a porridge-like mix, with no discernible clusters of egg – if this occurs, you may just as well not have bothered!

Finally, squeeze over the juice of half a lime to ‘lift’ the flavour, then scatter on a handful of chopped coriander to garnish. Remove your burgers from the oven and serve alongside the rice, accompanied by generous lashings of herby garlic-mayonnaise. In short – divine!

Browse this and other recipes by picture on my pinterest page: country walks in ketosis pinterest.

Thanks for reading and bon ap!

Adam.

Smoked Cod, Leek, Pepper & Parmesan ‘Pesto Parcels’ – delicious low carb fast food!

WP_20150119_20_36_42_Pro (1)

Sometimes all we want is something that’s quick and easy but in no way compromises on taste! Well this recipe is just that! Team it with a green salad as a starter or light lunch; or serve with steamed vegetables and roasted celeriac for a more substantial main course. Either way, this is a perfect dish for those evenings when you’re late home from work and don’t fancy using every pan in the kitchen! A chopping-board, sharp knife and a baking-tray are all you need; then 15 minutes later, dinner is served!

The taste-combination of smoked cod, parmesan and basil-pesto is divine! The three flavours are all equally robust, so they complement & carry each other in perfect equilibrium. The vegetables go velvety smooth and the cheese melts down into the sauce, forming ‘swirling layers’ of flavour – it’s amazing how something so simple can deliver such profound results!

There’s practically no carbohydrate here at all, so ketogenic-dieters and diabetics will be in ‘food heaven’. As will those on a paleo-regime or coeliacs, as there’s no gluten to worry about; just food as nature intended!

On a sturdy chopping-board, finely slice half a leek and half a yellow pepper. Pile these into the centre of generous tinfoil sheets, then spoon a teaspoon of basil-pesto on top of each pile. Shave some parmesan curls into the centre with your knife, then lay your smoked cod fillets across the lot.

Grind on some black pepper, then fold the edges of the tinfoil into the centre to form square ‘parcels’. Onto the baking-tray they go, then into a hot oven for 10 minutes until the fish is cooked through.

When they’re good and ready, simply unfold the parcels and spoon the fish into your serving-bowls. Pour the vegetable contents and sauce all around, then pile up your green salad on the side. Hey presto, dinner is served!

Browse this and other recipes by picture on my pinterest page: country walks in ketosis pinterest.

Thanks for reading and bon ap!

Adam.

Minute Steak with Red Leicester, Celery, Eggs & Caesar Leaves – a quick & delicious low carb lunch!

WP_20150117_15_51_58_Pro

Low carb food can be incredibly quick – take this delicious minute steak salad for example; from pan to table in less than 10 minutes!

The key to a good salad is not only taste, but texture! Celery is always a great addition as it provides instant crunch. This contrasts wonderfully with the firm bite of the cheese, the velvety lightness of eggs and the moreish ‘density’ of the beef steak. This is truly the perfect balance; as rich in flavour as it is in consistency. And so simple, you’ll want to cook it time and time again!

You can buy good quality Caesar dressing, but to be honest; making your own is so quick and easy, why would you want to compromise on taste? In this recipe I’ve used Red Leicester cheese because I love its nutty flavour and cheery brightness. Any firm, full bodied cheese will work just as well however. This can be done with cheddar, Emmental or even Manchego. The world is your oyster!

This recipe contains virtually no carbohydrate. As such it’s great for diabetics and those on a ketogenic diet. There’s also no gluten, so coeliacs and those with an intolerance need have no concerns. If you’re on a paleo-regime then you might wish to hold back on the cheese; but why deny yourself, is what I say…? Take advantage of the rich palette of low-carb foods available and you can’t go wrong!

Start by making your dressing. I have a separate post on this (Caesar Dressing recipe), but I’ve quickly outlined the process below for speed and convenience…

In a small food processor, whizz up a couple of anchovies and half a clove of garlic. The flavour of the garlic intensifies over time, so if you’re not going to eat all the dressing straight away, it’s best to err on the side of restraint. Add to this a small squeeze of lemon juice, a small handful of grated parmesan cheese, half a cup of good olive oil and half a cup of double cream. You can also add an egg yolk if you like, but bear in mind that raw egg will shorten the shelf-life. Give these a good blitz in the processor until smooth and emulsified, then taste to adjust the seasoning if required.

Toss you salad leaves in the dressing then pile these up into an impressive mound on your serving plate. Shave a few curls of parmesan cheese over the top to ‘add theatre’, then slice your Red Leicester and stack this up the side, like steaks on a bonfire.

Place a heavy-based saute-pan onto the hob and drizzle in a little oil, followed by a knob of butter. Season your steaks on both sides, then fry in the pan for one minute each side (hence the name!) until pleasingly browned but not overcooked! Lift these out, then arrange on your serving-plate next to the salad in an attractive fan (yes; I was born in the 1970s!).

Finally, crack a couple of eggs and lightly fry these in the remaining butter and steak-juices. When done to your liking, scoop them out with a fish-slice and place them atop your steaks to seal in the heat.

Voila! Your low-carb lunch is ready. Serve up onto generous plates and dig right in!

Browse this and other recipes by picture on my pinterest page: country walks in ketosis pinterest.

Thanks for reading and bon ap!

Adam.

Souffléed Bacon & Egg ‘Cheddar Bake’ – a quick & elegant twist on the traditional ‘low carb’ breakfast!

WP_20150118_13_36_17_Pro

I’m always heard to say ‘you can’t improve on a classic’; well sometimes you can give it a holiday! And this is precisely what I’m doing with this classic English breakfast dish: bacon and eggs! What’s the twist? Souffléing the eggs to give a small touch of French refinement and add variety to this much loved, everyday British staple.

Eggs and bacon will always be the friend of any ketogenic / low-carb dieter. A breakfast of healthy proteins is the best way to start the day; but first thing in the morning, the frying-pan sometimes feels a little much, a little too soon for the stomach to warm up to! Well this variant takes away all the mess and odour of frying, and is the perfect dish for a lazy weekend breakfast, or when friends & family come to stay. You can even prepare it as a quick late night supper; at dusk or dawn it’s equally delicious and promises success every time!

People are often scared of the word ‘soufflé’. But it’s actually an incredibly easy technique; all you have to do is understand the process, then you’re off and away!

When you cook an egg it turns from liquid to solid. You see this when you fry an egg, scramble it, poach it &tc. It’s the protein which solidifies in heat; and a soufflé is no different from this. The act of a soufflé rising is the same as a cake. Hot air rises, which lifts the mixture upwards. Then, once the right temperature is reached, the heat solidifies the egg-proteins and the air-bubbles are ‘locked’ in place. Meringue has the same process – the proteins form a hard, crystalline structure which supports and holds up the rest of the mixture – quite simple, and quite marvellous!

If the egg-whites hold something up, what is it they’re holding? The answer to this is your soufflé mix, which carries the flavour of whatever you’re cooking. In this recipe I’ve chosen grated cheddar cheese and Dijon mustard, but the process is the same for all. Whatever your ‘flavour-bearing mix’ is made of, you need to ensure that it’s the texture & consistency of melted chocolate. It’s that easy. Follow this rule of thumb and you’ll have perfect soufflés every time!

Before I jump the gun and detail the recipe in full, it’s worth noting that these are wonderful for a ketogenic diet, as they contain virtually no carbohydrate! This makes them ideal for diabetics or those who do not include gluten in their regime. You can make soufflés with no ‘solids’ at all; just the basic ingredients. This means they’re cheap, versatile and incredibly quick! Now do you see why I love them?

Start by laying your bacon rashers into the bottom of a baking dish. Place this into a hot oven for 10 minutes until the bacon is cooked through and turning crispy around the edges. I allowed 6 rashers for 2 people.

Whilst the bacon is cooking, you can start your egg-whites. In a clean mixing-bowl (I use a copper bowl as this stabilises the whites far better than anything else); separate 4 eggs, placing the yolks in a smaller bowl to form your mix. When it comes to separating eggs, I must admit to ‘not being flashy’. I simply crack them on the side of the bowl and strain the white through my fingers.

Once your eggs are separated, whisk the whites until they form stiff peaks. Volume should be minimum 8 times what you started with, and you should be able to upturn the bowl over your head and the mixture stays in situ (if it doesn’t then you have only yourself to blame!). The whisking forms valuable aerobic exercise for the cook. I strongly recommend that you do it by hand and don’t cheat by using an electric whisk! This way, you get to ‘understand’ the ingredients more, and get a true feel of how things work.

Into the bowl with the egg-yolks, season well & scatter in a generous handful of grated cheese and a half-dessertspoonful of Dijon mustard. Now bear in mind my rule of thumb above. You want this mix to be the consistency of melted chocolate. To achieve this, mix in double-cream until you have the right texture. You shouldn’t need much; three or four tablespoons maximum.

Now scrape some of your egg-whites to the side of their bowl and add your soufflé-mix. This will need to be folded into the whites with a good metal spoon. If you simply mix this in, you’ll knock out all the air. Folding is exactly as it sounds – you turn the mixture over on top of itself, so that gravity does the work, not your spoon! At no point should you be cutting through the middle of the mix, you just want to continue lifting and turning until the two are incorporated. It should be a pleasing, yellow, moussey texture, with traces of white still visible and air bubbles prevalent throughout.

Take your bacon out of the oven and ladle your egg-mix all over. Into the hot oven it goes for circa ten minutes. If your oven has a glass-front, you can have the joy of watching it rise. I’m fortunate enough to have an aga, which means I can open the door and peek in with no danger of the temperature falling.

You’ll know it’s ready when well risen and lightly firm to the touch. The surface should be evenly coloured a light ‘caramel’ shade.

Serve up straight from the oven. The top will sink down within a couple of minutes, so make sure your admiring onlookers are already in place at the table when you take the dish out of the oven! All in all, incredibly straightforward, fuss-free and delicious – oh, and yes; a trifle grand!!

Browse this and other recipes by picture on my pinterest page: country walks in ketosis pinterest.

Thanks for reading and bon ap!

Adam.

Succulent ‘Crispy Crackling’ Roast Pork with Buttered Leeks, Spinach & Celeriac – warming, filling & substantial, plus delciously low-carb

WP_20150108_20_36_41_Pro

There’s something truly mouth-watering about succulent roast pork, topped with a thick crunchy layer of crackling. This is winter ‘comfort food’ at its very best; just the thing to eat in front of a roaring fire when all outside is icy & unforgiving.

During these long, cold & dark evenings, food fulfils a greater role than sustenance alone. The heart and soul both crave a break from the grey monotony; and food provides this – it satisfies and nurtures, keeping the chill at bay and bringing a sense of warmth to more than just the stomach alone! And the cook is the provider of this relief. There’s a great joy in the hearty fare of winter, and preparing food like this is a way of showing love and care for friends & family. The appreciation & gratitude it receives is more than ample reward; as are the empty plates, scraped clean in indication that ‘you’ve done well’ and your efforts were worthwhile!

On a low-carb diet however, food can sometimes lack this feeling of filling, substantial warmth. All too often, the dieter will fall back on quick dishes of green vegetables and salad; both delicious in their own right, but ill-suited to the ravages of winter and the simple, robust fare it requires!

On a ketogenic diet, fat provides the principal sense of satiety, so pork-crackling can be tucked into without guilt or fear of piling on the pounds! Diabetics and those on a paleo-regime can equally reap these rewards, as can those with an intolerance to gluten, because this dish contains no wheat or carbohydrate beyond the natural fibre-based cellular-carbs in the celeriac itself.

Start by bringing the pork to room temperature on a plate in the kitchen for an hour or so before cooking. Pat the surface of the meat dry and season the skin liberally with rock salt and black pepper. Place a heavy-based pan on the hob and heat a little butter and oil until it’s good and hot, then add your pork, skin-side down, enjoying its splutter of protest as the meat hits the pan.

Continue to seal this on the hob for a few minutes on each side until all is golden and brown; then add a roughly chopped onion and a couple of cloves of crushed garlic. Once these have had a couple of minutes of high heat, pour on a glug of white wine or dry vermouth to lift the flavour from the bottom of the pan, then top up the liquid with chicken stock (or water and stock-cubes) until the meat sits waist-high in liquid. Now simply transfer the pan to a hot oven to roast for an hour or so, until the skin is deliciously crisp and caramelised.

Whilst this is in the oven, prepare your celeriac. Peel ‘the big ugly’, then dice it into 1cm chunks. In a sauté-pan heat a little more butter and oil and add finely sliced onion and a roughly chopped leek. Cook these until translucent, then tumble in your diced celeriac & crushed garlic, stirring well to prevent it sticking. Cover the pan’s contents with chicken stock and leave  to reduce, stirring occasionally until the liquid has all but evaporated.

At this point, lift out a piece of celeriac and (giving it a good blow) test the vegetables for tenderness and seasoning. We want it so that the celeriac is ‘melt in the mouth’ and tenderly soft. If there is still resistance, add more water and continue to reduce as before until the desired texture is reached.

Once the texture is as we want it, take your pork out of the oven to allow it to ‘rest’. Cover the joint with a double layer of tinfoil to prevent it getting cold, then you can start on your spinach.

Rinse this well, then add it to the pan, retaining whatever water is still clinging to the leaves. Stir this in, then allow to cook for a further 5 minutes until the spinach has wilted thoroughly and all water is staved off. I never cease to be amazed at how much spinach shrinks down in volume. My only point of comparison is my food budget at the end of the month! It’s always equally surprising how that diminishes so quickly; leaving me with a mere fraction of what I started with!

When all is cooked, stir a knob of butter through the vegetables and grate on a fine shaving of parmesan cheese to add a salty counterpoint to the richness of chicken-stock and leeks. Serve up your pork onto a pre-heated plate and spoon the vegetables to one side, garnishing the lot with freshly chopped herbs.

Cut the cracking into chunks and eat with your fingers, enjoying each crunch as it comes! Truly delectable in every way!

Browse this and other recipes by picture on my pinterest page: country walks in ketosis pinterest.

Thanks for reading and bon ap!

Adam.

Pot-Roasted Half-Leg of Lamb with Peppery Wasabi Cauliflower Cheese – low carb winter comfort food to warm the heart & soul

WP_20150112_21_26_46_Pro

It’s amazing how a small twist on a classic recipe can give a ‘once familiar dish’ a whole new lease of life & take it to new heights! Well this reinterpretation of cauliflower cheese is one such example.  The addition of wasabi-paste to a simple cheese-sauce completely revamps an already delicious recipe; but one that can sometimes verge on the bland and unexciting…

The hot peppery taste of wasabi goes brilliantly with lamb. It serves to cut through the richness and lift the flavour, the same reason why lamb is often served with a vinegary mint-sauce. I wouldn’t team wasabi with many roast meats; but lamb has a depth of flavour which is strong enough to carry it off. Chicken or pork would risk becoming ‘lost’ when faced with such a powerful bedfellow; but lamb is more than up to the challenge, and for this reason, I salute it!

The other strong advantage to lamb is that it’s at its best when simply left to do its own thing. You can leave it all day in a low oven and it just gets better and better! The meat becomes unctuously soft and melts off the bone at the merest suggestion of a nudge with a wooden spoon. The kitchen is also filled with the rich savoury aroma of roasting meat, which is truly mouthwatering! Amidst the cold of winter, we need food like this! Food that is filling, substantial and robust (a thing which low-carb recipes can often lack!).

Cauliflower is brilliant on a low-carb diet however. With only 1.5g net carbs per 100g, there’ll be no insulin-spiking or raise in blood-sugar levels, which makes it perfect for diabetics or those on a ketogenic-plan. It’s paleo-friendly and gluten-free, so its deliciousness and versatility can also be enjoyed by coeliacs. For this reason it’s become a firm favourite of my low-carb kitchen and I cannot recommend it highly enough!

Start by seasoning your piece of lamb on all sides and sealing the meat in a mix of butter & oil on a high heat in a heavy-bottomed pan. Once the joint is coloured and golden on all sides, tumble in chopped onion, leeks & a couple of cloves of crushed garlic, and continue to sauté these until the vegetables turn soft to the touch with a wooden-spoon.

At this point, stop stirring the mix and allow the heat to build up. After a minute or two, deglaze the pan with a good glug of port or red wine and crumble in a stock-cube or two for background flavour. Then pour on water until the pan’s contents are ‘waist-deep’ in liquid. Add a couple of bay-leaves and some dried herbs, then transfer the pan to a slow oven (circa 140-150°c) for 3-4 hours until the meat is soft, tender and succulent. If you have concerns that the meat may dry out, place a lid on the pan and turn down the heat slightly – every cooker is different; I have an aga so there’s none of the risk of air-scorching the meat which can sometimes occur in a fan-oven.

If you take the ‘lid-on approach’, remove the lid for the final half-hour of cooking. This means that the lamb will develop a crisp, delicious crust on top – delightful in every way! When ready, remove the pan from the oven and cover with the lid or tinfoil to allow the meat to ‘rest’ for 20 minutes. This should be done for all roasted meats, which would otherwise lack that ‘melt in the mouth’ quality if eaten straight from the oven.

An hour before you’re ready to eat, bring a large saucepan of water to the boil, filled to a couple of inches depth. Place in your cauliflower, then steam it through with the lid on until a knife goes in with a slight resistance. In this instance I left the cauliflower head whole, but you can equally cut this into florets if you wish to save time or want more or a ‘gratin effect’. Once cooked, drain the water from the pan and place to one side.

In a second heavy saucepan, add a cup and a half of double cream to the pan and place this onto a low heat. Grate a good whack of cheese and sprinkle a generous handful into the cream, to melt slowly. Season the sauce, then spoon a half-dessertspoonful of wasabi paste into the mix. If you prefer things a little less intense, feel free to add less; simply taste the sauce, adding the wasabi at intervals until you get to a flavour-strength that’s right for you. Leave the sauce on the hob, stirring occasionally for 5 minutes or until the cream has thickened to the texture of a rich custard.

Now simply ladle your sauce over the pre-cooked cauliflower and top the lot with your remaining grated cheese. Dust the top with a sprinkle of dried herbs, then into a medium oven it goes for circa 30 minutes until the surface is golden brown and bubbling.

Hey presto, your dinner is ready! Rush both lamb and cauliflower to the table and dig in with aplomb! Few dishes can be more delicious than this. If you have guests, it’s nice not to tell them about the wasabi-sauce – you can then watch their faces transform with wonder and surprise at the unexpected intensity of this wolf in sheep’s clothing!

Browse this and other recipes by picture on my pinterest page: country walks in ketosis pinterest.

Thanks for reading and bon ap!

Adam.

Wintry Pork ‘Bangers’ with Leeks, Savoy & Paprika – satisfying, filling & low carb!

WP_20150117_21_23_44_Pro

In Winter, food should be satisfying, filling and plentiful! When it’s cold outside, the heart & soul crave something with substance; and this dish is the perfect thing to ward off the chill! It’s robust in flavour, yet quick and easy to prepare; plus has that ‘added bonus’ of being a ‘one-pot-dish’, so you won’t be standing over the sink for hours or juggling 10 different pans at once! It’s one of those dishes which can simply be ‘left on the hob’ for 20 minutes, whilst you get on with something else (like write a blog…).

There’s truly a wonderful affinity between sausages and cabbage. It’s a combination that can only be described as ‘hearty’, both in texture and taste! The flavoursome ‘warmth’ of leeks and bacon provides a delicious background depth; all topped by a generous sprinkle of parmesan cheese, which melts in slowly & adds a delicious salty ‘tang’. This is definitely one of those dishes to ladle into bowls and eat curled up on the sofa in front of a favourite film. As such, it’s the perfect dinner for a cold Winter’s evening, when all you want is honest, rustic comfort-food!

Because savoy cabbage is wonderfully low in carbs (1.57g per 100) this dish is great for a ketogenic-diet or those on a paleo-plan. There’s no gluten, so coeliacs can tuck in without qualms; as can diabetics, who won’t experience any impact to blood-sugars or have to ramp up their insulin-levels to account for it! My one word of advice concerns the sausages. Read the packet carefully, as many sausages contain breadcrumbs. Most supermarkets stock a gluten-free variant however, or ask your butcher who’ll be more than obliging! Low-carb sausages are in no way difficult to find, you just have to check before you buy that what you’re buying is right! It’s important to remember the net-cabs rule too (see here for details).

Start by cutting your smoked-bacon into a fine dice. If you can get pre-cut lardons, all the better! Place a heavy-bottomed pan onto the hob and melt in a little butter and a dash of oil to stop it burning. Then tumble in your bacon and seal this on a high heat for 2 to 3 minutes.

Roughly slice your leek and add this to the pan, along with your sausages. Continue to cook these for circa 5 minutes, until the sausages start to brown slightly and the leeks begin to collapse with the press of a wooden-spoon.

Meanwhile, thinly slice your savoy cabbage and give it a good rinse. Once the sausages begin to colour, deglaze the pan with a little port or red-wine, then stir-in your cabbage. Crumble in a chicken stock-cube and sprinkle over a good teaspoon of paprika. Follow this with a generous sprinkle of dried herbs (sage, oregano or thyme are perfect) and a dessert-spoonful of Dijon mustard. Depending on how much water was left on the cabbage, pour in boiling-water until you have circa 1/2 a centimetre’s depth, then place the lid firmly on the pan and simmer for 10 minutes until the cabbage wilts down and turns tender. Then remove the lid and continue to cook on a low heat until the liquid is all but evaporated.

Once the water is staved off, stir well and check for seasoning. Sprinkle a generous handful of freshly grated parmesan over the top and tear over some basil leaves to garnish.

Then simply ladle into bowls and enjoy… delicious!

Browse this and other recipes by picture on my pinterest page: country walks in ketosis pinterest.

Thanks for reading and bon ap!

Adam.

Port-Braised Pheasant with Celeriac Forestière & Buttered Broccoli – low carb winter comfort food

WP_20150110_21_25_25_Pro

In January, local game is in plentiful supply. Pheasants, pigeons & partridges have had a joyous time, feeding off the rich Autumn harvest for three long months. The fruit of the fields & hedgerows has developed in them a fine deep flavour, plus contributed an insulating layer of fat. This lends them succulence & tenderness in the pot, which game-birds bagged earlier in the season tend to lack. This is truly ‘free range food’ at its best, and nature’s wildness can be tasted in every mouthful!

When all is cold and grey outside; the kitchen becomes a place of sanctuary. Its warm oven & bubbling pans make it the perfect haven to ward off the season’s bitter chill. In January, we need satisfying comfort food like this dish, to nurture us through the dark months and break the monotony of food which often seems to lose its vibrancy.

Pheasant can have a tendency to be on the dry side; as such it requires careful cooking. This doesn’t mean that it’s difficult or fiddly to cook; simply that it needs plenty of liquid and sumptuous lashings of butter to bring out its best! Here I’ve paired it with buttered broccoli & celeriac ‘forestière’. Forestière is a traditional French dish, taking its name from the woodlands where mushrooms are grown & foraged. The recipe traditionally also uses bacon, onions, herbs and garlic. This makes it deeply rich in flavour, with a ‘taste of the wild’ which compliments our pheasant perfectly! This dish can also be adapted to the more classical usage of chicken – but I feel we can go one better than that!

The use of celeriac makes this recipe wonderfully low in carbohydrate. With a net-carb value of circa 5.5g per 100; it’s a vegetable which can be enjoyed by ketogenic-dieters, diabetics, paleo-fans or simply anyone just wishing to avoid the stodge of potatoes! They’ll be no impact to your blood-sugar and none of the ‘bloat’ which classically accompanies a high-carb meal. The flavour of celeriac is also absolutely delicious, with a sweet, nutty taste that enriches stocks, sauces and even salads when eaten raw. The low-carb kitchen can’t get enough of it, so put it on your weekly shopping list!

Start by liberally seasoning your pheasant. Place a heavy bottomed pan on the hob and melt in a knob of butter and a little oil. Once this is piping hot, seal the pheasant, turning after a minute or two on each side until all is golden.

Now add diced bacon lardons to the pan and a finely sliced onion. Once the onion has softened and turned translucent, crush in a clove or two of garlic and chopped mushrooms. I used chestnut mushrooms and a small handful of dried porcinis. If you’re lucky enough to have morels, then I envy you, as these makethe perfect dish! Sauté all for a further couple of minutes to build up the heat. Now deglaze the pan with a generous glug of port (I advise placing your nose into the whooshing cloud of steam. You’ll be rewarded with a richly alcoholic ‘sigh’ – the cook’s true perk, and one which should never be passed up).

Once the port has reduced by half in volume, add diced celeriac (chopped to cubes of circa 1cm) and pour on chicken stock (or water and two stock cubes) to a depth that is ‘waist-high’ to the pan’s contents. Sprinkle in fresh or dried herbs and give the pan a good stir. I opted for thyme and sage because of their warmth of flavour. I always feel however that herbs are a matter of personal preferance – use what you like and you can’t go wrong! Then into a hot oven it goes for circa one hour, making sure to turn the pheasant over half-way through to brown the topside.

Once cooked remove from the oven and check for seasoning. Cover the pan with tinfoil and leave the pheasant to ‘rest’ for ten minutes, so that the meat can ‘relax’. Meanwhile bring a centimetre of water to the boil in a pan and steam your chopped broccoli for a couple of minutes until tender, but still retaining its bite. Drain this and top with a generous spoonful of butter. Placing a lid on the pan and giving it a good shake will ensure that the vegetables are all finely coated.

Then simply transfer your pheasant to a pre-heated serving dish and ladle the sauce all around. Pile your broccoli to one side and dig in! January comfort-food doesn’t get any better or more delicious than this! Hearty, satisfying warmth – truly food for the soul!

Browse this and other recipes by picture on my pinterest page: country walks in ketosis pinterest.

Thanks for reading and bon ap!

Adam.

Pizza – the ketogenic way! The low-carb food revolution continues!

WP_20150103_20_59_12_Pro

When I first started the ketogenic-diet, I thought “that’s it – you’ll never have pizza again!”. A period of food-mourning ensued, but now I’ve welcomed it back with open arms; and as always, it’s a true pleasure greeting familiar old friends! How can you eat pizza on a low-carb diet? Cauliflower pizza-base. Yes, that’s right; you’ve read it correctly: cauliflower!

I was a little sceptical when I first read about this. It sounded complicated, fiddly and didn’t overly promise much on the taste front… But having tried it, I’m now a firm convert! It’s no more labour-intensive than any other pizza-recipe; in fact, it’s a little bit easier, as there’s no faffing around with yeast or flouring kitchen-surfaces to roll out the base &tc.

Is it exactly the same as traditional flour-based pizza? Not exactly, but that in no way diminishes it; it’s simply different. The topping tastes just the same as you’d expect; the one difference is that the base isn’t ‘crisp’ like wood-fired pizza; it’s more chewy and firm in texture; which is certainly good enough for me. Any way, to be able to eat pizza without the associated ‘food-guilt’ is a wonderful thing. Second helpings? No problem with this recipe!

Diabetics, paleo-fans and those with a gluten-intolerance can also throw open the doors to this old favourite, because the carb-content is incredibly low. There’s no flour, no ‘bloat’, no soaring blood-sugars and no insulin-ramping to worry about – just delicious healthy food (I never thought I’d be saying that about pizza!!).

Start by making the base. Half a large cauliflower will make 1 dinner-plate sized pizza. Being me, I used two whole cauliflowers as I wanted some leftovers for lunch the next day. Pulse your cauliflower florets in a food processor until you have the consistency of breadcrumbs. Then simply place this into a large mixing-bowl and microwave for circa 8 minutes until the cauliflower is cooked through. This staves off moisture and cooks the vegetables through, so that the base doesn’t go into the oven ‘from raw’. Depending on your microwave, check after 6 minutes to see how things are going. To test that it’s done, taste a bit. You don’t want it to be cooked to point of being mooshy; just ‘biteable’ without the texture of rawness. When this is achieved, stir through to dissipate the heat and leave to cool down thoroughly.

At this point, start on your topping. Finely chop an onion and sauté this in olive oil with chopped garlic until the onion turns translucent. Ramp up the heat and deglaze the pan with a glug of red wine or port. If you wish to add peppers or other vegetables, feel free to do so; but all you really need is a can of tomatoes. Empty this into the pan once the liquid has been added. Season well and stir in chopped herbs and a vegetable stock-cube. Leave this on a low simmer until the contents reduce, then add a squeeze of tomato-purée. Hey presto; your sauce is done. Leave this also to stand for 20 minutes to cool down slightly.

No let the grating begin! Start with parmesan. Finely grate a good couple of handfuls for the base, then however much cheese you feel is gratuitously acceptable for the topping! Transfer these to a bowl until you’re ready to use them.

Now for the base. Add your parmesan cheese and season the cauliflower liberally. Next time I do this, I think I’ll add more parmesan than I used for this particular batch. Why? It’s the parmesan which melts and ‘firms up’ to give the base its crispness. I get the feeling that more parmesan will deliver more ‘bite’. Give it a go and let me know how you get on! Next beat some eggs in a bowl and add these slowly. I used 4 eggs for 2 cauliflower heads. You want the mix to be ‘shapeable’, not soggy. Picture the texture of cooled porridge! Pile the mix onto a silicone baking-sheet or greaseproof paper and pat into your desired shape, at about a 1/3 cm thickness. You don’t need a rolling-pin, just use your hands. The mix is not ‘elastic’ like a flour-base, so there’s no stretch. All you need do is ensure a thin covering across your surface area, and you’re done! The top picture was a square base, to cut up for lunch the next day. The picture below was the first ’round’ one (we made two of these for dinner – one each!).

When your base is the required shape, spoon on your tomato-topping and gently spread flat with the back of a spoon. Then pile on whatever keto-friendly ingredients you see fit! This dish is great for using up any bits and bobs you have lying around the fridge which are insufficient in quantity to ‘stand on their own two feet’. I used sliced mushrooms, courgette, mozarella, ham, salami, chorizo, peppers, olives and chilli. Whatever you use, chop the ingredients finely so that they’ll cook through nice and quickly, then scatter across the surface of your pizza.

Top the lot with generous handfuls of grated cheese, sprinkle on a few dried herbs then transfer the pizza with a paddle (if you have one) to the base of the oven. I have an aga, so I cooked this on the floor of the oven. You can equally use a pizza-stone, a slab of marble preheated in the oven, or simply a baking-tray. Make sure that the oven is good and hot, then in goes the pizza for 10 minutes until the top is bubbling, melted and golden brown, and the base is cooked through and caramelised around the edges.

Hey presto, your low-carb pizza is ready! Cut into slices at the table, or fold into wedges whilst watching a favourite film! Either way, it’s absolutely delicious! You won’t be disappointed!

Browse this and other recipes by picture on my pinterest page: country walks in ketosis pinterest.

Thanks for reading and bon ap!

Adam.

WP_20150103_20_15_03_Pro

Fiery Malaysian Laksa with Crisp Pork Belly – low carb goes East!

laksa

This recipe whoops a ‘grand huzzahin tribute to the splendid, vicious firework that is the scotch-bonnet chilli! In isolation, it must be considered a pungent, mean & unpleasant beast; one which doles out penance to all those who countenance it. But when tempered by a little sweetness & warmth; its unremitting intensity is bridled and the ‘beast is tamed’!

Much like a tiger, chilli is a thing of beauty; something to be admired yet very much treated with respect. But once the cook has learnt this skill, the two will become firm friends for life, with most pleasing results!

Laksa is a delicious dish from Malaysia, which carries considerable influence from other Oriental cuisines. The origin of the name is unknown, but thought to stem from either Persian or Sanskrit. There are a myriad versions of the recipe, but this one is based on the wonderful, keto-friendly foundation of coconut-milk and chicken-stock. These two mild and velvety ingredients are just what’s required to sooth the vicious, bad temper of the chillies; delivering a perfectly balanced & mouth-watering equilibrium of taste! This is heightened by the addition of coriander leaves and lemon/lime juice, which add just the right touch of sourness to complement the sweet coconut. Some dishes have a perfect flavour-profile; and this is one of them!

The original dish is made with thin rice-noodles (vermicelli). These are not ideal on a ketogenic-diet, due to their high carbohydrate content. This recipe therefore uses courgette-noodles, or ‘zoodles, which make a delicious alternative to their high-starch counterpart. This renders the dish infinitely accessible to diabetics, gluten-intolerants, or those who quite simply want a break from the stodge! The carb-content is very low, so there’ll be no impact to blood-sugars or insulin ramping – you can tuck in to your heart’s content!

In this version, I use pork-belly slices because of their crispness in contrast to the noodles. Should you wish however, you can equally replace these with chicken, other poultry, game or even fish. The true beauty of this dish lies in the sauce, everything else plays ‘second fiddle’. As a result, my choice of meat is guided by texture rather than taste. I leave any variants up to your own creative instinct therefore. If you have any special successes, make sure to write back and tell me how you got on!

So, to work! Start by cutting your pork-belly slices into inch chunks and placing-these onto a baking-tray. Season well and place into a hot oven for 30-40 minutes, or until crisp and golden brown.

If you have a ‘mini-food-processor’, destalk 1-2 scotch-bonnet chillies and whizz these up until finely chopped. Add two cloves of garlic and a large pinch of salt, then follow these with your coriander stalks and a grind of pepper. Blend these as fine as possible, then scrape out with a spatula. If you don’t have a food-processor, chop the lot with a sharp knife on a sturdy wooden board. If you choose this option, make sure not to touch anywhere near your eyes for a good long while – it hurts!!!!

Place a wok or broad-based pan onto the hob and add a good glug of oil. Sunflower- or rapeseed-oil are perfect; olive oil has a lower burning point so cook a little more slowly if you use this. Sauté the mix for a couple of minutes, then add a chopped onion and a diced pepper. Soften these for a minute, then pour in a half-cupful of chicken-stock, or water and stock-cubes (to taste). The mix should burst into an aromatic cloud of steam, that fills the room with a sharp chilli-garlic fragrance! This is delicious, but powerful; so don’t place your head directly over pan when adding the liquid!

The water will start to evaporate fairly quickly under the high heat. Before this happens, open a can of full-fat coconut milk and stir this into the mix, making sure to scrape the can clean with a spatula. If more water is required, add this in and season well. You want the liquid to be the consistency of a thin soup. As the dish simmers, it will soon thicken up.

Take 2-3 courgettes and cut into ‘zoodles’ with a spiraliser or julienne-peeler (see the following link for more details – courgette-noodles). Add the noodles to the sauce and simmer for 5 minutes until cooked through. At this point, squeeze in the juice of one lemon or lime and sprinkle in your chopped coriander leaves, reserving a few to garnish.

By this time, the sauce should be rich, thick and glossy. Taste to adjust the seasoning (including ‘warmth’ of flavour by crumbling in another half chicken-stock-cube) and then add powdered sweetener to ‘round’ the taste-profile. I suggest a small half-teaspoon, but this will naturally depend on how much chilli you used and your personal preference. Once all is to your liking, remove the pork from the oven, ladle the laksa into bowls and arrange the pork-pieces on top. Finish the dish by garnishing with a sprig of coriander and a slice of lime. Truly delectable in every way!

Browse this and other recipes by picture on my pinterest page: country walks in ketosis pinterest.

Thanks for reading and bon ap!

Adam.